This topic contains the following sections.
QuickBuild lets you prototype and build a vision application very quickly. You can acquire images, analyze them with various vision tools, and examine the results in order to determine the quality of the objects under inspection. Your application can use multiple cameras that respond to a variety of trigger types, or you can use a database of images. You can then use the VisionPro Application Wizard to generate an application or load a QuickBuild application into a .NET application that can access the results through the QuickBuild API. For many types of vision applications, QuickBuild can be very effective in providing the foundation to solve your vision task.
Launch QuickBuild using any of these methods:
Double-click the following icon the VisionPro installation utility places on your Windows desktop:
- Choose Start->Cognex->VisionPro->VisionPro QuickBuild from the Windows Start menu.
Use the command line option to launch Cognex.VisionPro.QuickBuild.exe, located by default under C:\Program Files\Cognex\VisionPro\bin.
The command line option offers the ability to load an existing QuickBuild application by specifying the name of the file on the command line. For example:
Cognex.VisionPro.QuickBuild.exe C:\home\VisionPro\Applications\OCVMaxWalkThrough.vpp
Enclose the name of the QuickBuild application in quotes when the name contains one or more spaces. For example:
Cognex.VisionPro.QuickBuild.exe "C:\home\VisionPro\Applications\New BarcodeTool.vpp"
When QuickBuild launches, it appears as shown in the following example:
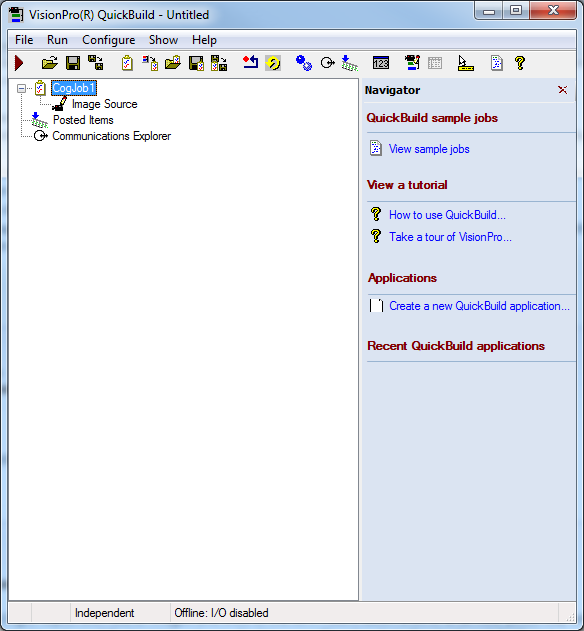
The QuickBuild window offers the following components:
The menu and button bar along the top allow you to configure application properties and access this software documentation.
For a breakdown of the menu and button options, see the topic QuickBuild Menus.
A Navigator pane provides access to sample applications, tutorials, and recent QuickBuild applications.
You can close the Navigator by clicking the red "x" in the top-right corner.
- Use the bulk of the QuickBuild window to manage the collections of vision tools you use to analyze acquired images, configure the results QuickBuild makes available to other applications, and connect your QuickBuild application with external equipment.
The simplest vision application has one image source acquiring a stream of images and a collection of configured vision tools that analyze each image based on a set of defined goals. For example, you might be analyzing images of lot codes to verify that the proper date has been clearly printed, or analyzing color images of blister packs to ensure each pack contains the proper medication and in exact amounts.
QuickBuild allows you to have multiple image sources and associate each one with its own set of vision tools. QuickBuild organizes each image source as well as its set of vision tools into Jobs. Every QuickBuild application has at least one Job, and many applications use multiple Jobs to accomplish the vision task. A Job can be configured to use any supported camera as an image source, and the same QuickBuild application can support multiple Jobs using different camera platforms (GigE Vision, FireWire, or Cognex frame grabber). A Job can also be configured to acquire images from a single image or image database stored on your PC.
QuickBuild handles the synchronization of image acquisitions in various Jobs, and can collect the result data they generate for the Communications Explorer, which can then pass the data onto the external equipment you use in your production environment. The Communications Explorer can also be used to configure incoming signals that control the timing of image acquisitions between the Jobs in your application.
A new QuickBuild application contains one empty Job. Developing a QuickBuild application typically involves the following tasks:
- Configure the first Job with the acquisition parameters and vision tools it needs to perform its inspection.
- Add and configure additional Jobs as necessary. You need a Job for each camera acting as an image source.
- Configure the Posted Items list for the entire application, which contains information you want to make available to an application that you generate with the VisionPro Application Wizard, or to a .NET application that loads the QuickBuild application. See the section Configuring Posted Items for more information.
- Use the Communications Explorer to configure I/O with external devices. See the topic Using the Communications Explorer for more information.
- (optional) Use the VisionPro Application Wizard to generate an executable application, or load the finished QuickBuild application into your .NET vision application. See the topic Using QuickBuild Projects in .NET Applications for more information.
See the section Working With Jobs for more information on how to configure an image source and add vision tools to a Job.
This section contains the following subsections.
- Setting the Image Source
- Configuring Job Properties
- Adding Vision Tools
- Running Jobs
- Using Previously Saved Tool Groups as Jobs
Each Job in a QuickBuild application contains an image source and a set of associated vision tools that analyze each image that source produces. Images come from supported cameras or from a stored file available to your PC.
A new QuickBuild application already contains one Job by default. To add a new Job to the application, click:

A Job has a default name of CogJobN, where N starts at 1 and extends to the highest number of Jobs in the application. You can right-click on a Job and use the rename option to give it a unique name for your application.
Double-click on a Job to open it with the QuickBuild Job Editor. The following figure shows an empty CogJob1:
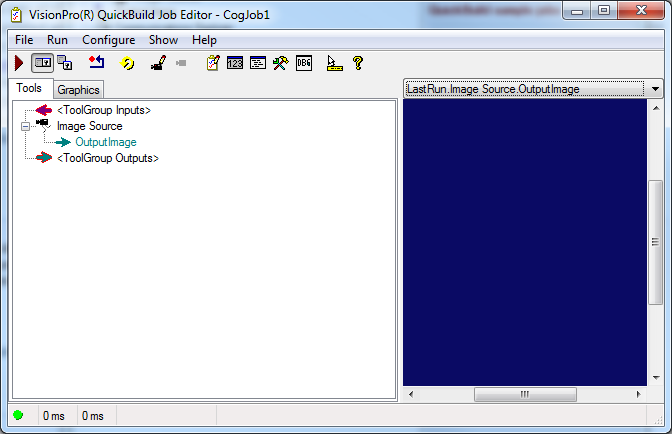
By default a new Job contains no vision tools, only an Image Source that lets you define where the images come from for this Job.
The OutputImage output terminal allows you to pass along the image produced by the Image Source to the vision tools that will analyze it. Refer to the topic Creating a Vision Application: QuickBuild for an example of how to link the terminals between vision tools.
For a list of QuickBuild Job Editor menu commands and tool buttons, see QuickBuild Menus.
You must set the acquisition properties of a Job before you can use it to acquire images. Choose Configure->Image Source or click

The Image Source dialog box appears as shown in the following figure:
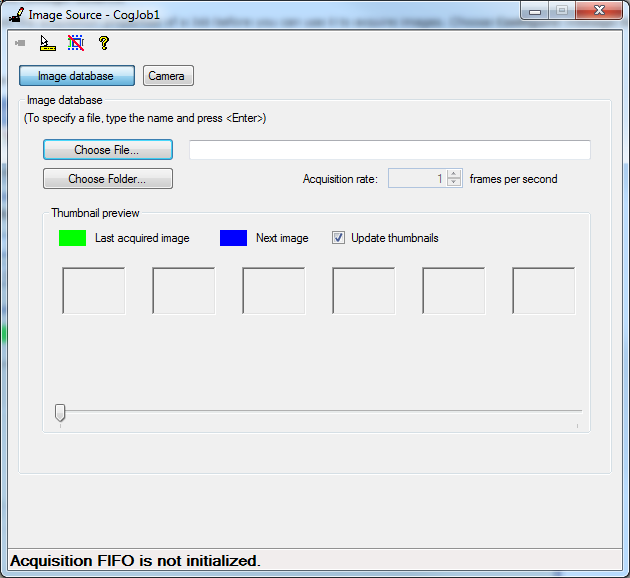
The Image Source dialog box offers many options depending on the method you want to use to acquire images. See the topic Configuring an Image Source for details on how to configure the source of images for your QuickBuild application. If you want to acquire images from a stored file or database of stored images, see the topic Acquiring Images from a File or Directory.
Each Job supports a set of properties that can be configured based on your vision application needs. Select Configure->Job Properties to open the Job properties window, as shown in the following figure:

Configure the following properties for your application:
| Property | Description |
| Acquire Images from Image Source | You can disable the built-in image acquisition from a camera or an image database if you want to supply your own image source through a custom tool. |
Image Queue Size | The default queue size is 32 images. The image queue stores images that have been acquired and are waiting to be analyzed by the Job. You may choose to increase the image queue size if your production environment can generate more than 32 images before the current image can be examined by the vision tools you add. Be aware that increasing the image queue size decreases the amount of memory available to your QuickBuild application and other applications in general. You can lower the image queue size to increase the amount of memory available to the PC, but be aware that an overflow condition occurs if an image arrives and QuickBuild is unable to store it in the image queue. You can configure how your Job responds to an overflow condition. |
Software Trigger Mode | Choose from any of the following trigger modes when you run this Job in continuous mode:
|
| Number of Software Acquisitions Pre-Queued | You can specify how many image requests QuickBuild will queue. |
| Edit Job Script | Lets you edit the script associated with this Job. If there is no script, clicking this button lets you choose a language and opens a script editor. See Scripting in QuickBuild to learn more about scripting. |
| Job Run Count | Lets you limit the number of Job runs in continuous running mode. If you start running your Job in continuous mode and the Job run limit is set, then the job will stop running after the specified number of runs. This setting applies to your Job either if it is acquiring from an image database or from a camera. You can see the remaining number of Job runs in the Job's Statistics window. To see the Job's Statistics window, select Show->Statistics in the QuickBuild Job Editor. |
Each Job in a complete QuickBuild application contains an image source and the vision tools necessary to analyze each acquired image. The Job Editor provides the graphical user interface that allows you to group a set of other vision tools into one logical collection.
Double-click a Job in the QuickBuild window to open it in a Job Editor. The following figure shows an example Job Editor with an acquired image:
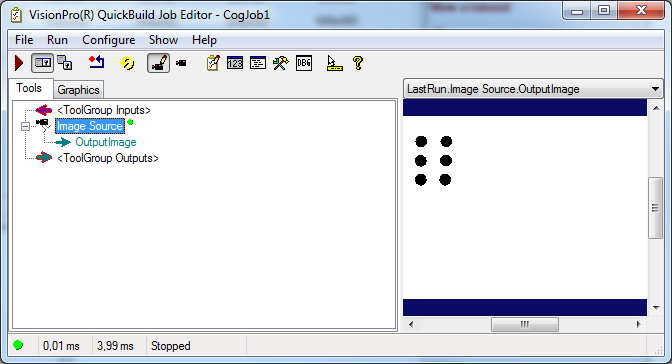
The left side of the window contains the current vision tools organized in a tree view, while the right side contains an image window with the latest acquired image.
Click

to open the floating toolbox window and double-click on the tools you want to add.
See the topic Creating a Vision Application: QuickBuild for an example of how to use a Job Editor.
You might find it easier to collect and manage the vision tools you add by using one or more CogToolBlocks, which is a specialized vision tool that collects other vision tools in order to increase and improve the structure of your application. See the topic Using a CogToolBlock for more information.
To acquire an image and run the vision tools in a Job once, click

Based on the triggering method you use, the Job will acquire an image and analyze it with the vision tools you have configured, displaying graphic results in the image window. For example, the following figure shows a Job after an ID Tool has analyzed an image of barcode symbols and a Results Analysis tool has generated a Warning level result:
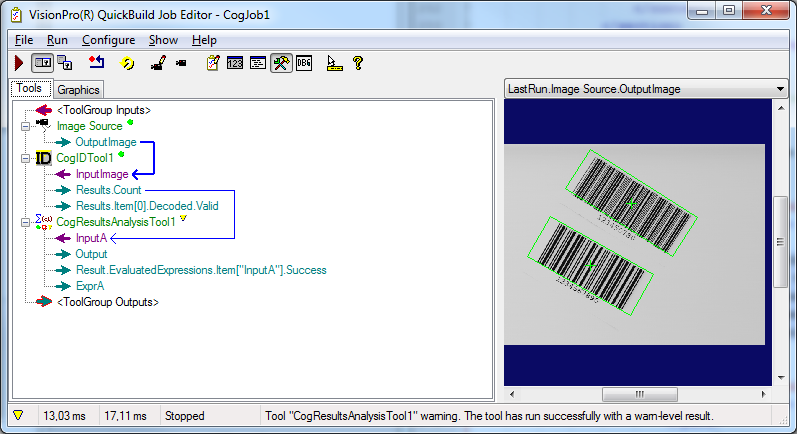
To run a Job continuously, click

Based on the triggering method you use, the Job will acquire images continuously and analyze them with the vision tools you have configured, displaying graphic results in the image window.
Generally speaking, you can use the File->Import ToolGroup command in QuickBuild to import tool group (.VPP) files that you saved with earlier version of VisionPro, including QuickStart, as individual Jobs. The differences between COM and .NET, however, mean that some aspects of tool groups created with the COM version of VisionPro may not be imported completely.
Some non-default terminals cannot be converted to QuickBuild. In particular, terminals that expose indexed results will not be converted unless you saved the tool group with results. When you load a tool group saved with the COM version, you may see an error message that informs you that QuickBuild was unable to update the terminals. The ToolGroupUpgradeError.txt named in the error message contains the names of the terminals that could not be converted. After you run the tool once, you will be able to add the terminals.
If your COM-based tool group used Results Analysis, you will see an error message that informs you that the results analysis configuration could not be upgraded. Use the CogResultsAnalysis Tool in QuickBuild to recreate the results analysis settings.
This section contains the following subsections.
Choose Configure->QuickBuild Application Properties or click

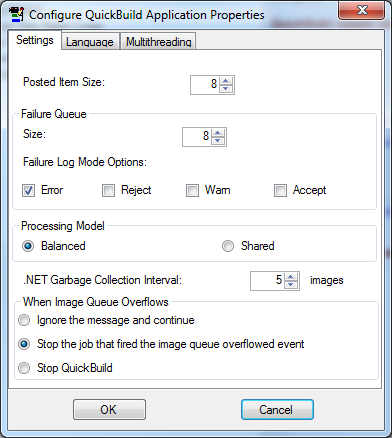
You can configure the following properties of your QuickBuild application in the Settings tab:
| Parameter | Description |
| Posted Item Size | By default, QuickBuild allocates enough memory for 8 packets of information in the Posted Items list. You can increase the size of the queue, but be aware that a larger number allocates more memory resources. |
| Failure Queue | QuickBuild maintains a Failure Queue to store information matching the Result property of a Job. By default, the application stores information about a Job when the Result property equals Error, but you can specify other Result property values that will cause the Failure Queue to log information as well change the size of the queue itself. |
| Processing Model | QuickBuild can execute the application using one of two processing models. |
In the Balanced model, images are analyzed in the order they arrive, regardless of which Job owns the image. For example, a QuickBuild application could contain three Jobs: CogJob1, CogJob2, and CogJob3. Under the Balanced model, if the first acquired image belongs to CogJob1, then CogJob1 executes. If the next acquired image belongs to CogJob3, then CogJob3 executes. Regardless of order, the next Job to execute will be the Job associated with the next acquired image. Using the Balanced model, all Jobs will execute with roughly the same frequency if the acquire frequency for all cameras is equivalent.
In a dual-CPU system, the Balanced model dictates a similar behavior but with an important difference. Using the same example QuickBuild application, if the first acquired image belongs to CogJob1, then the first CPU will process CogJob1. If the next image, however, also belongs to CogJob1, the second CPU will not process it. Instead, the second CPU will process any other Job that has an acquired image available for analysis. Once CogJob1 finishes processing its image, then its next image can be processed by either CPU. In a dual-CPU system, the Balanced model prevents the same Job from executing on both CPUs simultaneously.
Cognex recommends the default Balanced model for QuickBuild applications.
In the Shared model, QuickBuild does not attempt to manage an equal balance between Jobs and CPU resources. Instead, the order in which Jobs execute is managed by the underlying .NET architecture. For example, a QuickBuild application could contain three Jobs: CogJob1, CogJob2, and CogJob3. Under the Shared model, if the first acquired image belongs to CogJob1, then CogJob1 executes. If subsequent images belong to other Jobs in the application, there is no guarantee when those Jobs will execute as long as there are new images available for CogJob1 to analyze. Conceivably, CogJob1 could execute many times before any other Job is allowed to analyze its own image.
Cognex makes the Shared model available but recommends the default Balanced model for QuickBuild applications.
| .NET Garbage Collection Interval | By default, QuickBuild initiates .NET garbage collection after every five image acquisitions. You can choose to increase or decrease the rate of garbage collection based on the performance of the application. |
| When Image Queue Overflows | You can configure QuickBuild to ignore image queue overflows, stop the Job that caused the overflow, or stop QuickBuild altogether. |
Use the Language tab, shown in the following figure, to change the language QuickBuild uses:
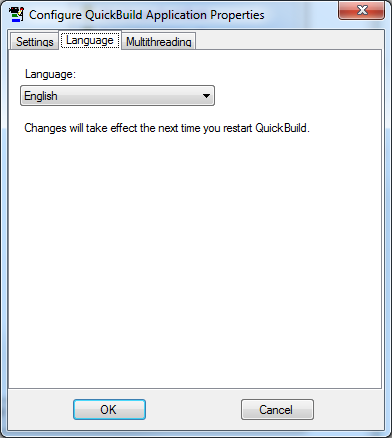
QuickBuild can be used in any of the following languages:
- English
- German
- Korean
- Japanese
- Simplified Chinese
See the topic Setting the VisionPro Locale for details on how to switch the language interface that QuickBuild uses.
Use the Multithreading tab, shown in the following figure, to enable multithreading support:
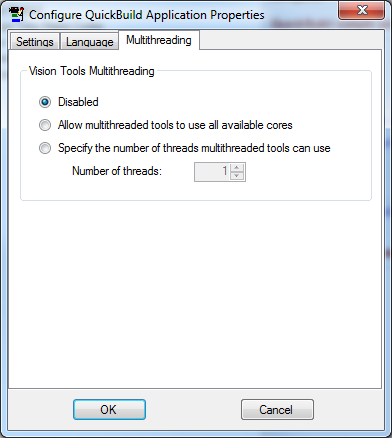
By default, vision tool multithreading support is Disabled. You can enable your application to make use of all available cores in your PC, or specify the number of threads the vision tools can use. You can experiment with this value to determine the best setting.
As the vision tools in a Job analyze an acquired image they generate result information. QuickBuild supports two places for storing result information:
- An application provides a Posted Items list to store information you want to make available to the end user, such as the count of objects analyzed or images of objects that fail inspection.
- An application supports a Failure Results Queue to store data only when result information about a Job matches selected criteria, such as when the vision tools in a Job are unable to analyze an image or when they generate a warning result.
Choose Configure->Posted Items or click

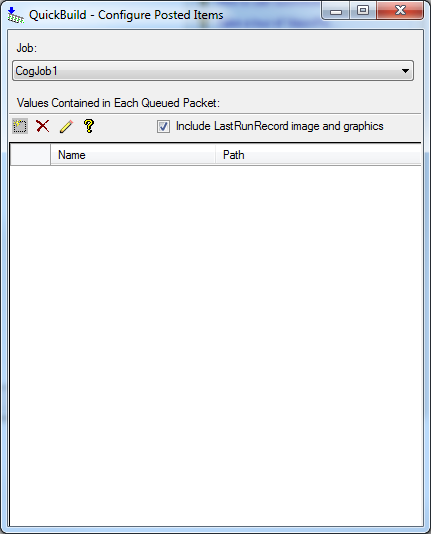
To configure the Posted Items list, perform the following steps:
- Select the Job containing the data you want to expose from the Job pulldown menu.
- (Optional) Clear the Include LastRunRecord image and graphics check box if you don't want the Posted Items list to contain a record of the state of the tool when it was last run, as well as any graphics the vision tools generate.
- Click the Add Item button

- Navigate through the properties until you find the one you want to expose in the Posted Items list.
- Click Add to Posted Items to add the selected property to the Posted Items list.
- Click Close when you have added all the properties you need for your application.
The following figure shows the Posted Items list configured with two properties:
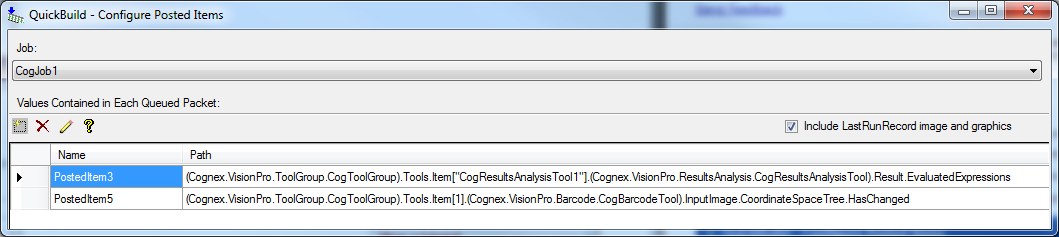
If you want to rename an item in the list, select it, click on its name, enter the new name, and press enter.
You can easily copy to the clipboard the Name or Path properties of an item by right-clicking on its row and selecting Copy selected name(s) or Copy selected path(s) respectively. You can copy these properties of multiple items by selecting the rows for the items of interest, right-clicking on the selection, and then selecting either Copy selected name(s) or Copy selected path(s).
If you want to remove any of the properties later, select the desired property and click the Remove button

This section contains the following subsections.
To view the results stored in the Posted Items list and Failure Results Queue, choose Show->Floating Results from the QuickBuild window. If the Job has not yet run, the Results Queue dialog box is empty as shown in the following figure:
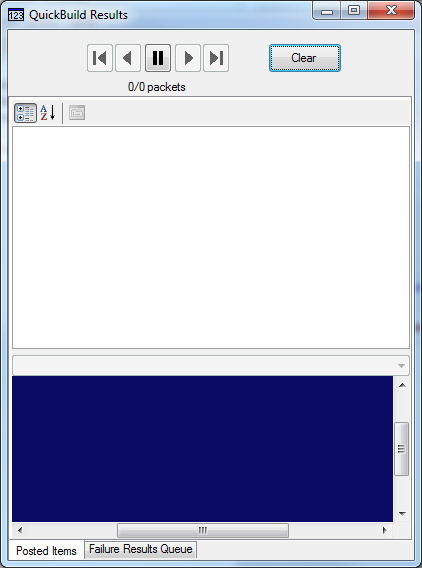
QuickBuild inserts new results to the end of the Posted Items list. Use the buttons along the top of the dialog box to navigate through the list. The following table describes each button:
| Button | Purpose |
 | Show the first packet in the list. |
 | Show the previous packet in the list. |
 | If you run your QuickBuild application with the results window open, the behavior of incoming packets differs depending on whether the Pause button is enabled or not enabled. |
If the Pause button is enabled, the last packet in the list is always overwritten. In addition, the dialog box shows the ID of the displayed packet as packet-ID/32 (assuming a maximum size of 32 packets).
If the Pause button is not enabled, the next packet a Job generates is pushed onto the end of the queue, while the first packet is removed from the beginning of the queue. In addition, the dialog box shows the ID of the displayed packet as packet-ID/31 (assuming a maximum size of 32 packets). This occurs because the first packet is dropped and all remaining packets are shifted up in the queue.

Show the next packet in the list.

Show the most recent packet added to the list.

Clear all the packets from the list.
If you configure the Posted Items to store results from Jobs within the application, then each time a Job finishes execution it adds a packet of data to the list. If you inspect the Posted Items list after all the Jobs in the application have completed, then the list will contain a separate packet for each Job. For example, if your QuickBuild application contains two Jobs and the Posted Items list is configured to extract result information from each Job, then the Posted Items list contains two new packets of data each time the Jobs complete their respective vision tasks.
The timing of new packets arriving to the Posted Items list, however, is completely dependent on the Jobs that originate the data. It is possible the Posted Items list receives three packets of data from one Job before another completes a single execution cycle.
Note that if the name is too long, you can hover your mouse over the line to see the full name.
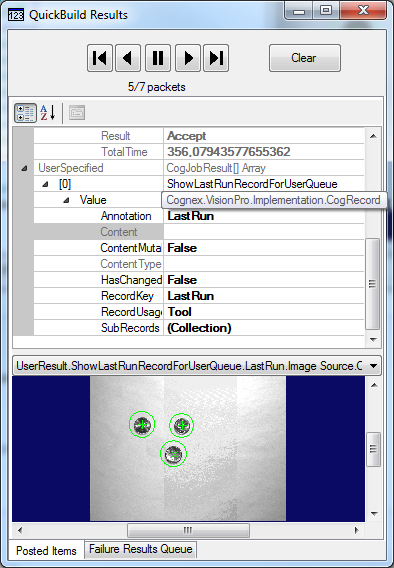
In addition to the data you want stored in each packet in the Posted Items list, QuickBuild includes SystemProvided information such as the name of the Job, the time required to process the image and the value of the Result property. The results from the Posted Item list can be extracted for use by an application generated with the VisionPro Application Wizard or with an encompassing .NET application. See the topic Using QuickBuild Projects in .NET Applications for more information.
QuickBuild maintains a Failure Queue to store information packets when the Result property of a Job is set to Error. You can change the size of the queue as well as specify other Result property values that will cause the Failure Queue to store information about the latest Job result.
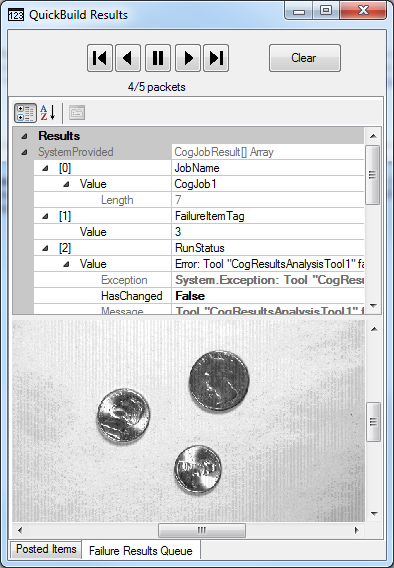
To view the results of the Failure Queue, click the Failure Results Queue tab of the QuickBuild Results dialog box. When any Job in the QuickBuild application generates a result that qualifies for the Failure Queue, the Failure Results Queue tab contains the failed data as well as the output image from the Job that signaled the failure, as shown in the following figure:
Once your QuickBuild application is complete, you can load it into a custom .NET application. The .NET application can use the QuickBuild API to access results in the Posted Items list, and use those results to control peripheral devices in your production environment.
See the topic Using QuickBuild Projects in .NET Applications for more information.
To check the contents of the Visionpro.ini file, click Help | VisionPro.ini. This opens a viewer with the file. If you want to edit the file, you can find it at C:\Windows (default path).
To check your license(s) for VisionPro, click Help | License. This opens a viewer with the contents of your license. This file is the output of the cogtool.exe --print command.
Observing the following guidelines will help you make the most of QuickBuild:
- Before attempting to manipulate a CogJobManager or CogJob object programmatically, disconnect the object from any QuickBuild edit control that holds a reference to the object. You can reconnect the control to the object once you have made your changes.
- Do not attempt to manipulate a single CogJobManager object using more than one QuickBuild control; QuickBuild works best when you use only one control.
- To avoid application failure, do not attempt to change the trigger mode of a Job while the Job is running or displaying live video. Stop the Job, change the trigger mode, then restart the Job.
- Use the QuickBuild graphical user interface to examine and change QuickBuild and job properties and settings. The QuickBuild programming interface is intended for specialized application requirements.