This topic contains the following sections.
VisionPro .NET scripting lets you customize and extend the capabilities of QuickBuild without writing an entire VisionPro vision application. Typically, you can use scripting to
- Conditionally execute tools based on the results of other tools
- Perform additional computation on tool results
- Create customized, reusable tools
VisionPro scripts are written under the Microsoft .NET Framework in either Visual Basic or in C#. To be able to write VisionPro scripts effectively, you should have a basic understanding of programming in either Visual Basic or C#. You should be able to write a "Hello, World" program and be familiar with the term Class, Interface, and Method. Scripting does not require a Visual Studio or other development environment license.
As your QuickBuild program runs, VisionPro executes your scripts at well-defined points, called Script Points, either instead of the normal VisionPro code or in addition to the normal VisionPro code.
You can add a script in any of three places within a QuickBuild application:
- ToolGroup scripts lets you control the behavior of a tool group.
- Job scripts gives you access to the acquisition process for a QuickBuild Job.
CogToolBlock scripts allow you customize and extend the capabilities of any of the vision tools the CogToolBlock contains, or to add additional logic to the results generated by the vision tools.
See the topic Using a CogToolBlock for more information on using scripts within a CogToolBlock, which offers a simplified programming interface versus the standard scripting features described here.
The default script for each script point is written so that if you make no changes your application runs as if the script did not exist.
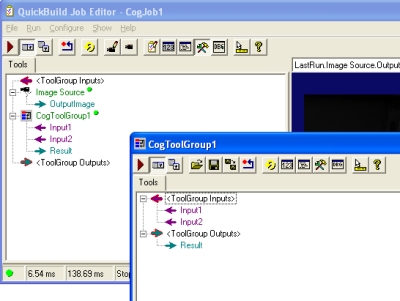
The icon for a CogToolGroup or a CogToolBlock is modified to reflect that it contains a script, as shown in the following Job:
The icon includes the symbol VB or C# to indicate the programming language.
This section contains the following subsections.
The VisionPro script editor lets you write your script in either C# or Visual Basic. If you have used Microsoft Visual Studio, the editor will be familiar to you. When you first open the script editor to write a ToolGroup script or a Job script, a pop-up menu asks you to choose whether you want to write the script in C# or in Visual Basic. Once you choose the programming language, you cannot change it unless you delete the script and start again.
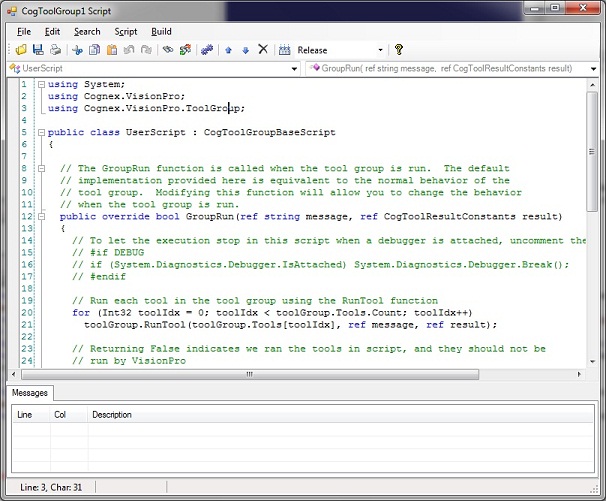
The editor includes a menu bar for performing common operations such as copy/paste, adding and removing references and compiling the script. For a list of keyboard shortcuts that you can use with the editor see Scripting Editor Commands.
The Messages tab displays any errors when you build your script. If you close the editor your script will be saved in its current state, but it will not execute until you fix the error.
Your script defines a .NET class and is compiled into an assembly. If your script makes references to other .NET assemblies you must add them so that your assembly compiles correctly.
Add or remove referenced assemblies with the following dialog box:
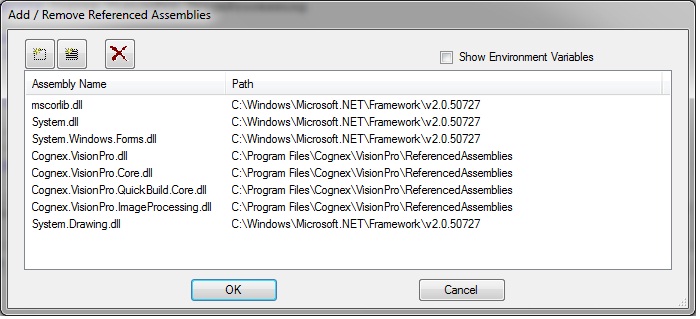
You can add references to other assemblies two ways:
- Specify the name of the assembly or choose it with a file browser.
Choose the assembly from a list of known assemblies.
To create this list, VisionPro looks for assemblies in the directories that contain assemblies that it already has references to. In most cases, this is the System directory and the VisionPro directory.
Be aware that non-VisionPro assemblies referenced from your script must be located in the same folder where QuickBuild is installed, which is %VPRO_ROOT%\bin by default. For more information, refer to the MSDN article How the Runtime Locates Assemblies, and Step 4: Locating the Assembly through Codebases or Probing in particular.
This section contains the following subsections.
- Tool Group Script Base Class
- Useful CogToolGroup Functions
- Working with Tools Within a Tool Group
- Defining Terminals in Tool Groups
The Tool Group script point lets you control the behavior of the tool group. You can control which of the individual tools in the tool group run and in which order. You can also adjust the inputs and outputs of individual tools. For example, you can use the scale factor that an alignment tool measures to adjust the input parameters of a caliper tool.
A Tool Group script applies to a single tool group. Each job contains at least one tool group, the default tool group. If your job contains more than one tool group, each tool group has its own independent script. When you edit the tool group script of one tool group, the scripts of other tool groups are not affected.
This section describes the interfaces and methods that you can use in your tool group script and provides some examples of using a tool group script to change the behavior of the tool group..
Your tool group script inherits from the following class.
public class CogToolGroupBaseScript : ICogToolGroupScript
{
  public virtual bool GroupRun(
    ref string message,
    ref Cognex.VisionPro.CogToolResultConstants result)
  {
    return true;
  }

  public virtual void ModifyCurrentRunRecord(ICogRecord currentRecord)
  {}

  public virtual void ModifyLastRunRecord(ICogRecord lastRecord)
  {}

  public virtual void Initialize(Cognex.VisionPro.ToolGroup.CogToolGroup host)
  {
    toolGroup = host;
  }
  protected Cognex.VisionPro.ToolGroup.CogToolGroup toolGroup=null;
}| Member | Description |
| toolGroup | You can use this member to access the CogToolGroup that is hosting your scripts. |
| Initialize | This method is called after you close the script editor and you script is compiled, or when the tool group is restored from a .vpp file. You should do any one-time initialization that your script requires in this function, including defining terminals that your script uses. Be sure to call the base class's Initialize method if you override this method in your script. |
| GroupRun | This method is called when the tool group runs
If this method returns True, VisionPro runs all of the tools in the group in addition to anything else your GroupRun method does. If this method returns False, you are responsible for running the tools yourself. Since you will usually want to run the tools yourself in a script, returning False is the typical case. When you implement this method, use toolGroup.RunTool to run the tool rather than the tool's Run method. |
| ModifyLastRunRecord | This method is called when the group's Last Run Record is created. You can override this method to add new run records or to add graphics to an existing record. |
These methods can be accessed using the toolGroup member provided by ToolGroupBaseScript:
| Member | Description |
| RunTool | Runs a single tool. Use this method only from the GroupRun method.You should provide the message and result parameters from the GroupRun method to RunTool. |
| Tools | This property returns a collection of all the tools in the tool group. |
| AddGraphicToRunRecord | Use this method in your ModifyLastRunRecord method to add graphics to the Last Run Record. The graphic that you pass to this method can be anything that implements the ICogGraphic interface. See the Script_MultipleTargets_Job.vpp sample for an example of using this function. |
| DefineScriptTerminalGetScriptTerminalDataSetScriptTerminalData | These methods let you create and interact with terminals in the hosting tool group. See the section Using Terminals below for more information about working with terminals. |
To work with the individual tools within a tool group from your script, use the toolGroup member's Tools property.
You can refer to the tools by their index or by their name. Generally speaking, it's easier to use the tool's name because you can set it to something meaningful for your application in QuickBuild. Note that the Tools property returns a generic ICogTool object. To use the tool properties and methods, you will want to cast the result to the class of your tool.
In Visual Basic you could access your tools like this:
Dim blobTool As CogBlobTool = toolGroup.Tools("MyBlobTool")
Dim blobTool As CogBlobTool = toolGroup.Tools(3)In C# you would do it this way:
CogBlobTool blobTool = (CogBlobTool)toolGroup.Tools["MyBlobTool"];
CogBlobTool blobTool = (CogBlobTool)toolGroup.Tools[3];
One of the reasons you use scripting is to compute results that are difficult or impossible to obtain with the regular QuickBuild user interface. For example you may want to produce a result that comes from the properties of several tools. You can do that in a script, but to expose the result as a value of a tool group, you need to define a terminal.
In your script, your Initialize method must call DefineScriptTerminal to define each terminal that your script exposes. Once the script is initialized successfully, your terminals will appear in the tree view of the tool group and you can link them to other tools. The name of a terminal can contain only alphanumeric characters. Do not use periods, parentheses, or any other punctuation in a terminal name.
The object that you use to define a terminal must meet two requirements:
- The object must be serializable.
- Types defined in your script cannot be used as terminals.
If there was an error in your script and it could not be initialized, any existing terminals are maintained, preserving the connections to other tools. The only time that terminals are removed is when there is no DefineScriptTerminal call to define them. Consequently, to delete one of your script terminals, all you have to do is to remove its definition from your script.
Once you have defined your script terminal, your script code can set the terminal's value with SetScriptTerminalData, and get its value with GetScriptTerminalData.
The following example shows how a script could create two input terminals and an output terminal for the tool group that contains the script:
public override void Initialize(CogToolGroup host)
{
  // DO NOT REMOVE - Call the base class implementation first - DO NOT REMOVE
  base.Initialize(host);

  Int32 res = 0;

  this.toolGroup.DefineScriptTerminal(res,"Result",false);
  this.toolGroup.DefineScriptTerminal(res,"Input1",true);
  this.toolGroup.DefineScriptTerminal(res,"Input2",true);

}Once you've created the terminals, they appear in the tool group editor window and the Job Editor windows:
To use the terminals within your script code, use the functions GetScriptTerminalData and SetScriptTerminalData:
// Multiply the values of the two input terminals and place the result on the output terminal

Int32 m1 = (Int32) this.toolGroup.GetScriptTerminalData("Input1");
Int32 m2 = (Int32) this.toolGroup.GetScriptTerminalData("Input2");
this.toolGroup.SetScriptTerminalData("Result",m1*m2);This section contains the following subsections.
In contrast with the tool group script point, the job script point gives you access to the CogJob object. Typically, you use job scripting to influence the acquisition process. You could, for example, write a job script that adjusts the the acquisition properties each time an image is acquired.
To open the job script point editor:
- In a QuickBuild Job Editor window, click the Configure Job Properties button or choose the
Configure->Job Properties menu.
- Click the Edit Job Script button in the in the Job Configuration dialog box
The first time you edit a job script, you will be asked to choose a language.
Note: Unlike the tool group script editor, the job script isn't saved until you close the editor window and click OK in the Job Configuration dialog. If you cancel the dialog box the script is not saved.
Your job script inherits from the following class:
  public class CogJobBaseScript : ICogJobScript
  {
    public virtual void Initialize(CogJob jobParam)
    {
      job = jobParam;
    }

    public virtual void AcqFifoConstruction(ICogAcqFifo fifo)
    {
    }

    public virtual void PreAcquisition()
    {
    }

    public virtual void PostAcquisition(ICogImage image)
    {
    }

    public virtual bool PostAcquisitionRef(ref ICogImage image)
    {
      PostAcquisition(image);
      return true;
    }

    public virtual bool PostAcquisitionRefInfo(ref ICogImage image, ICogAcqInfo info)
    {
      return PostAcquisitionRef(ref image);
    }


    protected CogJob job = null;
  }
}| Member | Description |
| job | You can use this member to access the CogJob that is hosting your script. |
| AcqFifoConstruction | This method is called when an acquisition FIFO is associated with the job. You can use it to perform one-time setup of the FIFO. |
| Initialize | This method is called once after the script is compiled. If you provide an AcqFifoConstruction method, it is not called when you edit the script. You may need to call it from this method if you intend to make a change to the FIFO after editing your script. The sample Script_AutoExposure_Job.vpp shows an example of this. |
| PreAcquisition |
This method is called just before StartAcquire
to give you an opportunity to make changes to the acquisition FIFO.
An acquisition may already be in progress when this method is called, depending on the setting of Number of Software Acquisitions Pre-queued in the Job Properties dialog. Since acquisitions are queued by default, you will need to change this setting to make sure that the hardware is idle when this method is called. |
| PostAcquisition | This method is called just after CompleteAcquire is called on the job's acquisition FIFO to give you an opportunity to change the FIFO after an acquisition. |
| PostAcquisitionRef | This method is similar to PostAcquisition, but the image is passed as a reference. If this method returns True, VisionPro processes the image. If it returns False, the image is not processed and QuickBuild acquires the next image. This allows you to combine several images before processing them. (If you override both PostAcquisition and PostAcquisitionRef, PostAcquisition is ignored.) |
| PostAcquisitionRefInfo | This method is similar to PostAcquisitionRef, but also includes information about the acquired image in an ICogAcqInfo that you can use to access the image's timestamp. If this method returns True, VisionPro processes the image. If it returns False, the image is not processed and QuickBuild acquires the next image. (If you override PostAcquisitionRefInfo and either PostAcquisition and PostAcquisitionRef, PostAcquisition or PostAcquisitionRef are ignored.) |
If your script needs to take some action after an image is acquired, you should override only one of the PostAcquisition... methods. When you create a new job script, the default script creates an entry for PostAcquisitionRefInfo which provides the most flexibility.
You can access these methods using the job member provided by CogJobBaseScript:
| Member | Description |
| AcqFifo | This property returns a reference to the job's acquisition FIFO. |
This section contains the following subsections.
If you have more experience writing .NET programs, there are additional details and techniques available. Be aware that many of the advanced techniques are riskier, and can cause unstable behavior in VisionPro if there are errors in your script code. Do not use an advanced technique if you are able to able to perform your task using a more basic approach.
When you write a script in .NET, you are actually creating a .NET assembly that conforms to an interface specified by VisionPro. VisionPro loads this assembly, constructs an instance of your script class, and calls methods in the interface at the appropriate time. This has several important implications:
- Your code becomes part of the VisionPro application. Bugs in your code can affect the stability of VisionPro.
- Your script is compiled into a .NET assembly in memory. This assembly is given a random name by the framework. If you use a debugging tool to look at the currently loaded assemblies, scripts will appear as assemblies with very strange names.
- Since you are using VisionPro to edit and save your script, and a bug in your script can crash VisionPro, you may occasionally lose work. Save frequently to reduce the amount of lost work.
- Assemblies in .NET can never be unloaded from memory. Each time you edit your script, you create a new .NET assembly. Previous versions of the assembly remain in memory until you restart VisionPro. Other than a small increase in memory usage, this behavior does not generally cause any problems.
- After each script assembly is loaded, VisionPro constructs an instance of your script class. When you edit the script, VisionPro attempts to dispose the instance of the previous script, runs the garbage collector to purge it from memory, and creates an instance of the updated script. In order for this to work successfully, your script must cooperate in the clean up of script objects that are no longer needed
- Note the distinction between the assembly that contains the code of your script and which cannot be unloaded, and the instance of the script class which is in the garbage-collected heap
Your script can register for events or delegates. See the sample Script_Events_GUI_Job.vpp for an example of writing an event handler.
Handling events poses some unique risks:
- Your handler cannot generate any exceptions. Since many coding mistakes result in an exception, you should always use try / catch in your handler.
- Do not call any function that may generate the event that you are currently handling. If you do, you will end up in an infinite loop that will crash VisionPro.
- You should implement a Dispose method for your script that unregisters the event. If you fail to do this, a new event handler will be added each time you edit the script.
- Your script code will be executed inside a running VisionPro application. This means that internal VisionPro objects may be handling the same events as the ones you are trying to handle. Your code must allow the internal handlers to run, and if there are multiple handlers for an event, there are no guarantees about the order in which the handlers will run. Also, internal VisionPro objects may be generating "extra" events that weren't anticipated by your event handler code. You may need to verify that your code is handling only the event instances that you intended to handle.
- Make your event handler a static function if possible.
You can store information in member variables of the script object, and it will be available every time the script runs. For example, if you want to keep a count of the total number of failures, you can add an Int32 class member and increment it each time a failure is found. However, be aware of the following points:
- When you edit your script, a new assembly is created that will have a different counter than the previous version.
- You can create static objects, but it is not recommended. Note that VisionPro only generates a single copy of your script class, so there is little distinction between static objects and class members. Class members have the advantage of having a lifetime that is tied to the script.
- When you save your application, the script is stored in source form. The values of any data members of your script are not saved.
If your script creates objects, it may need to clean them up as well. For instance, if you create an event handler in your Initialize method, it's probably a good idea to dispose of it. To do this, you'll need to make sure that your script class inherits from IDisposable and that you implement a Dispose method that disposes of the object you created. For an example, see the example script Script_Events_GUI_Job.vpp .
This section contains the following subsections.
- Script_MultipleTargets_Job.vpp
- Script_PGRScorpion_Strobed_Job.vpp
- Script_AutoExposure_Job.vpp
- Script_SortedPMAlignResult.vpp
- Script_StereoCamera_Job.vpp (advanced)
- Script_Events_GUI_Job.vpp (advanced)
- Script_GigEBaslerscout_Bandwidth_job.vpp
- Script_GigeBaslerscout_Strobing_Job.vpp
The samples described in this section are in the \Program Files\Cognex\VisionPro\Samples\QuickBuild directory.
- To load a sample click the Show Sample Code button in QuickBuild.
- Choose one of the samples from the Script section
If QuickBuild reports the job name already exists and prompts you for a new name, just choose a new name and press Enter.
You can open more than one job at the same time in QuickBuild. This is useful if you want to keep one of the samples open as reference as you develop your own application.
This sample uses script to inspect multiple objects in a single image and produce a single pass/fail result for the whole image. The images to be inspected are also produced using script.
After opening the Script_MultipleTargets_Job.vpp file, double click the MultipleTargetJob, select LastRun.Synthetic Image.OutputImage from the drop-down list in the display area, and run the job. You will see an image like this:
This sample illustrates some useful techniques:
- The Synthetic Image tool group contains a script that makes it behave as if it were a custom tool that generates images. Double-click the Synthetic Image tool group and to open its tool edit window, then click to Tool Group Script button to see the script that generates the images.
- Click the Tool Group Script button of the job's tool group to see the script that inspects the image. This script runs the Caliper tool once for each blob result. The script uses the CenterOfMass of each blob result to set the Region.Center input of the Caliper tool even though they are not shown as connected in the GUI.
This is a very simple sample that uses a script to write to a non-standard register in the camera that selects the strobe output pin. The .VPP file also contains an acquisition FIFO configured for the PGR Scorpion camera with strobing enabled.
This sample is intended to be a basis for any application that uses strobes with a PGR Scorpion camera. You can simply start QuickBuild, open this sample file, and proceed to use QuickBuild in a normal fashion to create your application. You do not need to edit the script in any way to enable strobing.
If you are using a different camera and you need to read or write DCAM registers, you can use the script in this sample file as a starting point. Note that without a PGR Scorpion camera, you will get an error when you open the sample file indicating that acquisition could not be initialized. You can ignore this error.
Once you've opened the file, double-click CogJob1 (it's likely that you had to rename it), choose Configure->Job Properties, and click the Edit Job Script button to see the script.
This sample demonstrates the PreAcquisition and PostAcquisition script functions. To use this sample you will need a camera that supports exposure adjustment.
Open the sample file, double click Image Source, select the frame grabber and video format for your camera, and click the Initialize Acquisition button. Click the live video button in the upper left corner. You will see the live video image from your camera, and the exposure value will change gradually until the image is reasonably exposed.
To inspect the script, stop the live display and switch to the QuickBuild Job Editor. Double-click CogJob1 (it's likely that you had to rename it), choose Configure->Job Properties, and click the Edit Job Script button to see the script. You may want to adjust some of the constants in the script to get an ideal image from your camera.
This script shows how to define and use terminals in Tool Groups. It uses a Tool Group, SortPMAlignResults, to sort the results of a PMAlign tool, then makes the results available to the PMAlign tool so it can identify the leftmost result.
The SortPMAlignResults tool group doesn't have any tools. Instead, it's used to hold the script that defines a SortedResults output terminal and an InputPMAlignResults input terminal. The tool group's GroupRun method sorts the PMAlign tool's results supplied in its input terminal, and makes the sorted results available in the SortedResults output terminal.
The script of the job's default tool group uses the results in its ModifyLastRunRecord method to label the leftmost result.
This sample uses a script to acquire images programmatically instead of relying on the CogInputImageTool. This is useful when your application has special acquisition requirements.
The sample assumes you have an Cognex MVS-8504 installed, otherwise it will report an error. For best effect, you should have two cameras of the same type attached to the frame grabber. Update the video format specified in the script to be compatible with your cameras. If you don't have the cameras or an MVS-8504, you can still load and examine the sample, but you will not be able to acquire images with it.
After opening the sample, double click on StereoJob and select LastRun.Stereo Camera.LeftImage from the drop down list in the display area and run the job.
You can then double click on Stereo Camera to open the tool group, then click the script edit button in the Stereo Camera tool group to see the script.
Several key points to note in this script:
- The acquisition performed in the script is very simple, and does not attempt handle errors or attempt to overlap calls to StartAcquire to improve performance.
- If you make changes to the script, it is possible to create a script that takes does not relinquish control of the acquisition hardware. When you edit your script, the new version of your script will not be able to gain access to the acquisition hardware because it is still being used by the old copy of your script. If this should occur, save your work, then exit and restart QuickBuild to make sure there are no artifacts remaining from previous scripts.
This script shows how to handle events in a script. It uses a form created in the script to display the number of events handled. You will need a camera connected to your system to use this sample. .
Open the sample file. A small window named Form Created in Script appears. This window shows a count of the number of events handled. In this case, the script is counting the move part event of the acquisition FIFO. Double click Image Source, select the frame grabber and video format for your camera, and click the Initialize Acquisition button. When you run the tool or start live display, you should see the event count increase.
To inspect the script, stop the live display and switch to the QuickBuild Job Editor. Double-click CogJob1 (it's likely that you had to rename it), choose Configure->Job Properties, and click the Edit Job Script button to see the script.
Points of interest in this sample:
- Depending on the Number of Software Acquisitions Pre-queued setting, you may see the event count increase by more than one when you run the job once. This is a side effect of the additional queued acquisition starting before the job completes.
- The script form gives a visual clue about the lifetime of your script.
When you edit the script, you will see the form from the previous version of your script disappear.
It reappears when you edit the close the Job Properties dialog box.
As an experiment, you can remove the code in the Dispose() method to prevent your script from being cleaned up when edited. If you then open and close the Job Properties dialog several times, you will see multiple script forms appear, all of which are registered to handle the move part event. This illustrates why you want to write a dispose method for your script if you are handling events.
- The form was created using Microsoft Visual Studio and then copied into the script code.
This script shows how to limit the throughput of a Basler GigE Vision camera so that multiple cameras can reliably share a connection to the PC.
This script shows how to turn strobing on and off with a Basler GigE Vision camera.