This topic contains the following sections.
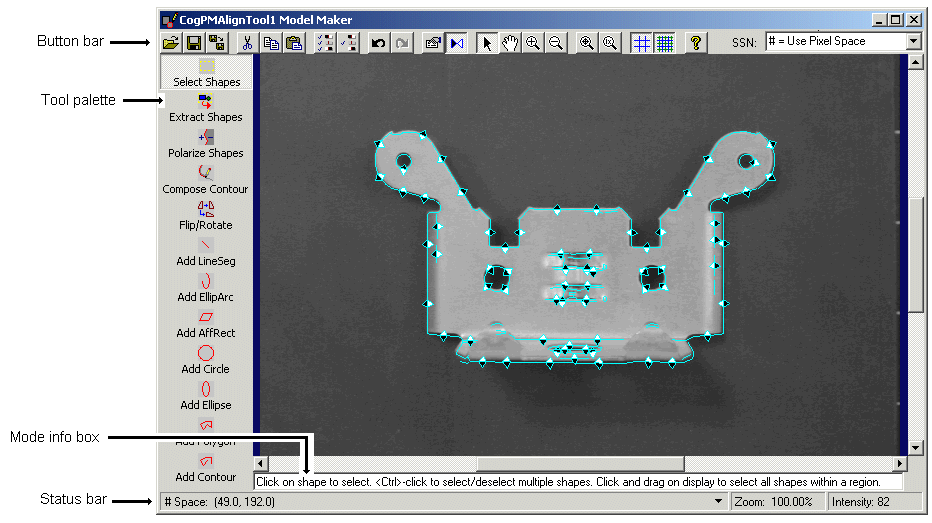
You use the Model Maker to create and modify the shape model collection you are using to perform shape training with a PMAlign tool. The Model Maker can either be launched from a PMAlign tool edit control or added to your custom vision application. The following figure shows the Model Maker with a training image and a shape model collection:
The Model Maker offers the following features:
- A toolbar along the top for opening or importing an existing shape collection, performing common editing operations on shapes, and changing the currently selected space of the image and the existing shapes.
- A tool palette to extract shapes from the current training image, polarize existing shapes, and create new shapes.
- An image window displays the current training image and graphics for all the existing shapes.
The Model Maker supports the following button bar:

Most of the buttons are available only in Select Shapes mode, when you can select shapes for cutting, copying, pasting, and other operations. The following table describes the function of each button in the toolbar:
| Button | Description | Function |
 | Open/Import | Open or import a VisionPro persistence (.vpp) file containing a shape model collection or a DXF model (.dxf) file containing a DXF model. Opening a file replaces any shape models you are currently working with in Model Maker, while importing a file adds to the existing shape models you are currently working with in Model Maker. For more information on opening or importing shapes, see the section Opening or Importing Files. The topic How To Import Shapes contains detailed information on importing shape models. |
 | Save | Save the current shape model collection to a VisionPro persistence (.vpp) file. |
 | Save As/Export | Save the current shape model collection to a new VisionPro persistence (.vpp) file. The Save As option saves all shapes while the Export option saves only the currently selected shapes. |
 | Cut | Cut the selected shapes and place them on the clipboard. |
 | Copy | Copy the selected shapes to the clipboard. |
 | Paste | Paste the cut or copied shape models to the training image. If the coordinate space for the pasted shape model is not a valid space name, the paste operation will fail and the Model Maker will report an error. If the coordinate space is valid but not the currently selected space indicated in the Selected Space Name box, the geometric properties of the pasted shape model are mapped to their corresponding values in the currently selected space. |
 | Select All | Select all the shape models, placing a shape-selection box around them so they can be cut, copied, relocated and resized in unison. See the section Selecting Shapes for more information on using the shape-selection box. |
 | Select Unknown Polarities | Select all shape models with an undefined polarity setting. See the topic Selecting Shapes with an Undefined Polarity for more information. See the topic Shape Polarity for a description of shape polarity. |
 | Undo | Undo the last edit. The Model Maker supports an undo operation for the 10 previous edits. |
 | Redo | Redo the last undo operation. The Model Maker supports a redo of the last 10 operations. |
 | Shape Properties Window | Open the Shape Properties Window for the selected shape, which lets you edit the geometry, polarity, and weight for this particular shape model. See the section Opening a Shape Properties Window for more information. |
 | Show/Hide Polarity Adornments | Enable or disable the polarity adornments on all shapes. See the topic Shape Polarity for a description of shape polarity. See the topic How To Polarize Shapes for information on how to let Model Maker determine the best polarity for any selected shape. Polarity adornments are not visible when a shape is very small. To view the polarity adornments you must zoom in on the image. |
 | Pointer | Switch the cursor in the image window to a pointer. |
 | Pan | Use the hand cursor in order to pan the image within the image window. |
 | Zoom In | Use this magnifying cursor to zoom in on the image within the Display window. |
 | Zoom Out | Use this magnifying cursor to zoom out on the image within the Display window. |
 | Fit Image | Fit the image within the size of the image window. |
 | Zoom 100% | Displays the image at a magnification factor at 100%. |
 | Grid On/Off | Superimpose a grid over the borders of all pixels in the image. You must zoom in on the image in order to see the pixel grid. |
 | Sub-Grid On/Off | Superimpose a grid within the border of each pixel in the image. You must zoom in on the image in order to see the subpixel grid. |
 | Selected Space Name | Select the coordinate space the Model Maker uses. The list of spaces comes from the selected space tree of the current training image. Changing the selected space changes both the selected space of the image and the selected space of all the shapes. For more information, see the section Changing the Selected Space Name. |
The Model Maker supports the following tool palette:
| Tool | Description | Function |
 | Select Shapes | Put the Model Maker in select shapes mode, where you can select one or more shapes for editing. See the section Selecting Shapes for more information. |
 | Extract Shapes | Extract shape models from the current image. See the topic How to Extract Shapes for more information. |
 | Polarize Shapes | Use the Shape Polarization tool to set the polarity value for the currently selected shapes. See the topic How to Polarize Shapes for more information. |
 | Compose Contour | Compose a contour shape model. See the topic How to Work with Contours for more information |
 | Flip/Rotate | Flip or rotate the currently selected shapes, or change the handedness of the selected shapes. See the section Flipping and Rotating Shapes for more information. |
 | Add Line Segment | Add a new line segment to the shape model collection. See the section Creating New Shapes for more information. |
 | Add Elliptical Arc | Add a new elliptical arc to the shape model collection. See the section Creating New Shapes for more information. |
 | Add Affine Rectangle | Add a new affine rectangle to the shape model collection. See the section Creating New Shapes for more information. |
 | Add Circle | Add a new circle to the shape model collection. See the section Creating New Shapes for more information. |
 | Add Ellipse | Add a new ellipse to the shape model collection. See the section Creating New Shapes for more information. |
 | Add Polygon | Add a new polygon to the shape model collection. See the section Creating New Shapes for more information. |
 | Add Contour | Add a new general contour to the shape model collection. See the section Creating a New Contour with New Segments for more information. |
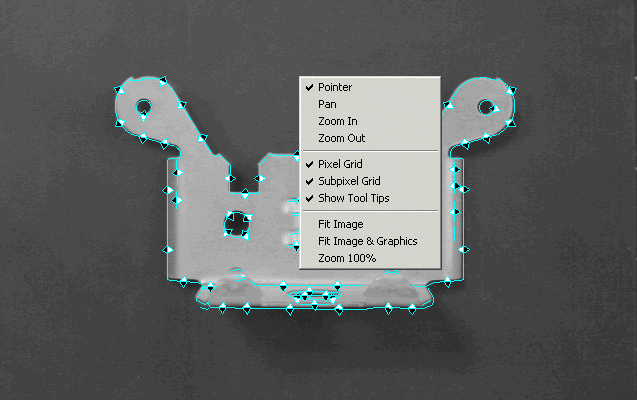
The image window shows the current training image with any existing shape models. Right-click within the image window to display the popup menu shown in the following figure:
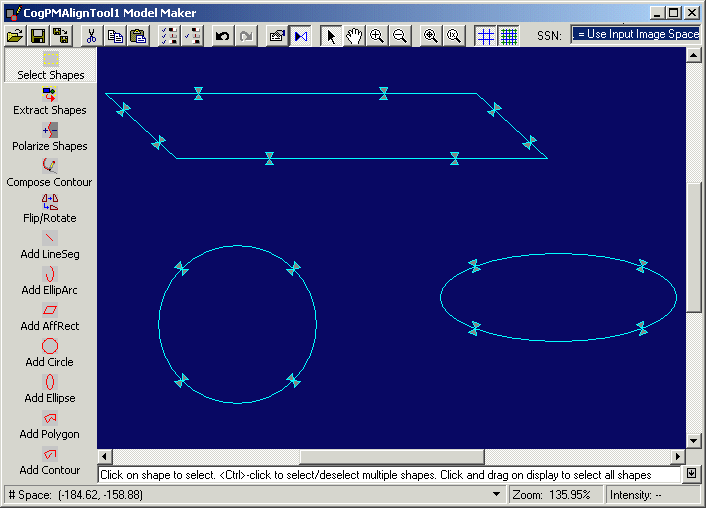
If you are creating shape models for training with just a transformation and not an image, the image window uses a blue background against the shape models. For example, the following figure shows the Model Maker using shape models and no training image:
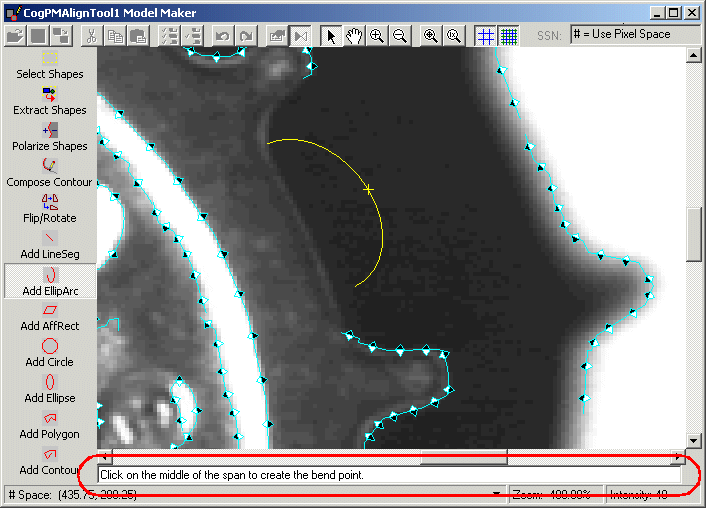
The Mode Info box beneath the image window provides a description of what action is appropriate to the current operation. For example, the following figure shows the Mode Info box directing the user to click on the middle point of an elliptical arc segment to create the bend point:

The status bar along the bottom of the Model Maker displays the following information:
- The cursor location in any coordinate space the training image supports
- The current zoom factor
- The grey value of the pixel at the current mouse position