This topic contains the following sections.
- Starting the Model Maker
- Creating New Shapes
- Extracting Shapes
- Creating Simple Shapes
- Opening and Importing Shape Model Files
- Selecting Shapes
- Selecting All Shapes
- Using the Shape Selection Box
- Selecting Shapes Individually
- Selecting Shapes with an Undefined Polarity
- Unselecting Shapes
- Scaling and Rotating Shapes Uniformly
- Changing the Weight Property
- Changing Shape Polarity
- Flipping and Rotating Shapes
- Changing the Selected Space Name
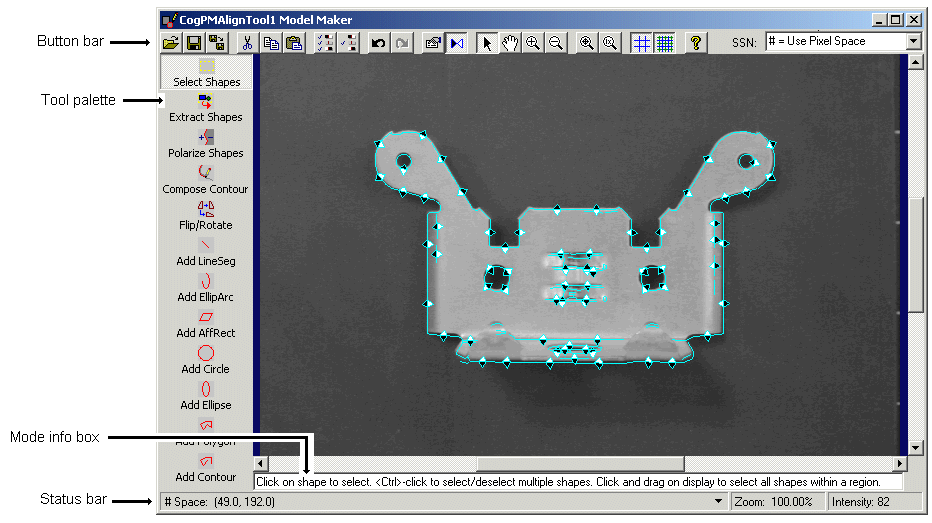
You use the Model Maker to create and modify the shape model collection you are using to perform shape training with a PMAlign tool. The Model Maker can either be launched from a PMAlign tool edit control or added to your custom vision application. The following figure shows the Model Maker with a training image and a shape model collection:
Click the Model Maker button

- You have a training image and you select a training mode of Shape Models with Image
- You select a Train Mode of Shape Models with Transform
The Model Maker can also be included in your custom vision application. For example, use the Cognex Synthetic Model Editor Control component in your Visual Basic application. See the topic Adding Edit Controls to Visual Studio for more information.
In order to train a PMAlign tool with a shape model collection, one or more shape model objects must exist in your shape model collection. You can create new shapes manually, have the Model Maker extract new shapes automatically, or you can import shapes from DXF or VPP files.
The Model Maker includes a Shape Extraction tool for constructing a set of shape models based on the features in an actual image. The Shape Extraction tool requires an input image, a training region and a set of extraction mode parameters.
Click the Extract Shapes button

See the topic How To Extract Shapes for detailed information on extracting shapes from the training image.
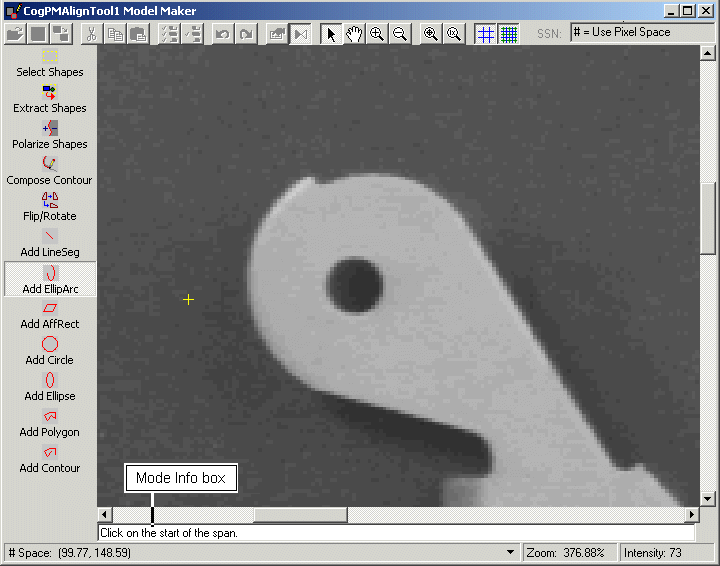
Use the Model Maker tool palette to create the simple shapes the Model Maker supports. Depending on the shape you select, the Mode Info box at the bottom of the Model Maker provides you with the next step you need to take. For example, if you click on the Elliptical Arc tool, the Mode Info box instructs you to select a start point for the arc span, as shown in the following figure:
The Model Maker allows you to open or import an existing shape model collection and add it to the training image. Opening a collection replaces any existing shape models previously present in Model Maker, while importing a collection adds to the existing shape models.
Click the Open/Import


Use the Open dialog box to select a VisionPro persistence (.vpp) file, a DXF model (.dxf) file, or a CVL shape tree archive. Be aware that when you open a shape model collection, Model Maker uses the selected space name of the first item in the collection. If any shape models in the collection have a different selected space name, they are automatically mapped to the selected space name of the first item. If the collection contains an unrecognized selected space name, Model Maker displays an error.
If you select a CVL shape tree archive, it must meet the following requirements:
- it must have been created with CVL 6.2 or later
- the shapes in the archive must be derived from ccShape
- the archive must have been written using pointer, or complex, persistence
If VisionPro encounters a shape in the archive that it cannot convert, the shape is ignored.
If you select a DXF model (.dxf) model file, the DXF Shape Extraction dialog box appears as shown in the following figure:

See the topic How To Import Shapes from DXF Files for more information on opening DXF model (.dxf) files.
To move a shape, change its properties, give it a polarity value, or perform any of a number of tasks, the shape must be selected.
Click the Select Shapes tool

To select all shapes in the training image, press <Ctrl>+A or click the Select All button

In Select Shapes mode, you can use the Shape Selection box to select one or more shapes. To create a Shape Selection box, click on an empty area of the training image and drag the mouse in any direction. As you drag the mouse the Shape Selection box appears with a dotted-yellow border, as shown in the following figure:

The Model Maker selects any shapes completely within the borders of the Shape Selection box.
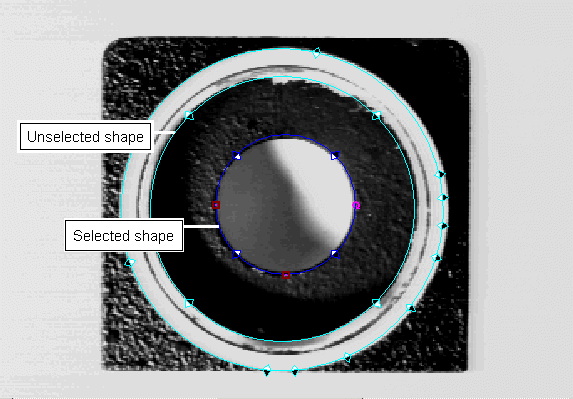
Left-click on any single shape to select it. To select more shapes, press and hold the Ctrl-key while you left-click on the next shape.
The polarity of a shape model indicates which side of a boundary is light and which side is dark. When you extract shape models from an existing image, the Model Maker determines the polarity of each new shape automatically. When you create new shapes manually, however, they have no explicit polarity. See the topic Shape Polarity for more information on polarity.
Click the Select Unknown Polarities button

If the training image contains a contour and some of its segments have a defined polarity while other segments do not, trying to select all shapes with an undefined polarity generates the following message box:
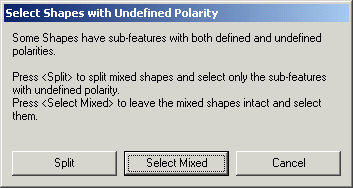
Choose Split to break off the segments with an undefined polarity and form them into a new, possibly disconnected, contour. The segments that had a defined polarity value form a second contour and are unselected.
Choose Select Mixed to select the entire contour regardless of the fact that some segments have a defined polarity.
Click on an empty area of the training image to unselect all shapes. To unselect a single shape while keeping other shapes selected, press and hold the Ctrl-key while you left-click on the shape you want to unselect.
To scale or rotate all shapes uniformly, first press Ctrl+A or click the Select All button
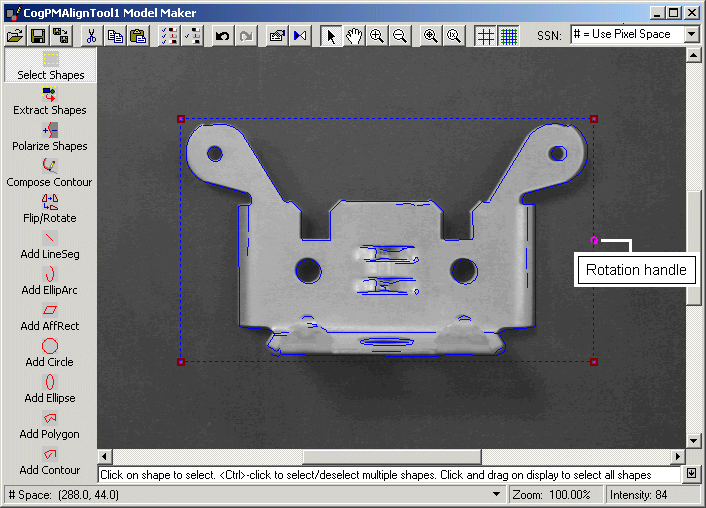
To scale all shapes uniformly, click a handle in any corner of the selection box and drag the handle in any direction. To rotate all the shapes uniformly, click the rotation handle and drag the handle in any direction.
Each shape model supports properties of geometry, polarity, and weight. To manually change the current value of a shape model polarity and weight for any particular shape, you can use the Shape Properties window.
Click the Shape Properties Window button

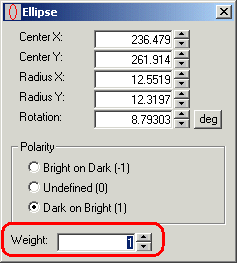
By default, a shape has a weight property value of 1, but you can change the value based on the relative importance of the feature the shape represents. See the topic Shape Training for more information.
The polarity of a shape model indicates which side of a boundary is light and which side is dark. When you extract shape models from an existing image, the Model Maker determines the polarity of each new shape automatically. When you create new shapes manually, however, they have no explicit polarity. See the topic Shape Polarity for more information on polarity.
You can set the polarity value for any shape manually or using the Shape Polarization tool. See the topic How to Polarize Shapes for more information.
To flip or rotate the selected shapes, select the Flip/Rotate tool

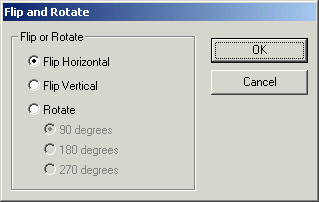
Use the dialog box to select how to flip or rotate the selected shapes in the training image. Flipping and rotating shapes changes the geometric properties of the shapes, and flipping a shape is the easiest way to change its handedness.
The Model Maker toolbar contains a drop-down list with all the coordinate spaces available to the shape models. These coordinate spaces represent the coordinate space tree of the training image. If a training image is not provided, this list is replaced with a text box and “#” space is selected.
Changing the selected space name changes the selected space of the image and the selected space of all shapes currently in the image.
Cognex recommends you select your target coordinate space before creating any shapes. If shapes already exist, however, and you change the selected space name, a message box appears as shown in the following figure:
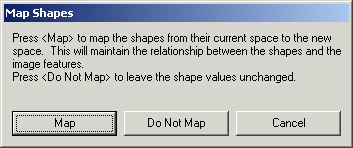
Choose Map to map the geometric values of the shapes from their current coordinate space to corresponding values in the new coordinate space, or you can choose not to map the shapes, which changes their coordinate space without mapping their geometric values to the new space. This can cause existing shape models to greatly expand or reduce in size based on the mapping determined by the coordinate space.