This topic contains the following sections.
Shape Extraction is a mechanism that automatically creates VisionPro shapes based on the contours of an image. Model Maker includes a shape extraction tool that you can use to create shape models for PatMax.
The first part of this topic describes how to use the shape extraction tool. The second part of this topic gives you some tips for using the shape extraction tool effectively. The third part of this topic, Extracting What You Need shows you how to use the extraction region, the extraction parameters, and pruning to extract only the shapes you need.
Open the Model Maker from the PMAlign edit control by clicking Model Maker button

You must have a training image and an appropriate training mode for the Model Maker button to be active.
Click the Extract Shapes button

The Shape Extraction dialog appears over the image. By default, the shape extraction tool operates on the entire image. In some cases, however, you may want to limit shape extraction to part of an image. The extraction tool indicates the region with a yellow rectangle. You may need to make the Model Maker window larger to see the sizing handles of the rectangle.
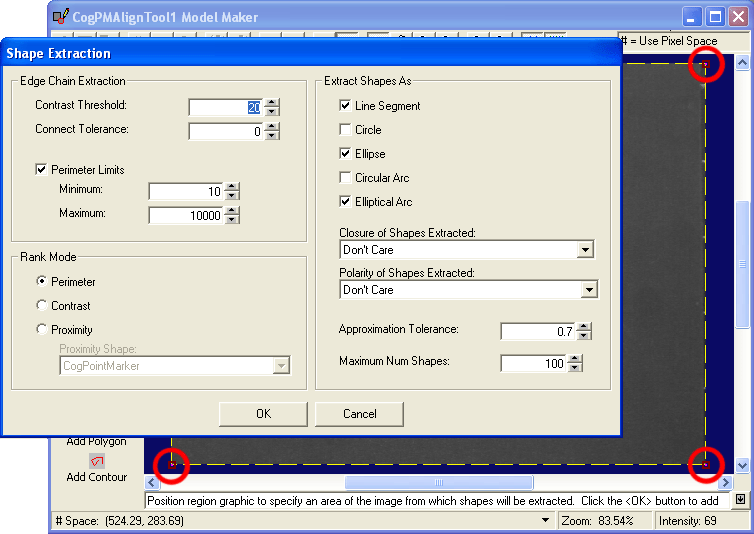
The Shape Extraction dialog contains all the parameters that control how shapes are extracted from the image.
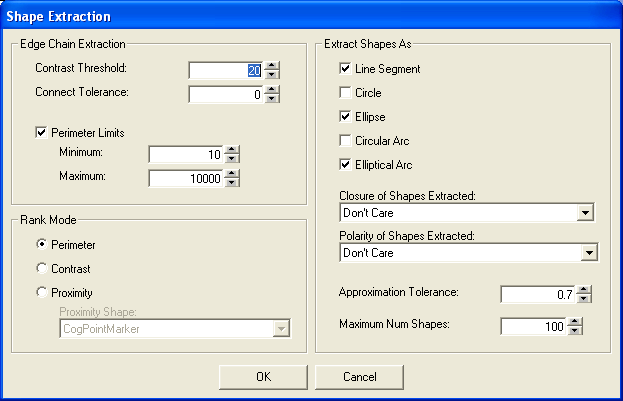
The extraction parameters are grouped in three kinds of settings: Edge Chain Extraction, Extract Shapes As, and Rank Mode. The following sections describe the parameters in each group in detail.
The Edge Chain Extraction settings control how the shape extractor finds the edges in the image, which is the first step in extracting shapes.
| Parameter | Description |
| ContrastThreshold | The minimum contrast difference between adjacent pixels that constitutes an edge. The shape extractor ignores edges with a contrast difference that is less than or equal to this threshold. |
| ConnectTolerance | If the distance between the end points of two edge chains is within this tolerance, the shape extractor joins them into a single chain. This parameter is always given in units of the selected space of the image. |
| PerimeterLimitsEnabled | When selected, this parameter limits the length of edge chains. This parameter is always given in units of the selected space of the image. Chains that are shorter than the minimum or longer than the maximum are discarded. Bear in mind that these perimeter limits apply to the edge chains and may not correlate exactly with the perimeters of the extracted shapes. |
The Extract Shapes As settings control the process of converting the edge chains into VisionPro shapes.
| Parameter | Description |
| VocabularyVocabularyVocabularyVocabulary | These options specify the Vocabulary which specifies the VisionPro shapes into which edges are converted. You must choose at least one of these shapes. The shape vocabulary does not specify the kinds of shapes that the shape extractor extracts. Instead, the vocabulary specifies the primitive shapes that the extractor will use to convert the edge chains into VisionPro shapes. Note: When Model Maker finds circular shapes, it always uses CogEllipse whose x- and y-radii are of equal length instead of CogCircle. Similarly, Model Maker always uses CogEllipticalArc instead of CogCircularArc. |
| Closure | Lets you choose whether the shape extractor should extract only open shapes, only closed shapes, or either kind. If you choose Open Shapes or Don't Care, the shape vocabulary must include at least one open shape. |
| Polarity | Lets you choose whether the shape extractor should extract only shapes that are dark on bright background, light on a dark background, or either kind. This setting applies only to closed shapes. |
| ApproximationTolerance | Specifies by how much the extracted shape can deviate from the edge chain information. This parameter is always given in units of the selected space of the image Smaller values result in shapes that follow the edges more closely, but higher values result in simpler shapes. |
| MaxNumShapes | Specifies the maximum number of shapes that the shape extractor returns. The shape extractor first discards all of the shapes that do not match the closure, polarity, and perimeter constraints. Then it uses the Rank Mode settings to rank the shapes. |
The Rank Mode settings let you specify the order in which shapes should be returned. In Model Maker, you use this setting in conjunction with the Max Num Shapes settings to ensure that the shapes you are interested in are extracted.
The shape rankings are computed from the raw image edge data, before they are converted into approximating shapes. For this reason, it is possible that the approximating shapes appear out of ranked order.
| Parameter | Description |
| RankMode | Shapes with the longest perimeters are ranked first. Shapes beyond Max Num Shapes are discarded. |
| RankMode | Shapes with the highest contrast are ranked first. Shapes beyond Max Num Shapes are discarded. |
| RankMode | Shapes closest to a ProximityShape are ranked first. Shapes beyond Max Num Shapes are discarded. In Model Maker the shape appears in yellow, initially in the center of the image. You may need to move the Shape Extraction dialog box to see it. |
This section gives you some tips that will help you use the shape extraction tool more effectively.
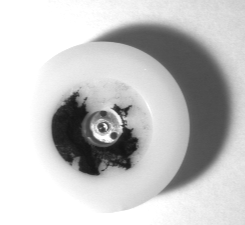
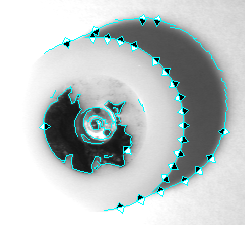
Not all images are good candidates for shape extraction. Good candidates are images have high contrast and well-defined edges. Poor images have poor contrast or edges that are not part of the object your are inspecting. The following image is not a good candidate for shape extraction.
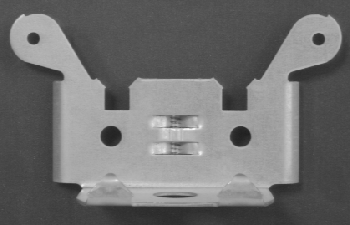
Keep in mind that the shape extractor does some of its filtering on the edge chains that it finds rather than on the shapes that have been found. For example, when you limit the number shapes to find, the shape extractor applies that limit to the edge chains and then extracts the shapes from those edge chains. For example, assume you are working with this image:
If you wanted to extract shapes for the four well-defined circles, your first instinct might be to set the extraction parameters like this:
| Parameter | Setting |
| Vocabulary | Circle |
| Closure of Shapes Extracted | Closed Shapes |
| Polarity of Shapes Extracted | Dark on Bright |
| Maximum Num Shapes | 4 |
This is the result of those settings. The shape extractor found only three of the four circles.
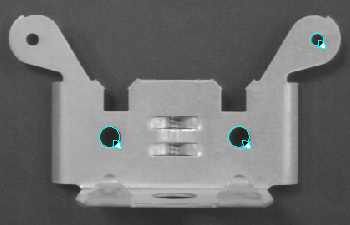
Even if you were to set the vocabulary to include Ellipses, the result would be the same.
The shape extractor is finding four closed shapes, but only three match the vocabulary. You can verify this by adding Line Segment to the vocabulary. In this case you will see an irregular fourth shape:
The extractor found the four circles and the irregular shape. Since you are ranking by perimeter, it keeps only the longest four chains. In this case it keeps the irregular shape and three of the circles. Then the extractor tries to fit the chains into the vocabulary, and the irregular shape does not fit. Only three of the four longest shapes fit the vocabulary, so that is what it returns.
The easiest way to work around this behavior is to increase the number of found shapes and to always include Line Segment when you are looking for closed shapes so you can delete extraneous shapes manually.
If you are using the perimeter limits, connection tolerance, or approximation tolerance settings, remember that these values are in the selected space of the image. The default minimum perimeter setting (10) may be appropriate for pixel-calibrated images, but not for centimeter-calibrated images.
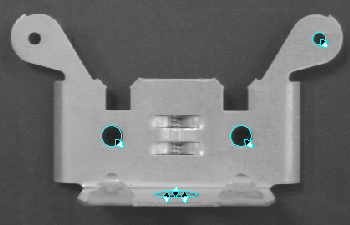
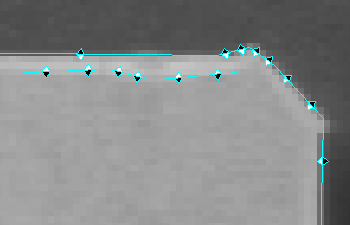
Extraction works best with images that have good lighting and well-defined edges, but even so, the shape extractor may create shapes for unwanted artifacts. For example, using the default shape extractor settings on the following image results in shapes extracted for shadows and highlights. Some of the larger ones are marked in red circles. Some very small extracted shapes are not visible at this magnification.
One way to solve this problem is to simply select and delete all the extraneous shapes, but a shape that has many highlights might have many small features that you cannot see unless you magnify the image.
A better solution is to use a combination of the selection rectangle, tolerance values, and shape vocabularies as well as multiple uses of the shape extractor.
To extract a shape for the "ears" of the bracket, you might limit the extraction region like this:
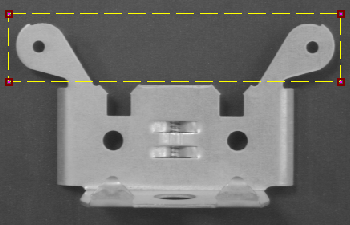
Setting the extraction parameters as in the following table ensures that the shape extractor extracts only open shapes. Setting a high minimum perimeters ensures that the shapes will follow the larger features. Remember that the polarity setting does not apply to open shapes.
| Parameter | Setting |
| Vocabulary | Line Segment, Elliptical Arc |
| Closure of Shapes Extracted | Open Shapes |
| Perimeter Limits | Minimum: 100 Maximum: 500 |
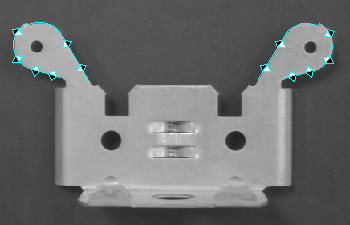
This is the result of shape extraction with these parameters:
Now to extract the circles, enlarge the extraction region to contain the entire shape, and change the extraction parameters so that the shape extractor extracts dark closed shapes on a bright background.
| Parameter | Setting |
| Vocabulary | Line Segment, Circle, Ellipse |
| Closure of Shapes Extracted | Closed Shapes |
| Polarity of Shapes Extracted | Dark on Bright |
| Perimeter Limits | Minimum: 10 Maximum: 500 |
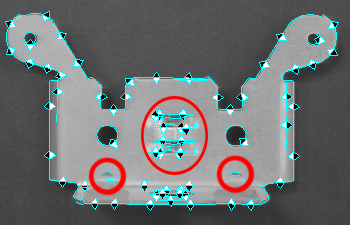
This results in new shapes for all four circles and the irregular shape at the bottom of the part.
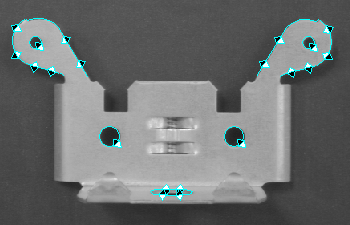
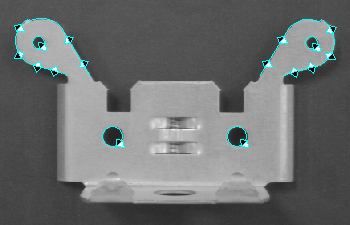
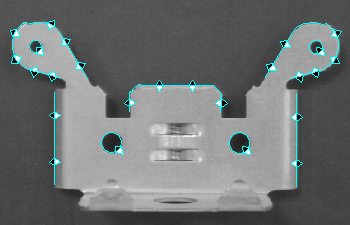
To remove the additional closed shape, select it, and delete it. The complete set of shapes looks like this:
If you extract a shape for the tab in the center of the bracket you may find that the highlights give you spurious line segments, as you can seen in this magnified image:
To avoid the highlights, set the minimum perimeter to 100 and the contrast tolerance to 50. The longer minimum perimeter avoids extraction of short line segments, and the higher contrast tolerance avoids the highlights. Set the closure setting to Open Shapes and limit the extraction region to the tab, and the result will be something like this:

Finally, to make the shape pattern more complete, you should include the side edges of the bracket. You will need to set the contrast threshold back to 20 for the sides of the bracket. Setting the minimum perimeter to 75 ensures that the extractor extracts long segments. Use the extraction region to extract only the sides. The complete shape pattern, then, would look like this:
If you find that you cannot get the shape extractor to extract the shape you want, you can use Model Maker to draw the shape yourself.