The Checkerboard Calibration tool edit control provides a graphical user interface to the CogCalibCheckerboardTool tool, which you use to calibrate an application so that it returns results in meaningful, real-world values. By adding a Checkerboard Calibration tool to your application, the tools you use to analyze an image can return results in a specific unit of measurement such as inches, centimeters, millimeters, and so on.
The Checkerboard Calibration tool locates the vertices in an image of a checkerboard-style calibration plate (or the dots in a grid-of-dots-style plate) and determines the best-fit 2D transformation between the found image locations and the physical dimensions of the plate. The tool can generate either a linear transformation, or a nonlinear one that also accounts for optical and perspective distortion. The Checkerboard Calibration tool also supports nonlinear transformation using a linescan camera.
| The Checkerboard Calibration tool supports both checkerboard and grid-of-dots calibration plates. Cognex recommends the use of checkerboard calibration plates with the CogCalibCheckerboardTool. Support for grid-of-dots plates is provided for compatibility purposes. |
You do not need to specify the measurement standard you want to use explicitly. As part of configuring a Checkerboard Calibration tool, you define the grid spacing (either the tile height and width or the dot spacing) in the unit of measurement you want to use. For example, if you want to use millimeters, then you would define the grid spacing in millimeters.
| If you are using calibration plates from Cognex with DataMatrix fiducial marks, the physical grid pitch may be encoded as part of the fiducial mark. Contact your Cognex representative for information about DataMatrix calibration plates. |
Once calculated, the 2D transformation can be used on subsequent image acquisitions to map the uncalibrated coordinate space of the input image to a raw calibrated coordinate space. By further specifying a precise location and orientation for the origin of this space, you allow the tool to generate a final calibrated space which can then be passed onto other vision tools. Vision tools that use this calibrated output image return point locations in terms of the unit of measurement you define. If the 2D transformation is nonlinear, the tool also warps the pixels of the input image to correct for the distortion. See the topic Calibration and Fixturing for more information on calibrating applications and coordinate spaces.
As you develop your vision application, you typically capture an image of a calibration plate, acquired from an Acquisition FIFO tool, and pass it to a Checkerboard Calibration tool. Once the calibration transformation has been calculated and you are satisfied with the final calibrated coordinate space, you use the same Acquisition FIFO tool to capture images of objects you want to inspect. As the application operates, the Checkerboard Calibration tool takes the stored 2D transformation and attaches it to the coordinate space tree of the input image. Images of the calibration plate you use for calibration must be greyscale images. However, run-time images that use the calibration tool can be either color or greyscale.
You will need to recalibrate your application if you switch to a different type of camera or if you alter the distance between the camera and the object under inspection. In either case, the number of grid points (checkerboard tiles or dots) required to span a specific distance in uncalibrated space changes and you must let the Checkerboard Calibration tool determine the new mapping.
The following figure shows the Checkerboard Calibration tool edit control:
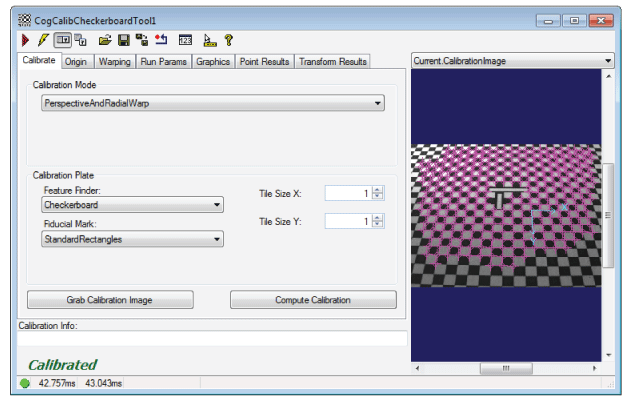
The edit control offers the following features:
- A row of control buttons at the top left provide access to the most common operations.
- A set of function tabs allow you to determine the type of mapping (linear or non-linear), define the ratio between the grid spacing and the unit of measurement you want to use, and name the new calibrated coordinate space.
- An image display window displays acquired images and the output image the Checkerboard Calibration tool generates.
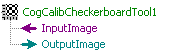
You can experiment with the edit control by using QuickBuild to create a CogCalibCheckerboard tool. A new CogCalibCheckerboard tool appears with the input terminals for the image of the checkerboard pattern and the output image using the calibrated coordinate space, as shown in the following figure:
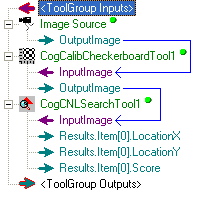
In a QuickBuild application, the Checkerboard Calibration tool accepts the output image from an image-acquisition tool and then passes its own output image to other vision tools that will use the calibrated coordinate space. For example, the following figure shows the output image from a Checkerboard Calibration tool being passed to a CNLSearch tool:
To include the edit control in your custom vision application, you must first add it to your Visual Studio.NET development environment. See the topic Adding Edit Controls to Visual Studio for more information.
This topic contains the following sections.

The following table describes the function of each button:
| Button | Description | Function |
 | Run | Generate an output image by mapping the latest input image to the calibrated coordinate space. You do not need to run the Checkerboard Calibration tool to initially generate the calibrated coordinate space, but the tool must run as the application executes in order to generate the output image which can be used by other vision tools. The tool cannot run until it has been calibrated. |
 | Electric mode | Toggle electric mode, where the Checkerboard Calibration tool executes automatically when particular configuration parameters change. In electric mode, a lightning bolt appears next to every electric property. |
 | Local image display | Open or close the local image display window. A Checkerboard Calibration tool supports the following image buffers:
In addition, if you use the tool to generate a nonlinear 2D transformation, the tool generates a Current.UndistortedCalibrationImage buffer, which contains a warped image of the calibration plate to remove any known distortion. You can also use this undistorted image to specify a destination rectangle. |
 | Floating image display | Open one or more floating image windows, which support the same image buffers as the local image display window. |
 | Open | Open a VisionPro persistence (.vpp) file that contains a set of saved properties for this vision tool object type. VisionPro reports an error if you try to open a .vpp file for another object type. |
 | Save | Save the current properties of the vision tool to a VisionPro persistence (.vpp) file. The edit control allows you to choose between saving the vision tool with or without its image buffers and tool results. |
 | Save As | Save the current properties of the vision tool to a new VisionPro persistence (.vpp) file. |
 | Reset | Reset the vision tool to its default state. |
 | Show Floating Results | Open a floating window that displays the point locations of each known vertex in the calibration image in both uncalibrated and raw calibrated space, as well as the parameters that define the 2D transformation. |
 | Show ToolTips | Enable or disable the display of tooltips for individual items in the edit control. |
 | Help | Open this VisionPro online help file. |
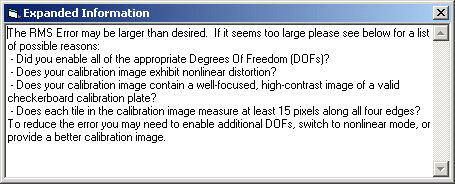
The edit control includes a GetInfoStrings text box along the bottom, which displays any diagnostic text strings from the last attempt to calculate a 2D transformation. The following figure shows an example Calibration Info box:

Additional information appears in a separate box, as shown in the following figure:
The text box is empty if the tool is not calibrated.
If the tool did not produce any message strings during the last calibration attempt, the box appears empty. All of the tabs on the edit control display this message box.
This section contains the following subsections.
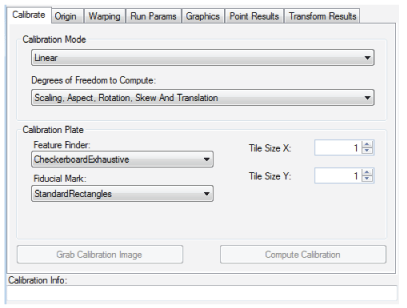
Use the Calibrate tab to select the type of 2D transformation to generate and define the checkerboard tiles in terms of the physical units you want to use in your application. The following figure shows the default Calibrate tab:
| Depending on which calibration mode and calibration plate type is selected, additional controls may be visible on the Calibrate tab. |
Select one of the following calibration Calibration Mode values.
| Mode | Description | ||
| NoDistortionWarp | This mode will model perspective distortion only; any nonlinear optical distortion is ignored. By comparing the residual error values produced using this computation mode with the residual error values from ThreeParamRadialWarp or SineTanLawProjectionWarp you can improve your understanding of the individual sources of residual error. | ||
This model calibrates for nonlinear optical distortion and perspective distortion. When compared with PerspectiveAndRadialWarp, this mode adds additional coefficients that properly model the location of the optical center.
| |||
| SineTanLawProjectionWarp | This model calibrates for nonlinear optical distortion and perspective distortion. When compared with ThreeParamRadialWarp, this model uses a computation model that is appropriate for lenses with moderate to severe distortion, typically those with focal lengths less than 6mm. | ||
The calibration or fixturing computation will generate a nonlinear transformation between coordinate spaces suitable for use with a linescan camera. The transformation will calibrate for perspective and radial distortion.
| |||
The calibration or fixturing computation will generate a nonlinear transformation between coordinate spaces suitable for use with a linescan camera. The transformation will calibrate for perspective and radial distortion.
| |||
This model calibrates for nonlinear optical distortion and perspective distortion. This method assumes that the optical center precisely corresponds to the image sensor center.
| |||
This model calibrates for linear distortion (aspect, skew, and shear) only.
|
| If you are calibrating a linescan camera, you can choose between the nonlinear linescan calibration with one-dimensional warping or two-dimensional warping. See the topic on Linescan Camera Calibration for the differences between the warping functions. |
Select one of the following calibration Degrees of Freedom to Compute values.
| Option | Description |
| None | The transformation returned by the N point to N point fitting will be the identity transform. It will have unity scale and aspect. It will contain no rotation, skew, or translation. No points are required for this DOF computation. |
| TranslationX | The transformation computed by the N point to N point fitting will contain only translation in the X direction. At least one pair of points is required for this DOF computation. |
| TranslationY | The transformation computed by the N point to N point fitting will contain only translation in the Y direction. At least one pair of points is required for this DOF computation. |
| Translation | The transformation computed by the N point to N point fitting will contain only translation. At least one pair of points is required for this DOF computation. |
| RotationAndTranslation | The transformation computed by the N point to N point fitting will contain only rigid rotation and translation. At least two pairs of points are required for this DOF computation. |
| ScalingRotationAndTranslation | The transformation computed by the N point to N point fitting will contain uniform scaling, rigid rotation, and translation. At least two pairs of points are required for this DOF computation. |
| ScalingAspectRotationAndTranslation | The transformation computed by the N point to N point fitting will contain nonuniform scaling, rigid rotation, and translation. At least three pairs of points are required for this DOF computation. |
| ScalingAspectRotationSkewAndTranslation | The transformation computed by the N point to N point fitting will contain nonuniform scaling, skewed rotation, and translation. At least three pairs of points are required for this DOF computation. |
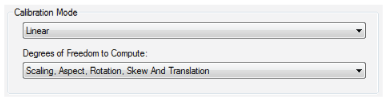
Use the following options to describe the attributes of the calibration plate (grid type spacing and fiducial type) and to control the method the tool uses to locate grid points in the image.
| If you are specify any of the DataMatrix fiducial types, you can enable a timeout for the calibration operation. If the DataMatrix Timeout checkbox is checked, the tool will terminate the calibration operation after the specified timeout value (DataMatrixTimeoutSeconds) has passed. |
| Parameter | Description | ||
This value specifies how the tool will search the calibration image for calibration vertex points. This method must match the type of calibration plate that you are using.
| |||
This value specifies the type and characteristics of the fiducial marks on the calibration plate.
| |||
Enter the grid spacing for the calibration plate. For a checkerboard-style plate, this is the tile size. For a grid-of-dots calibration plate, this is the spacing between dot centers in the X- and Y-direction. Enter the grid spacing using real-world units of measurement you want to use for your vision application. For example, if you want to use inches for your application and your calibration plate uses tiles that are one-half inch in size, enter a value of 0.5.
|

Click Grab Calibration to copy the current image stored in the Current.InputImage buffer into the Current.Calibration buffer. To configure the tool you must copy an image of a calibration plate into the Current.Calibration buffer.

Click Calibrate to have the tool calculate the best-fit 2D transformation, linear or nonlinear, based on the Current.Calibration image and the current set of parameters.
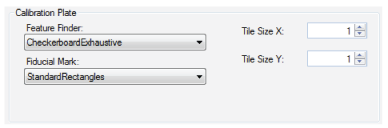
Use the Origin tab to move the origin of the calibrated space to a different location. The following figure shows the default Origin tab:
This section contains the following subsections.
Use the Warping tab to specify a destination rectangle as well as any scale and rotation you desire in the output image when you are using a nonlinear transformation. The Warping tab is enabled only in nonlinear mode. The following figure shows the default Warping tab:
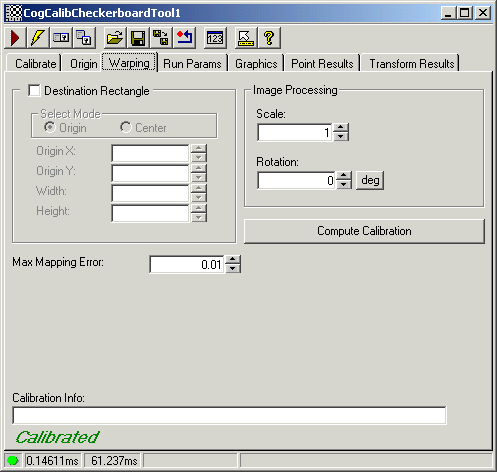
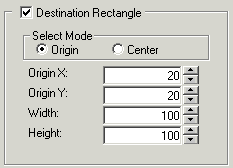
If you enable the WarpDestinationRectangle checkbox, a graphic representing the destination rectangle appears over the Current.UndistortedCalibrationImage, as shown in the following figure:
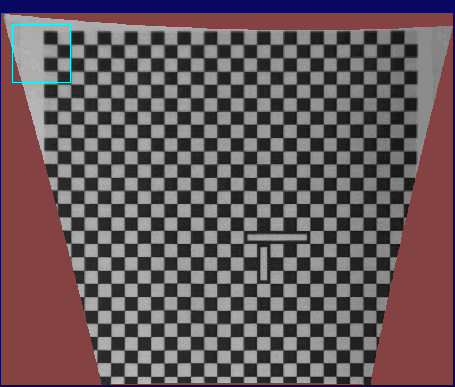
Use the graphic in the Current.UndistortedCalibrationImage buffer to specify the area of the image where you do not want to process the unfilled boundary pixels, or use the parameters in the Warping tab to provide precise measurements.
Note: If you are performing linescan calibration, the Origin Y and Height values of the rectangle are ignored; only the Origin X and Width are used.
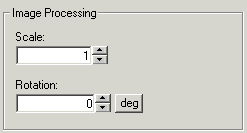
Use the following options to specify a scale and rotation value to apply during the warping operation:
| Parameter | Description |
| WarpScaling | Specify the scaling factor to apply to the output image. |
| WarpRotation | Specify a rotation factor to apply to the output image. |
Click Calibrate to have the tool calculate the best-fit 2D transformation, linear or nonlinear, based on the Current.Calibration image and the current set of parameters. If you change any settings on this tab, you must recalibrate the tool.

The WarpMaxErrorInPixels parameter specifies the maximum error allowed during image warping, measured in pixels of the calibration image.
Use the Run Params tab to specify the name of the final calibrated coordinate space and the grey value of any undefined pixels in the output image after the tool warps the image. The following figure shows the default Run Params tab:
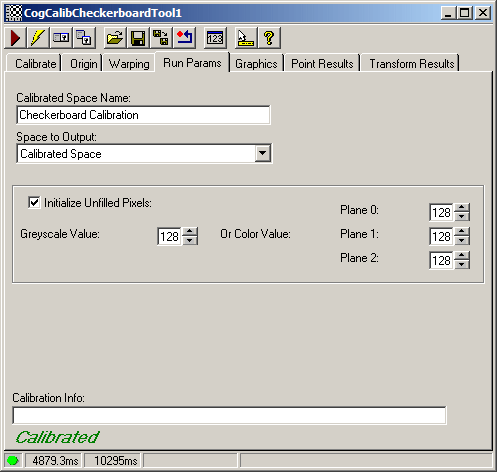
The Run Params tab contains the following parameters:
| Parameter | Description |
| CalibratedSpaceName | Choose a valid non-qualified name for the calibrated coordinate space that will be attached to the coordinate space tree of the output image. |
| SpaceToOutput | Choose whether the selected space of the output image will be a fully-qualified copy of the calibrated space name, or a fully-qualified copy of the uncalibrated space name. |
Select the value for unfilled pixels in the output image after the tool performs an image warping. If you leave the Initialize Unfilled Pixels: checkbox unchecked, unfilled pixels will not get initialized. For monochrome images, choose the Greyscale Value. For color images, choose a value for each color plane; RGB or HSI depending on your image type. Plane 0 for R or H, Plane 1 for G or S, and Plane 2 for B or I. |
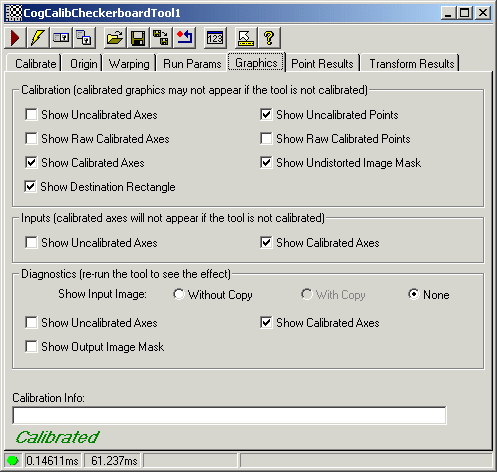
Use the Graphics tab to determine what graphics the tool will use. The following figure shows the default Graphics tab for a tool configured with a nonlinear calibration:
Use the Point Results tab to view all the vertex points found in the calibration plate. The following figure shows an example Point Results tab:
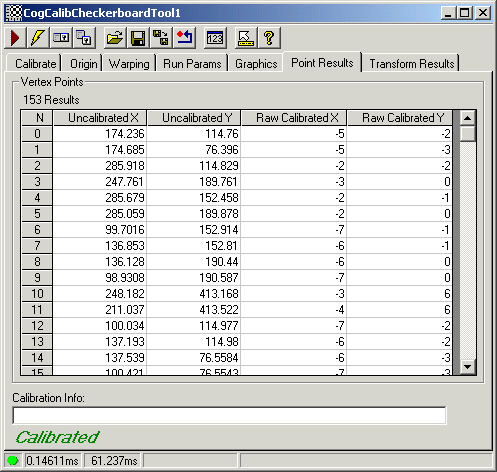
All fields in the Point Results tab are read only. The uncalibrated point results are reported in the selected space coordinates of the calibration image, while the raw calibrated point results are reported in the raw calibrated coordinate space.
Select any point result to highlight the point on the Current.CalibrationImage buffer (and on the Current.UndistortedCalibrationImage buffer is warping is in effect).
Use the Transform tab to view details of the 2D transformation as calculated by the tool. The following figure shows an example Transform Results tab:
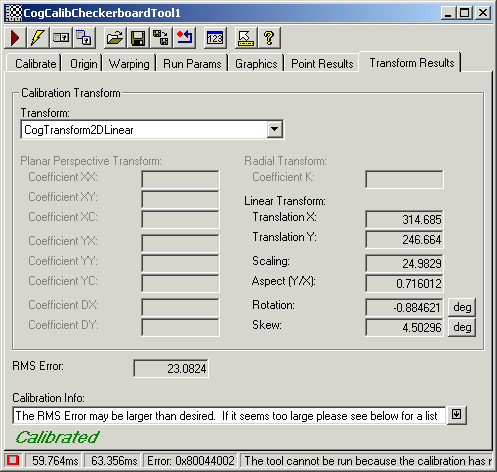
The Transform Results tab contains the following fields:
| Field | Description |
Transform list | The list displays one or more of the following transform types that the tool has calculated:
|
| Planar Perspective Transform | These values describe the planar perspective properties of the uncalibrated to raw calibrated transform. These fields are disabled if the computation method is Linear, ThreeParamRadialWarp, SineTanLawProjectionWarp or NoDistortionWarp. |
| Radial Transform | These values describe the radial distortion property of the uncalibrated to raw calibrated transform. These fields are disabled if the computation method is Linear, ThreeParamRadialWarp, SineTanLawProjectionWarp, or NoDistortionWarp. |
Linear Transform | These values vary depending on the type of 2D transformation the tool calculated, in the following ways:
|
| ComputedRMSError | This is the error between the uncalibrated points and the mapped raw calibrated points, expressed in uncalibrated space. In most cases, a large RMS error indicates that you have specified a linear transformation when the calibration image exhibits significant perspective or radial distortion. |