This topic contains the following sections.
- Configuring Discrete Input Lines
- Configuring Discrete Output Lines
- Using the Output Visual Indicator
- Initializing Line State
- Configuring Communication Properties
- Checking the Current Discrete I/O Configuration
- Adding Virtual Devices
- State Diagram
- Loading Saved Jobs that Use Discrete I/O
- The Application Wizard
Use the Communications Explorer to configure I/O signals to and from your QuickBuild application, as described in the topic Using the Communications Explorer. The Communications Explorer can be configured to send and receive the following types of I/O data:
Discrete I/O signals control your application from remote sources as well as generate the output signals necessary to transmit results and other data to discrete devices
See the topic Controlling Your QuickBuild Application With Discrete I/O for a description of the type of discrete I/O signals QuickBuild supports.
TCP/IP packets exchange application data and results with other applications running on the same or on remote machines.
See the topic Using TCP/IP to Exchange Application Data for more information on the TCP/IP capabilities of QuickBuild.
This topic describes how to use the Communications Explorer to configure discrete I/O signals. For details on configuring TCP/IP signals, see the topic Adding TCP/IP Ouptut to Your QuickBuild Application.
Perform the following steps to configure a discrete input line with the signal you want it to accept:
Open the Communications Explorer.
See the section on Starting the Communications Explorer for details.
- Select the frame grabber or general-purpose digital I/O board connected to the I/O hardware you want to use to configure a discrete input signal.
Select the desired input line:
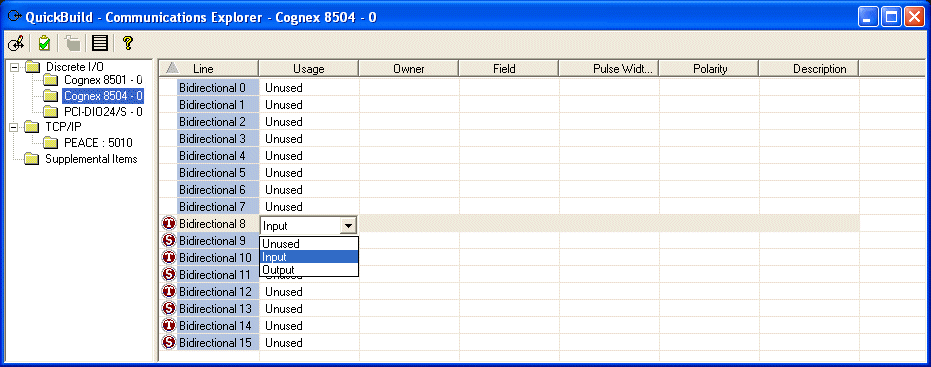
Select the Usage column and choose Input.
Note: Switching this box back to Unused at any time resets all the fields.
Select Owner and use the Owner Selection dialog box to choose between the entire QuickBuild application or individual Jobs the application contains:
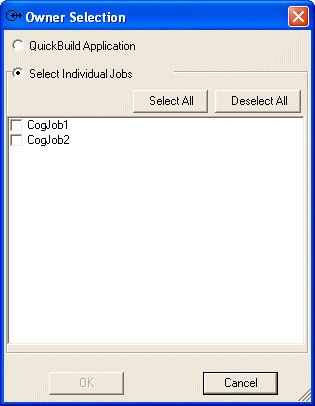
Choose Application when you want this input line to accept one of the following input signals:
- Online
- Emergency Stop
- Run Once (all Jobs)
- Run Continuous (all Jobs)
Choose one or more individual Jobs when you want this input line to accept one of the following signals:
- Run Once
- Run Continuous
- Select Field to choose the type of input signal this line will be used for.
- Select Polarity and specify whether the input signal arrives in an Active High or Active Low state.
- (optional) Select Description and enter a description of the input signal.
Perform the following steps to configure a discrete output line with the signal you want your QuickBuild application to send:
Open the Communications Explorer.
See the topic Using the Communications Explorer for details on how to start Communications Explorer.
- Select the frame grabber or general-purpose digital I/O board connected to the I/O hardware you want to use to configure a discrete output signal.
Select the desired output line:
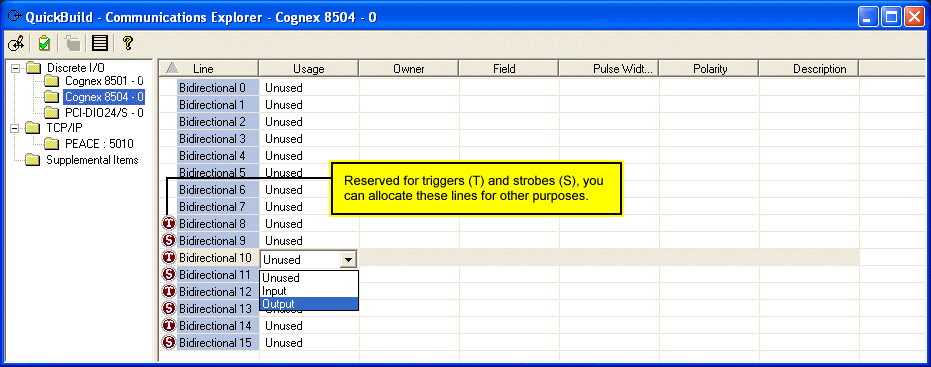
Select Usage and choose Output.
Note: Switching this box back to Unused at any time resets all the fields.
Select Owner and select the entire QuickBuild application or one of the Jobs it contains:
Choose QuickBuild Application when you want this output line to send one of the following signals:
- System Heartbeat
- Application Running
Choose an individual Job in the application when you want this output line to send one of the following signals:
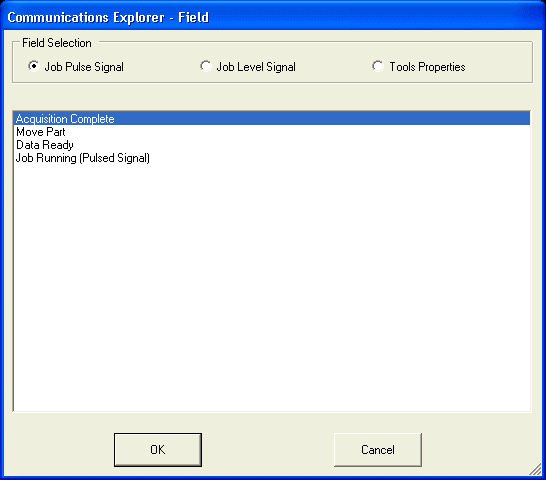
- A Job Pulse signal: Acquisition Complete, Move Part, Data Ready, or Job Running
- A level Job Running signal
- A tool property
If you choose QuickBuild Application for the Owner field, select Field and choose from either Heartbeat or Application Running.
Otherwise, select Field and use the following interface to choose the type of Job signal you want to send:
If you are using this output line to send a tool property, the dialog box displays only the tool properties that can be represented with a discrete output signal, as shown in the following figure:
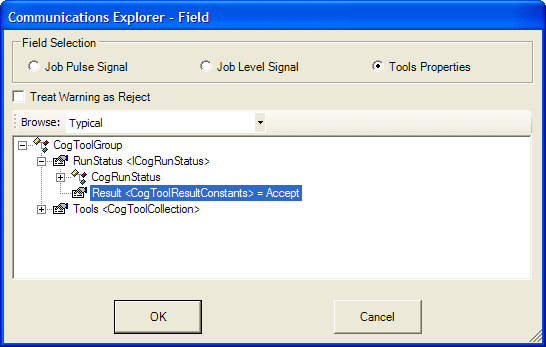
The dialog exposes the underlying structure of the tool properties, which can be fairly complex. To reduce this complexity the dialog provides three structure levels:
- Typical: The default displays only the most often used properties.
- Enhanced: Display more properties.
- All: Display the entire structure of each tool in the application.
Note: If you configure an output line to transmit the status of a tool property then you must configure a different line to transmit a Data Ready signal.
- If you are using this output line to send a System Heartbeat or one of the Job pulse signals, select Pulse Width and specify the length of the signal when asserted, in milliseconds.
Select Polarity and specify the line polarity of this output signal.
See the section on Line Polarity for more information.
- (optional) Select Description and enter a description of the input signal.
The Communications Explorer includes a visual indicator, highlighted in the following figure, that you can use to verify output signals are being sent from your QuickBuild application:

With the indicator enabled, the Communications Explorer includes a green indicator to confirm that output signals are being sent, as shown in the following figure:

The indicator increments by one for each discrete output signal sent. Be aware, however, that the visual indicator is not guaranteed to match the physical output signal activity, and the meter can increment more than once per inspection to indicate acquisition complete signals, move part signals, and so on. In general, Cognex does not recommend counting the number of increments in the indicator as an indication of discrete I/O signals sent to any particular device.
Some signals require the discrete I/O line switch from a Low to High or High to Low state, while others assert themselves in an Active High or Active Low state.
Depending on your production environment you might need to initialize all the discrete output lines to their non-asserted state. For example, if you configure a discrete output line to carry a Job Busy signal in an active High state, you might want the signal to exist in an active Low state as you start your QuickBuild application. To initialize all output lines to their non-asserted state, click the Update Active Line Polarity button, highlighted in the following figure:

Click the communications properties button, highlighted in the following figure, to configure how the QuickBuild application responds to I/O errors and control the size of the I/O queue:

Use the Discrete tab of the dialog box to configure communication properties:
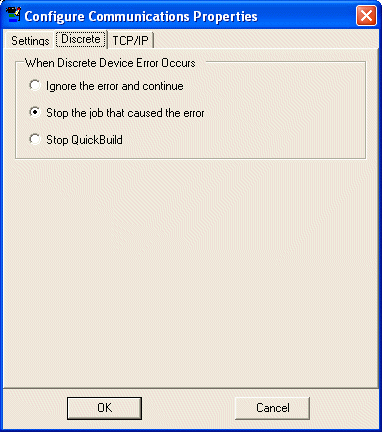
You can configure QuickBuild to ignore all I/O errors, stop the Job that caused the error while letting other Jobs continue, or stop all Jobs in the QuickBuild application.
The Communications Explorer provides the ability to check the current configuration of configured I/O signals against the hardware currently installed in your PC. This feature can be useful when you move a QuickBuild application from one development environment to another, to ensure that the new environment supports the same physical I/O characteristics as the previous one. This feature can also be helpful when you want to load a saved Job into an existing QuickBuild application where multiple Jobs support discrete I/O, to ensure that different Jobs are not competing for the same discrete output lines.
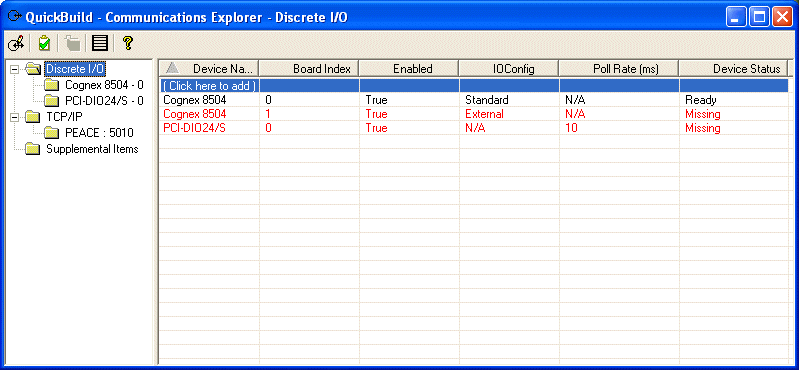
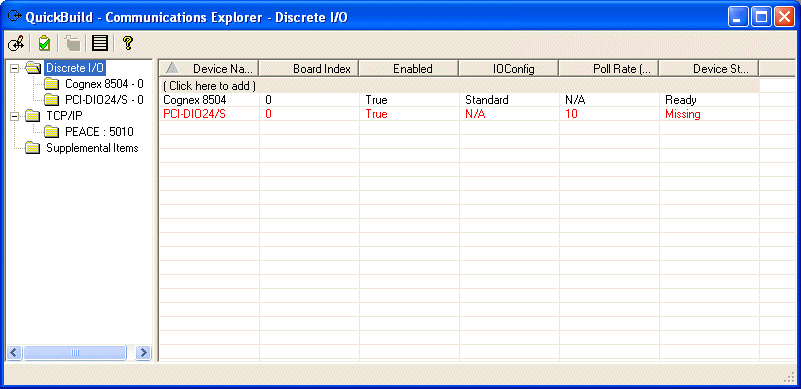
By default, the Communications Explorer will indicate any missing hardware automatically each time you launch it. For example, the following figure shows the Communications Explorer configured to use hardware that the current PC does not have installed:
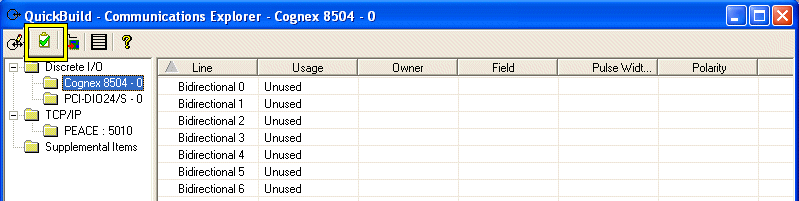
To match the current set of discrete I/O signals to the frame grabbers in your PC, select a particular device and click the Configuration Checking button:
The Communications Explorer displays any missing hardware as shown:
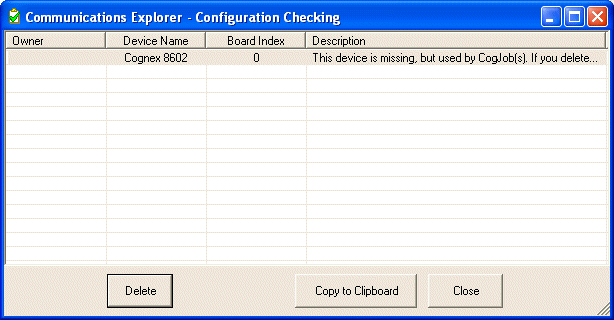
You can copy the message to the Windows clipboard for later processing, or click Delete, which changes the Usage box for that entry to Unused.
Note: The Configuration Checking window will not list missing hardware components if those components were never configured to send any discrete output signals.
The Configuration Checking feature can also indicate when two Jobs have been configured to use the same output lines, which can happen when you load a saved Job with existing I/O configuration into your current QuickBuild application. For example, the following figure shows how two Jobs have both been configured to use output line 4:
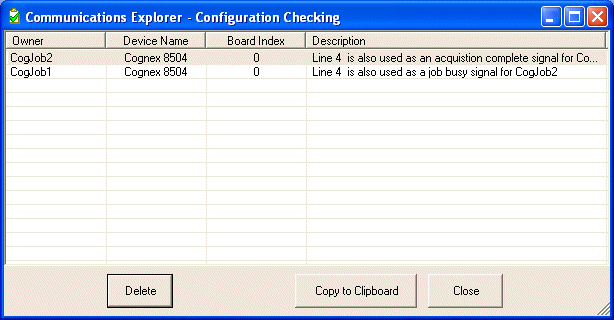
QuickBuild will alert you to any conflicts in the discrete output lines when you run your application.
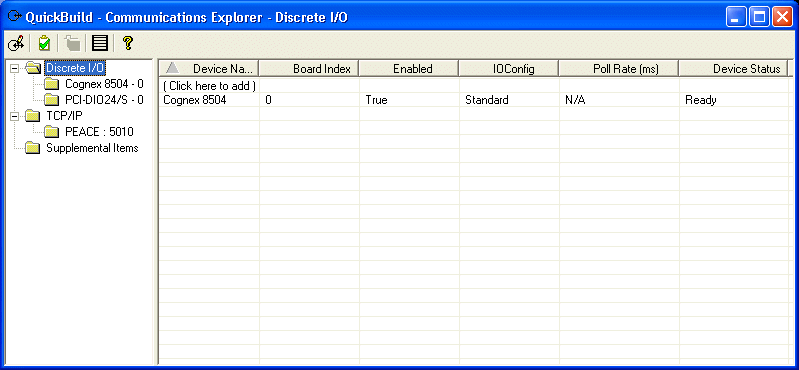
The Communications Explorer allows you to add devices to the list of hardware you can use to configure Discrete I/O signals. This allows you to define a set of communication signals for a PC containing different hardware than the PC you are using to create the application. This can be useful in cases where you want to develop your application on a PC that will be used to simulate the hardware in a deployed application.
To add a virtual device to the Communications Explorer, perform the following steps:
Select the Discrete I/O folder and display the current list of I/O hardware Communications Explorer can use:
Click (Click here to add) and select a device from the list, as shown:
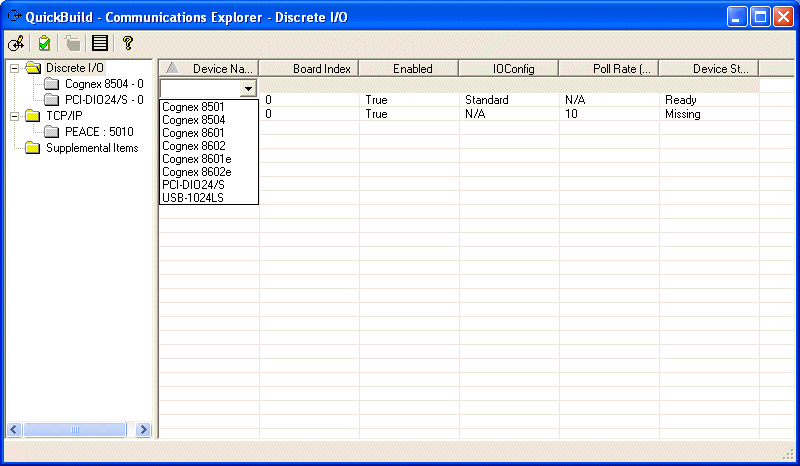
If the PC you are currently using does not contain the device, the Communications Explorer indicates the device is missing, as shown:
The following table describes the state of I/O lines at various times as you use your QuickBuild application.
| State | Cognex Frame Grabber I/O Lines |
| After loading a QuickBuild VPP file | Disables all physical I/O lines that are enabled by the previous QuickBuild application before loading a new QuickBuild application. All physical I/O lines stay as disabled after loading a new QuickBuild application. |
| After setting up I/O line | Maintain the previous state unless a Job(s) is run at least once or the Update Active Line Polarity button is pressed. In this case, the line state changes as its polarity changes. |
During initialization of the first run or pressing the Update Active Line Polarity button for the first time. | Initialize active I/O lines to the current polarity. Only those lines that are used will be affected. Inactive I/O line state does not change. |
| Subsequent runs | Polarity of an active output line changes based on its Field output. |
| Pressing the Update Active Line Polarity button for the second time and beyond. | The current polarity is applied to the enabled lines. |
Note: All physical I/O lines will be disabled when the user shuts down the QuickBuild application or if the application receives an Emergency Stop signal.
If you load an existing Job, and the Job contains conflicting settings for an already configured I/O line, the Configuration Checker will ask you whether or not to replace the existing configurations with the new ones. Be aware that the Pulse Width, Polarity, and Description fields are not part of a Job settings but are overall settings for the QuickBuild application; these fields are not changed when you load an existing Job.
For example, Job1 in QuickBuild uses the following parameters:
- Line: Bidirectional 0
- Usage: Output
- Owner: CogJob1
- Field: Acquisition Complete
- Pulse Width: 50
- Polarity: High to Low
- Description: Acq Complete Signal
The Pulse Width (50), Polarity (High to Low), and Description (Acq Complete Signal) are cached by the QuickBuild application.
Next, load an existing Job2 that uses the same line with the following parameters:
- Line: Bidirectional 0
- Usage: Output
- Owner: CogJob2
- Field: Move Part
- Pulse Width: 100
- Polarity: Low to High
- Description: Move the Widget
The configuration checking feature of Communication Explorer lets you know the lines conflict because they employ the same output line. If you remove the conflicting line of Job1, then the output line of Job2 will remain and no longer conflict. Since QuickBuild cached the Pulse Width (50), Polarity (High to Low), and Description (Acq Complete Signal) of Job1, however, these values will now be associated with Job2. You will notice that the fields for Job will change to reflect this caching.
The Application Wizard preserves any discrete I/O settings you configure and transfers them to the generated application it generates. See the topic Using the VisionPro Application Wizard for more information.