This topic contains the following sections.
The Bilinear Interpolation option for Sampling Mode has been deprecated in favor of Bilinear Accurate Interpolation. Cognex recommends you use the Bilinear Accurate Interpolation option for new and existing applications. Be aware that the Bilinear Interpolation option will be removed in a future VisionPro release.
The Affine Transform edit control provides a graphical user interface to the CogAffineTransformTool vision tool, which transforms the area of an image contained within a CogRectangleAffine object and generates a new rectangular output image. The tool removes the effect of any rotation and skew present in the dimensions of the affine rectangle, and allows you to specify an additional scaling factor if you want to reduce or enlarge those features the rectangle contains. In addition, you can have the Affine Transform tool generate an optional output image mask.
The Affine Transform tool can accept 16-bit encoded images, allowing you to accept images with a bit depth of 8-bits, 10-bits, 12-bit, 14-bits and 16-bits.
Note: The output image's coordinate space tree is adjusted to preserve the relationship between root space and image features.
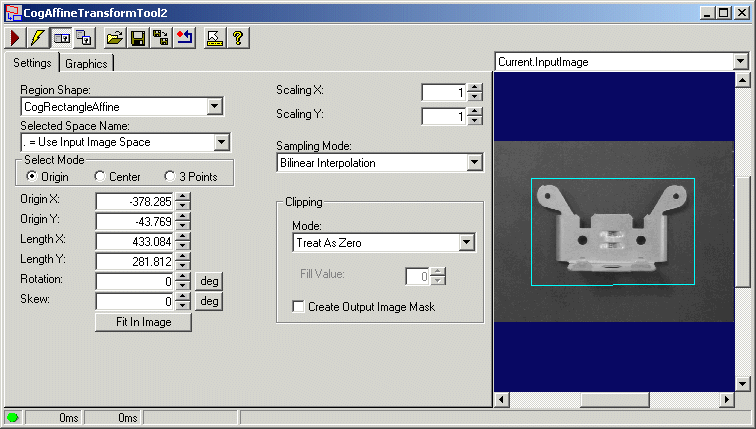
The Affine Transform edit control allows you to define the affine rectangle, specify an optional scaling factor, determine how the tool handles clipping, and view vision tool results. The following figure shows the Affine Transform edit control:
The edit control offers the following features:
- A row of control buttons at the top left
- Two function tabs for setting run-time parameters and determining which image buffers the tool will generate.
- An image display window for displaying Affine Transform tool images and graphics
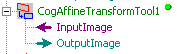
You can experiment with the edit control by using QuickBuild to create a CogAffineTransform tool. A new CogAffineTransform tool appears with the input terminals for two input points, as shown in the following figure:
To include the edit control in your custom vision application, you must first add it to your Visual Studio.NET development environment. See the topic Adding Edit Controls to Visual Studio for more information.

The following table describes the function of each button:
| Button | Description | Function |
 | Run | Generate an output image, along with an optional image mask, based on the current configuration parameters. |
 | Electric mode | Toggle electric mode, where the Affine Transform tool executes automatically when particular configuration parameters change. In electric mode, a lightning bolt appears next to every electric property. |
 | Local image display | Open or close the local image display window. An Affine Transform tool supports the following image buffers:
|
 | Floating image display | Open a floating image window, which supports the same image buffers as the local image display window. |
 | Open | Open a VisionPro persistence (.vpp) file that contains a set of saved properties for this vision tool object type. VisionPro reports an error if you try to open a .vpp file for another object type. |
 | Save | Save the current properties of the vision tool to a VisionPro persistence (.vpp) file. The edit control allows you to choose between saving the vision tool with or without its image buffers and tool results. |
 | Save As | Save the current properties of the vision tool to a new VisionPro persistence (.vpp) file. |
 | Reset | Reset the vision tool to its default state. This tool gives you a choice between resetting to the default-constructed state, which is appropriate when you are using it in a Visual Studio.NET application, and its template-initialized state, which is appropriate for QuickBuild applications. |
 | Show ToolTips | Enable or disable the display of tooltips for individual items in the edit control. |
 | Help | Open this VisionPro online help file. |
Use the Settings tab to specify a scaling factor, choose a sampling mode, and determine how the tool handles clipping. The following figure shows the default Settings tab:
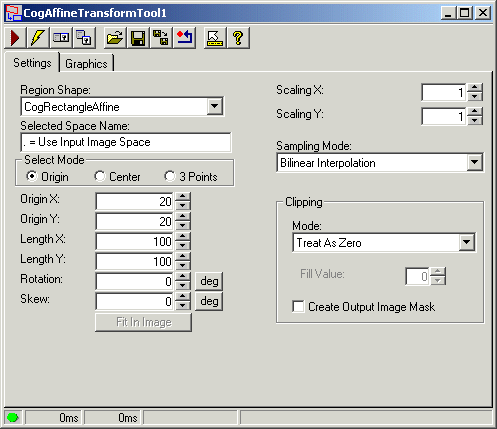
The following table describes the options in the Settings tab:
| Button | Description |
| Region | Determine whether the tool uses an affine rectangle or the entire input image. By default, the Affine Transform tool uses an affine rectangle to define the area of the input image you are interested in. You can, however, choose to use the whole input image. Since the input image is rectangular, the output image will contain exactly the same image information. Applications that use the Affine Transform tool on the whole input image typically use it to reduce or enlarge the scale of the image. For example, reducing the scale of an image can allow other vision tools to operate faster on the reduced image, although reducing the size can result in less accuracy. |
| SelectedSpaceName | The coordinate space in which the affine rectangle is interpreted. For more information, see the topic Coordinate Space Names. |
| Select Mode | Define a set of parameters that define the affine rectangle. Angles of rotation and skew can be specified in degrees or radians, although the underlying tool keeps the measurements in radians |
| FitToImage | Center the affine rectangle within Current.InputImage. |
| ScalingX and ScalingY | Set the scaling factor in the along the directions of the (x, y) axes. Use the same scaling factor for both to generate uniform scaling. Use a higher value for Scaling X if you want to stretch the image horizontally, or use a higher value for Scaling Y if you want to stretch the image vertically. |
| SamplingMode | Specify the sampling mode used when performing the affine transform operation. By default, the tool uses the bilinear interpolation accurate method. |
Specify what to do if any portion of the affine region lies outside the input image. Choose one of the following: Treat As Zero: Treat clipped pixels from the input image as having a value of 0. The resulting pixels in the output image will have a value of 0 except along the edge where clipping occurred, where they will vary between 0 and the value of the neighboring input pixels that were not clipped. This is the fastest clipping mode but results in the output image having a faint edge along the clipped boundary. Fill With Constant: Fill an output pixel with the grey value you specify in the Fill Value box if any of the input image pixels used to calculate the value of an output pixel have been clipped. This clipping mode requires more time but ensures that every pixel in the output image is either computed entirely from unclipped pixels or filled with the specified constant grey value. Generate Error: Generate an error message if any pixels are clipped. | |
| ClipFillValue | Choose a grey value to fill clipped pixels when you use a clipping mode of Fill With Constant. |
Have the tool generate an optional image mask for use with another vision tool that will analyze the output image generated by this Affine Transform tool. To use the image mask in QuickBuild, you must enable the output terminal for OutputImageMask. |
Use the Graphics tab to control which graphics the Affine Transform tool generates and displays. The following figure shows the Graphics tab:
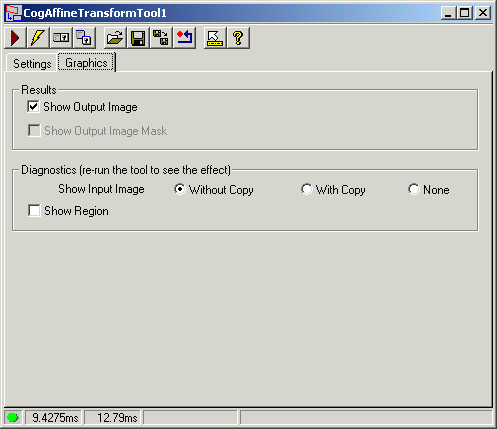

Enable either of the following options:
| Option | Description |
| Show Output Image | You can choose not to generate an image record for the LastRun.OutputImage. |
| Show Output Image Mask | You can choose not to generate an image record for the LastRun.OutputImageMask. This option is available only if you have the Create Output Image Mask option selected on the Settings tab. |

Enable any of the following options:
| Option | Description |
| Show Input Image | Determine whether or not the input image is recorded as part of the diagnostic record, and whether the image is copied to the record or saved in the record as a reference. |
| Show Region | Enable a graphic representing the affine rectangle. |