Configure the HMI
In the previous section, you have configured a new inspection in your Task to calculate the cumulative blob count in the acquired images. In this procedure, you will be configuring the vision project's local Human Machine Interface (HMI) to properly showcase the results of said blob inspection during testing. As part of this, you will learn the following:
- How to use tags to bind specific fields on an HMI (Human Machine Interface).
- How to add an additional field that displays the total number of blobs (defects) your application finds.
- How to create a HMI checkbox object to clear the Process Image for Defects with CogBlobTool.
When you create a new project with Creating a New Project with Project Types (as we do in this tutorial), Cognex Designer automatically creates two pre-configured HMI pages for the project:
- A local HMI page, available in the Pages node of the Project Explorer. This web page is used for testing purposes, and is available only locally (that is, it cannot be published during project deployment). Since this Getting Started tutorial is based off a pre-configured Single Camera project type, you should already have two local HMI pages in your Pages node: Settings and SingleCamera.
- A WebPage HMI,available in the Web Pages node of the Project Explorer. This web page is published when the project is deployed, and can be displayed in an Internet Web Browser (Internet Explorer and Google Chrome) as an HTML5 page, or in the deployed mode tab of the vision application.
This saves you time, as predefined project types create many basic HMI objects for you such as buttons, titles, and checkboxes. In addition, a project created from a Project Type already contains scripts such as Task.OnComplete (the script within the predefined task block CalculateResult), which tallies the number of images your application processes per task execution.
This topic of the Getting Started series describes how to modify the local HMI page so that the changes made earlier can be tested in Test Mode.
How Tags are Bound to Fields on an HMI
Before you add a new field to the HMI, take some time to examine how HMI fields are bound via Tags, and how you can use the Properties Pane and the Expression Builder to explore these fields, their relationships, and their values.
HMIs, either in a GUI or on a Web Server, are updated dynamically as your Cognex Designer project processes tasks. You can check this with the local HMI page as follows:
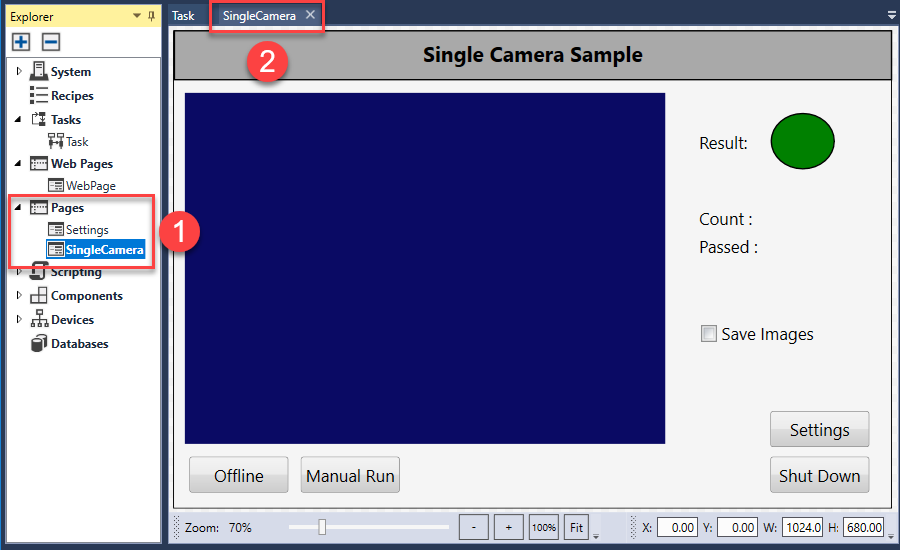
- Select the Task window, and click the
 button to run your application again.
 - In the Project Explorer, double-click Pages > SingleCamera (1). The SingleCamera HMI page then opens in a new tab (2).
- Bring forward the Toolbox with the View > Toolbox option, if it is not visible in the Cognex Designer GUI.
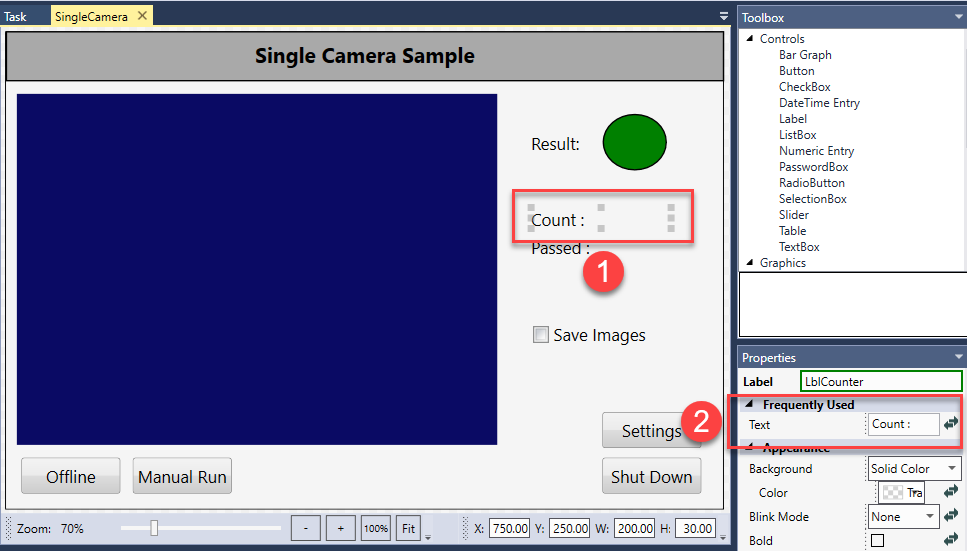
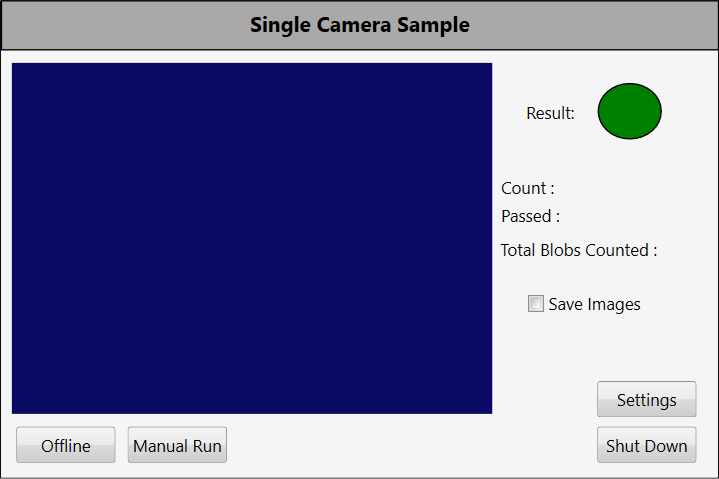
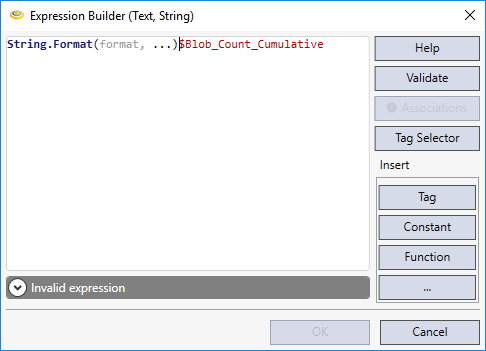
- On the HMI, select the field Count : (1). Notice that the Properties pane in the lower-right side of the Cognex Designer interface populates with information about the selected field. For example, the Count : label on the HMI is defined by the Text field in the Properties pane (2).
- Click the
 (Expression Builder) button next to the Frequently Used > Text field to open the Expression Builder. This dialog is used to bind tags to HMI objects, such as HMI labels.
 - As you can see from the Expression Builder, the tag $TotalInspections has been bound to the label Count: and the Result of the expression is a String (a label with a string value of Count : {0}). In a similar way, you will use the Expression Builder to bind a new label (Total Blobs Counted), to the tag you created earlier (Blob_Count_Cumulative), the value of which is calculated by the Script Block CalculateCumulativeBlobs.
- Click OK to close the Expression Builder.
Adding a New Field To an HMI
Add a Total Blobs Counted field to your local HMI with the following steps:
- Make sure that the Page of the project is still open. If it is not, see the previous procedure on how to open it.
-
Select Controls > Label from the Toolbox pane. Drag the Label to where you want it to appear on the HMI. In this example, we are placing it below the Passed : label.
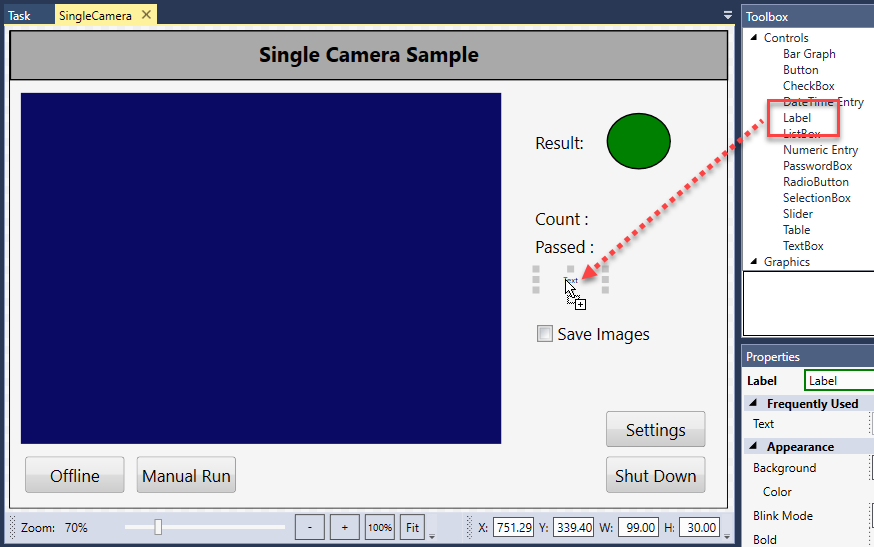
- With the label still selected, edit the Properties pane as follows:
- In the field Frequently Used > Text, replace the default value Text with Total Blobs Counted :.
- With the Appearance > Font Size property, increase the Font Size to the same as the other Labels (this should be 24). Click the other Labels and check their Font Size property to ensure that the values match.
- Resize the text box if needed by selecting and dragging the text box edges. You can also select and drag the text box(es) to another part of the HMI. Move and resize the text box(es) until the HMI looks similar to the below example.
 Tip: Ensure that you expand the text box enough to display a three-digit figure. This may involve slightly realigning the text box with the other text box labels.
 - Make sure that the Total Blobs Counted : textbox is still selected, and then click the (Expression Builder) button next to the Frequently Used > Text field to open the Expression Builder.
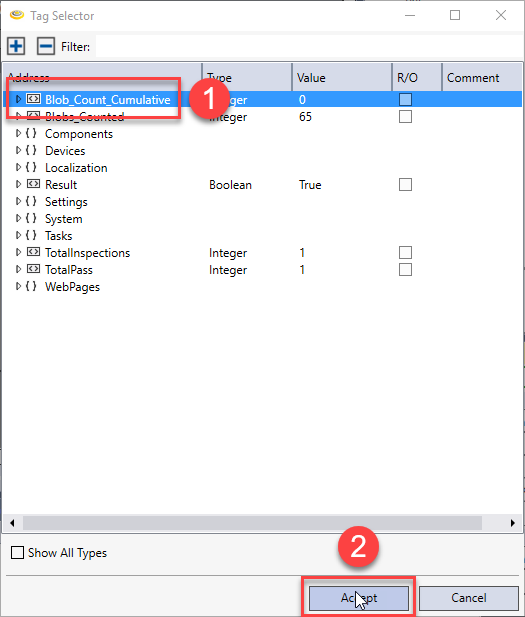
- Click the Tag Selector button in the Expression Builder. The Tag Selector dialog appears.
-
In the Tag Selector dialog box, select the Blob_Count_Cumulative tag (1), and then click Accept (2).
-
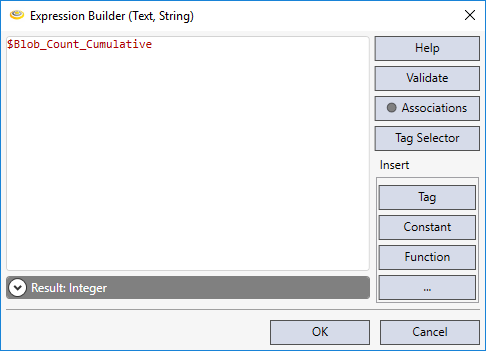
Click Accept. The $Blob_Count_Cumulative tag appears in the Expression Builder as seen below.
-
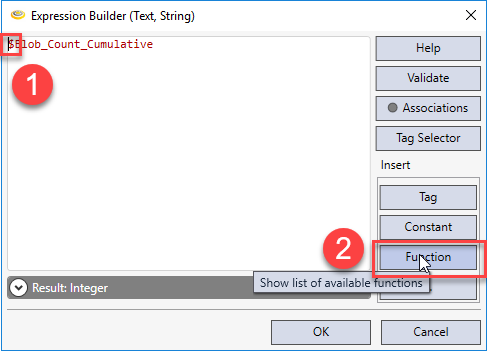
Position your cursor before the dollar sign ($) (1). Then, click the Function button in the Insert area of the Expression Builder dialog (2).
-
The list of available functions appears. Scroll down until you see Function String.Format(...). Double-click String.Format(...) to add the function to the Expression Builder.
-
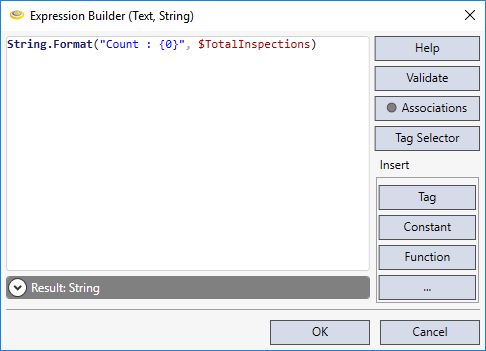
Modify the expression in the Expression Builder to read as follows:
String.Format("Total Blobs Counted : {0}", $Blob_Count_Cumulative)This expression indicates that the value linked to tag $Blob_Count_Cumulative is displayed on the HMI as a string literal ("Total Blobs Counted :" with a placeholder for an integer, represented by Blob_Count_Cumulative. The default value of Blob_Count_Cumulative has been set to {0}. Your expression should be identical to the expression shown below.
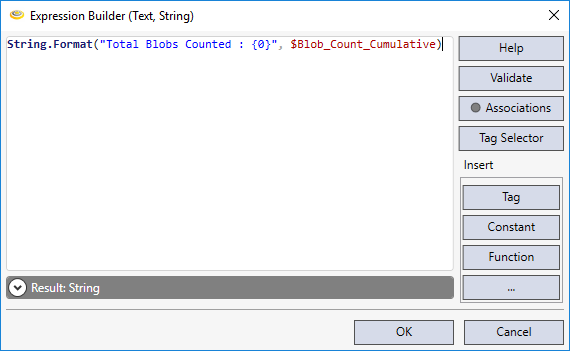 Note: Remember to use the curly braces, quotes, commas, and parenthesis as shown above. Double-check the case of the tags you are referencing for consistency.
 - Click the Validate button to validate the expression you entered, to ensure it will execute successfully when your application is executed. You should receive the message Expression validated successfully. If not, correct the expression before continuing. The Expression Builder will re-evaluate the expression as you modify it and display any errors it finds. Click OK to apply the changes and close the Expression Builder once you are done.
- Finally, to display the cumulative blob count on your HMI, you need to tell Cognex Designer that the task block CogBlobInspect must pass its tagged output Results_GetBlobs_Count as an input to the Script Block CalculateCumulativeBlobs. Configure this as follows:
- Click the Task tab to open the Task Editor again.
Left-click the output pin of the CogBlobInspect block (1), and while holding the left mouse button, drag a connection from the output pin of the CogBlobInspect block to the input pin of the CalculateCumulativeBlobs script block (2), as shown below.
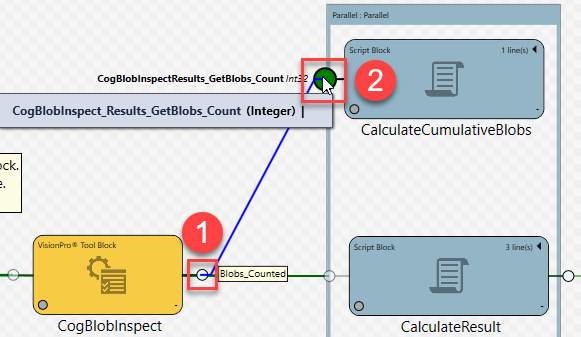
This step illustrates two important Cognex Designer concepts:
- Firstly, the fact that you pass data between blocks either by tagging explicitly (by creating a Tag in the Tag Manager) or by tagging implicitly (drawing a graphical connector between Task Blocks). For instance, if you had not connected the pins in this step, Cognex Designer could not have obtained the results of the blob count (Results_GetBlobs_Count) to calculate the cumulative number of blobs (Blob_Count_Cumulative).
- An application can only be termed "complete" when you run the entire sequence from the Task window in Test Mode (by clicking Project > Run). In other words, unless all proper connections and definitions are made in the Task window, your application can not be properly modeled in test mode or deployed to a production environment.
Adding a CheckBox Object to the HMI
Since we have added a cumulative blob counter, it makes sense to add a control that allows us to reset that counter whenever we want.
Though there are many ways to accomplish this in Cognex Designer, we use a Checkbox web page control element in this example.
- Select the SingleCamera tab to open the local HMI, if it is not already open.
- In the Toolbox pane, select Controls > Checkbox, and drag a Checkbox into the HMI, positioning it between the Manual Run and Shut Down buttons, as seen below.
-
Drag Checkbox into the HMI, positioning it between the buttons Manual Run and Shut Down, as in the graphic below.
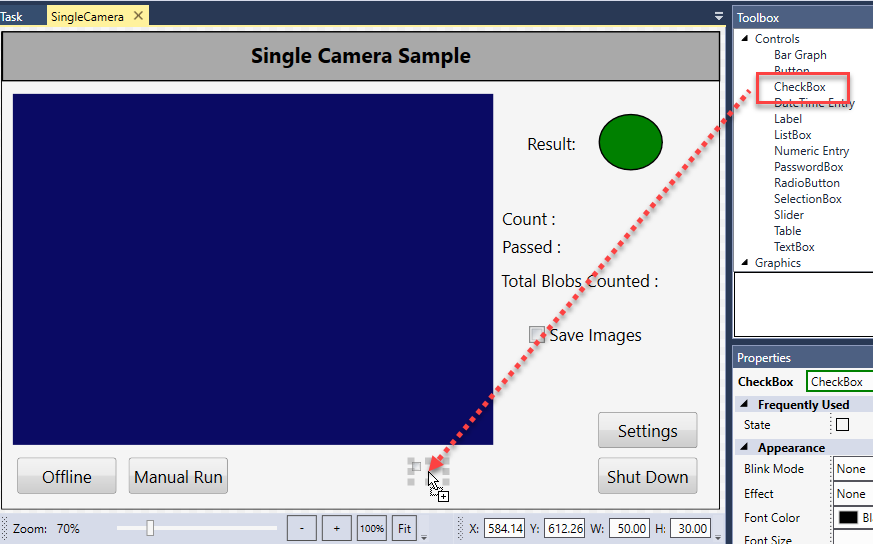
- Update the label text of the CheckBox through its Appearance > Text property in the Properties window. Change the default Checkbox label text to Reset Cumulative Blob Count.
- As you did earlier when you added the label Total Blobs Counted : to the Web HMI, re-size, move, and change the fonts as needed to adjust the appearance of the new label. The web page then should look similar to the below example:
- On the HMI, select the CheckBox you added if it is not already selected.
- Click the
 (Edit Action) button in the Events > On Checked row. This opens a new Script Editor window (CheckBox.Checked) allowing you to develop an action specific to checking the CheckBox.
 -
Select the Blob_Count_Cumulative tag in the Toolbox (1), and drag it into the Script Editor window (2).
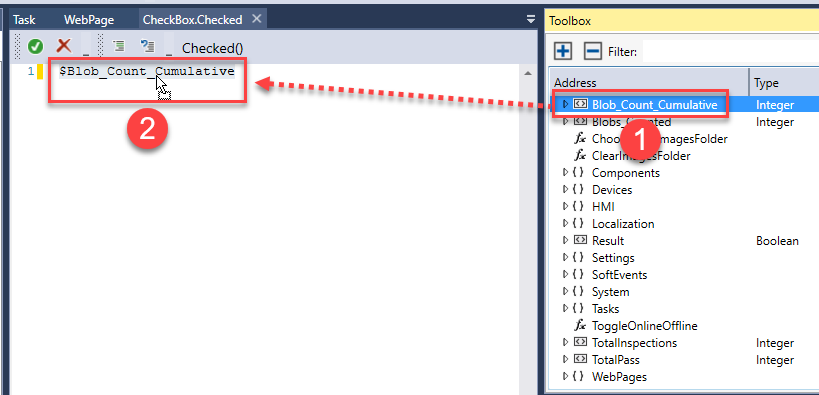
-
Modify the line of code to the following:
$Blob_Count_Cumulative = 0;
This is a simple C# initialization to zero.
- Click the
 (Check Script) button to validate the script. Fix any errors, if needed. Once you are done, close the CheckBox.Checked tab and return to the HMI Web Page tab.
 -
Select the title Single Camera Sample on your HMI. Then, in the Properties pane, use the Frequently Used > Text field to rename the title to a more appropriate title, such as Blob Defect Checker.
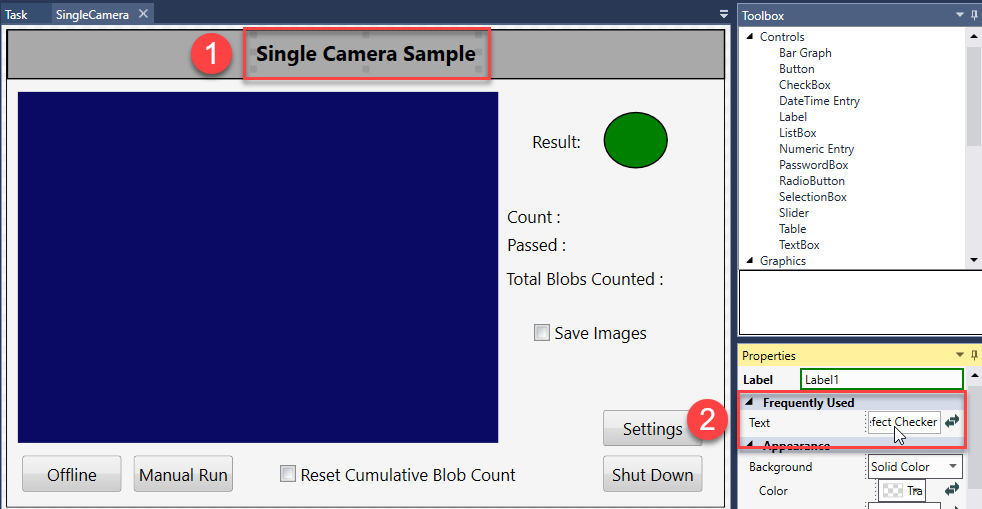
Once you are done, the HMI should look similar to the below example.


With this, you have finished customizing the Web HMI of the project. In the next topic, you will test both the HMI and your new application to ensure it performs as you expect.