This topic contains the following sections.
The Find Corner edit control provides a graphical user interface to the CogFindCornerTool vision tool, which runs a series of Caliper tools over two specified regions of an image to locate two sets of edge points, supplies the two sets of edge points to an underlying Fit Line tool. The CogFindCornerTool ultimately returns the two lines that best fit those input points and the corner defined by those lines, while generating the smallest root mean square (RMSError) error.
The Find Corner edit control allows you to specify the regions of the image analyzed, control the number of Calipers used, and view vision tool results. The following figure shows the Find Corner edit control:

The edit control offers the following features:
- A row of control buttons at the top left
- A set of function tabs for specifying a number of Calipers for each of the two line segments, the length of the search areas, and viewing the fitting results
- An image display window for displaying Find Corner tool images and graphics
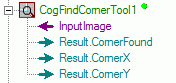
You can experiment with the edit control by using QuickBuild to create a CogFindCorner tool. A new CogFindCorner tool appears as shown in the following figure:

The following table describes the function of each button:
| Button | Description | Function |
 | Run | Uses the current set of configured Calipers to analyze the image stored in the Current.InputImage buffer to produce a set of input points that are then passed to a Fit Line tool. |
 | Electric mode | Toggles electric mode, where the Find Corner tool executes automatically when particular configuration parameters change. In electric mode, a lightning bolt appears next to every electric property. |
 | Local image display | Opens or closes the local image display window. A Find Corner tool supports the following image buffers:
|
 | Floating image display | Opens one or more floating image windows, which support the same image buffers as the local image display window |
 | Open | Opens a VisionPro persistence (.vpp) file that contains a set of saved properties for this vision tool object type. VisionPro reports an error if you try to open a .vpp file for another object type. |
 | Save | Saves the current properties of the vision tool to a VisionPro persistence (.vpp) file. The edit control allows you to choose between saving the vision tool with or without its image buffers and tool results. |
 | Save As | Saves the current properties of the vision tool to a new VisionPro persistence (.vpp) file |
 | Reset | Resets the vision tool to its default state. |
 | Show Floating Results | Opens a separate results window with the same contents as seen in the Points Results tab |
 | Show ToolTips | Enables or disables the display of tooltips for individual items in the edit control |
 | Help | Opens this VisionPro online help file |
Use the Settings tab to configure the expected line segments this Find Corner tool will use. The following figure shows the default Settings tab:
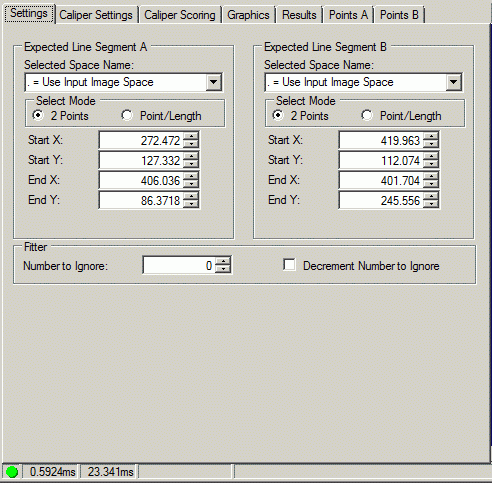
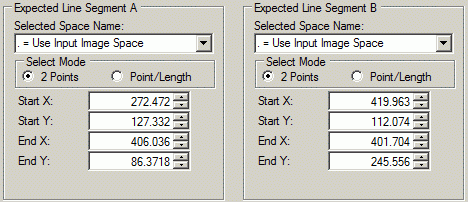
Use the Expected Line Segment A and Expected Line Segment B areas of the Settings tab to shape the line segments on which the Calipers operate.
| Feature | Description |
| SelectedSpaceName | Names the coordinate space for the input image. |
| Select Mode | Determines whether the expected line segment is determined by the 2 Points method (two [x, y] coordinates) or by the Point/Length method (a starting [x, y] coordinate followed by a line length and a measure of rotation). |
| StartX and StartY | Names the starting (x, y) coordinate of the expected line segment |
| EndX and EndY | Names the ending (x, y) coordinate of the expected line segment when using the 2 Points method. |
| Length and Rotation | Controls the length and angle of rotation of the expected line segment when using the Point/Length method. |

Use the Fitter section of the Settings tab to configure the number of points to ignore.
| Feature | Description |
| NumToIgnore | Controls the number of edge points the underlying Fit Line tool can ignore while calculating each of the two best fitting lines. To determine which point to ignore, the Fit Line tool considers all possible subsets and keeps the set that produces the best score. |
| DecrementNumToIgnore | Allows the Find Corner tool to decrement the number of points to ignore for each Caliper that fails to produce a valid edge point. This feature protects an application where Caliper failures can leave the Fit Line tool with fewer than two input points. Cognex recommends you enable this option if you allow the tool to ignore any input points. |
Use the Caliper Settings tab to shape all the Calipers the Find Corner tool uses to locate edges or edge points and to configure how the Calipers perform their image analysis. The following figure shows the default Caliper Settings tab:
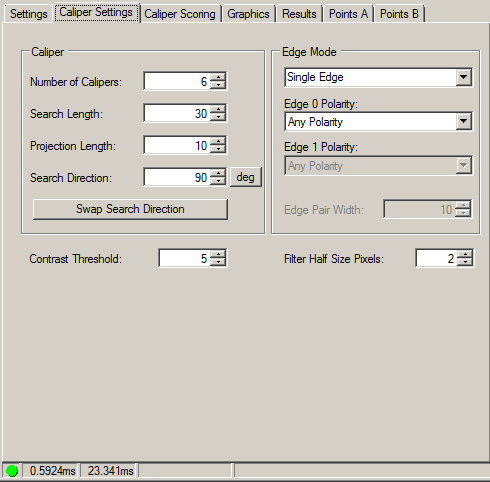

Use the Caliper section of the Caliper Settings tab to shape all the Calipers the Find Corner tool uses to locate edges or edge points.
| Feature | Description |
| NumCalipers | Controls the number of Calipers to use along the two line segments. The tool requires a minimum of two Calipers per line segment, although using more allows the tool to generate a better fit. In addition, you should use more than two Calipers if you allow the underlying Fit Line tool to ignore one or more points while calculating the best fitting line. To determine which point to ignore, the Fit Line tool considers all possible subsets and keeps the set that produces the best possible score. |
| CaliperSearchLength | Controls the amount of image perpendicular to the expected line segment that each Caliper takes into consideration. You can use the Find Corner graphics to specify a general search length or use this field to enter a precise value. |
| CaliperProjectionLength | Controls the amount of image parallel to the expected line segment that each Caliper takes into consideration. You can use the Find Corner graphics to specify a general projection length or use this field to enter a precise value. You should not specify a projection length that causes the individual Caliper tools to overlap or the tool might produce unexpected results. |
Controls the direction in which each Caliper searches for edges or edge pairs. By default, the search direction is +90 degrees as measured from the expected line segment. To avoid including extraneous edges or other image features inside a Caliper, you can adjust the skew of the Calipers by specifying a different value for the search direction. You can use the Find Corner graphics to modify the direction or use this field to enter a precise value. | |
| Swap Search Direction | Reverses the search direction by subtracting 180 degrees, or adding 180 degrees if the search direction is already a negative value. |
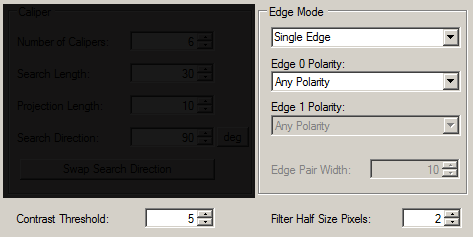
Use the Edge Mode section and the fields underneath of the Caliper Settings tab to configure how the Calipers perform their image analysis.
| Feature | Description |
| EdgeMode | Controls whether the Calipers search for a single edge or an edge pair. |
| Edge0Polarity | Determines the polarity of the edge, or the first edge in an edge pair, that each Caliper searches for. |
| Edge1Polarity | Available only in Edge Pair mode, this determines the polarity of the second edge. |
| Width | Dictates the minimum distance between edges when using Edge Pair mode. |
| ContrastThreshold | Specifies the minimum contrast required for an edge to be considered during the scoring phase of the Caliper operation. |
| FilterHalfSizeInPixels | Specifies the half-width of the filter. |
Use the Caliper Scoring tab to create a collection of scoring functions for the Calipers to use. The following figure shows the default Caliper Scoring tab:
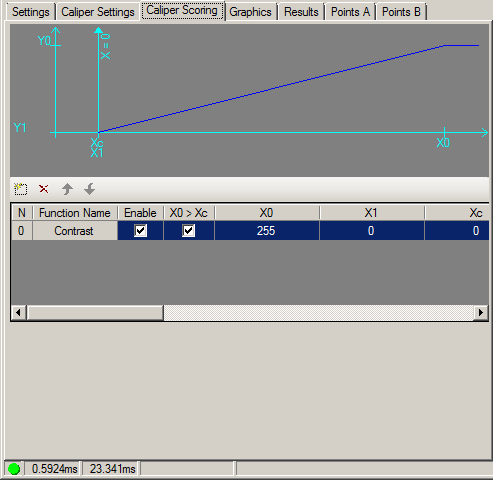
If the Edge Mode is Single Edge, the following scoring functions are available:
If the Edge Mode is Edge Pair, then these scoring functions are available:
- CogCaliperScorerContrast
- CogCaliperScorerPosition
- CogCaliperScorerPositionNeg
- CogCaliperScorerPositionNorm
- CogCaliperScorerPositionNormNeg
- CogCaliperScorerSizeDiffNorm
- CogCaliperScorerSizeDiffNormAsym
- CogCaliperScorerSizeNorm
- CogCaliperScorerStraddle
Use the following function buttons to manage the scoring functions:

| Button | Description |
 | Add a new scoring function. A menu appears with a list of scoring functions appropriate to the current edge mode. Highlight the function that you want and a new line appears in the list of functions at the bottom of the tab. You can add more than one function of the same type. |
 | RemoveAt the currently highlighted function in the list of functions at the bottom of the tab. A verification message appears asking you to confirm deletion. |
 | Move the currently highlighted function up in the list, and updates the index of the function within the collection. |
 | Move the currently highlighted function down in the list, and updates the index of the function within the collection. |
The following table describes the columns of the scoring function list:
| Column | Description |
| N | The index of the scoring function within the function collection, which is either SingleEdgeScorers or TwoEdgeScorers. |
| Function Name | The name of the function. You can add more than one of the same type of scoring function; the Results tab tracks the functions with both the function name and the index within the function collection. |
| Enabled | Enables or disables this scoring function the next time the Find Corner tool executes. |
| X0 > Xc | Represents the orientation of the graph. For the function to be valid, X1 must be between or equal to X0 and Xc. This column allows you to swap X0 and Xc, if necessary. |
| X0, X1, Xc, Y0, Y1 | The parameter values for a one-sided function, or the first set of values for a two-sided function. See each scoring function class for information about these values. |
| X0h > Xch | Represents the orientation of the graph. Applies only to two-sided functions (the SizeDiffNormAsym function). To be valid, X1h must be between or equal to X0h and Xch. This column allows you to swap X0h and Xch, if necessary. |
| SetXYParameters | The second set of parameter values for a two-sided function. See each scoring function class for information about these values. |
Use the Graphics tab to control which graphics the Find Corner tool generates and displays. The following figure shows the default Graphics tab:
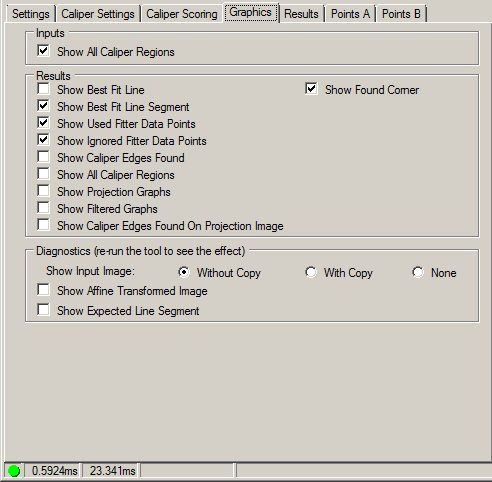

Check the Show All Caliper checkbox to show all Caliper regions in the Current.InputImage buffer.
Display any of the following results in the LastRun.InputImage buffer:
- Show the found corner.
- Show both entire best fit lines.
- Show the best fit line segments.
- Show the edge points the Fit Line tool used to calculate the two lines.
- Show the edge points the Fit Line tool ignored to calculate the two lines.
- Show the edges found by the Calipers.
- Show the regions used by the Calipers.
Enable any of the following results to generate a LastRun.RegionData_Caliper<X> buffer for each Caliper the tool uses:
- Create projection graphs from all the Calipers.
- Create filtered graphs from all the Calipers.
- Show the location of each edge on each projection graph.

Choose any of the following diagnostic graphics:
- Control whether or not the input image is recorded as part of the diagnostic record, and whether the image is copied to the record or saved in the record as a reference.
- Show the projection region of the image in the LastRun.RegionData_Caliper<X> buffer for each Caliper the tool uses.
- Show the expected line segments as configured in the Current.InputImage in the LastRun.InputImage buffer.
Use the Results tab to view the results of each execution of the Find Corner tool. The following figure shows the default Results tab:
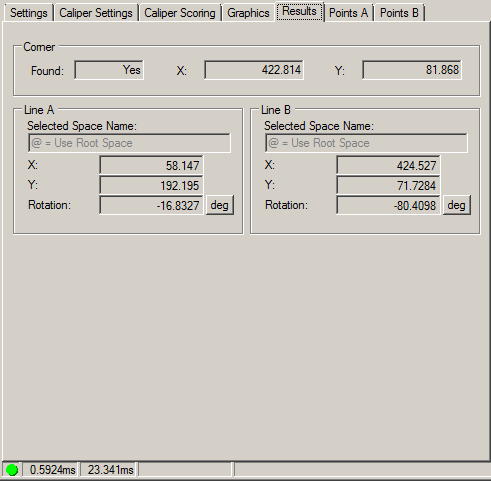

| Feature | Description |
| CornerFound | Displays whether or not a corner was found. |
| CornerX and CornerY | Display the (x, y) coordinates of the found corner point. |
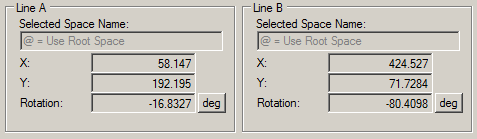
Use the GetLine areas of the Results tab to view the following results about Line A and Line B the tool found:
| Feature | Description |
| SelectedSpaceName | Displays the coordinate space for the input image. |
| X and Y | Display the (x, y) coordinates of a single point on the found line. |
| Rotation | Displays the angle of rotation for the found line. |
Use the Points A and Points B tabs to view information about each edge point the Calipers found for Line A and Line B. The following figures show an example of the Points A and Points B tabs:
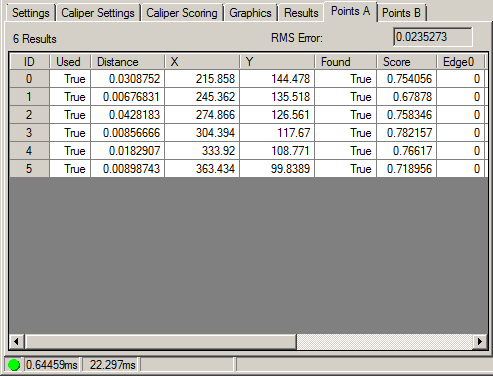
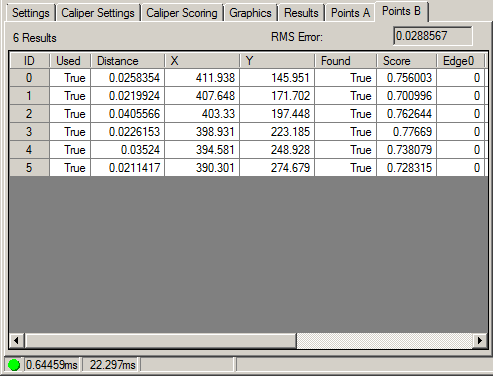
Each of the two tabs shows the RMSError error of the fitting operation, while the points grids on the tabs give the following information about each point result:
| Column | Description |
| ID | Unique ID for this result in the collection |
| Used | Indicates whether the point was used to perform the line fit |
| DistanceToLine | The distance from the point to the line |
| X | The x-coordinate of the edge point |
| Y | The y-coordinate of the edge point |
| Found | Indicates whether the Caliper found an edge point or not |
| Score | The overall score of this result in the range 0.0 - 1.0 |
| Edge0 | The first edge that contributed to this result. In Edge Pair mode, there is a similar column for Edge1. |
| Width | The width of the result when using Edge Pair mode. |
| Position | A signed measurement along the search direction relative to the center of the input region. |
| GetContributingScores | The remaining columns list the individual results of the enabled scoring functions within the list created on the Scoring tab. Functions are identified by both the function name and their index within the collection of scoring functions. |