This topic contains the following sections.
The tool requires you to specify a rectangular region where the character string must appear in each image, and supports an automated method of determining the best parameter settings that allow the tool to correctly determine the boundaries of each individual character within that region, such as the minimum character width, the minimum number of pixels per character, and so on. In addition, you can optionally enable a feature that forces the tool to match the character against a subset of all possible characters for any given position.
For more information on the CogOCRMax tool, see the topic OCRMax Tool and the topic Choosing Segmentation Parameters, which gives more information on how to choose the right parameters that allow the tool to distinguish each character in the string.
This section contains the following subsections.
As described in the topic OCRMax Tool, an OCRMax tool requires a font file to store the character data the tool will use during classification. For each OCRMax tool in your application, you must either load an existing font file or create one from scratch.
There is no single method of creating a trained font for your OCRMax tool. In general, Cognex recommends using the Tune tab of the OCRMax Edit Control, which allows you to take advantage of the auto-tuning capabilities the tool supports.
This section contains the following subsections.
Using the Tune tab of the OCRMax edit control gives you access to auto-segmentation, auto-tuning, and fine control of the boundary rectangles the OCRMax tool uses during segmentation and classification. To use the Tune tab to create a font file, perform the following steps:
- Establish an image source and give the OCRMax tool a sample image of the characters you need it to classify.
- Select the Current.InputImage image in the display.
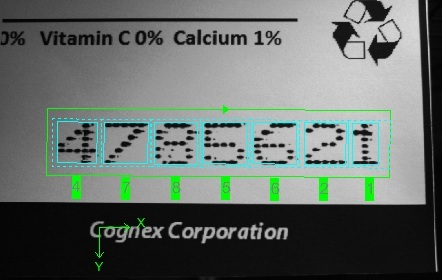
Select the region of interest graphic and modify it to fit closely around the character string, as shown:
Click Extract Line to have the tool perform segmentation on the character string and attempt to distinguish individual characters.
In most cases, the tool can correctly identify individual character symbols, as shown:
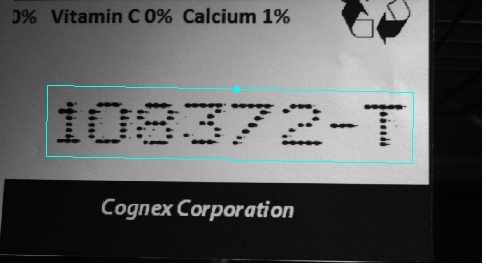
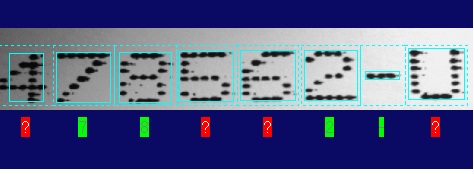
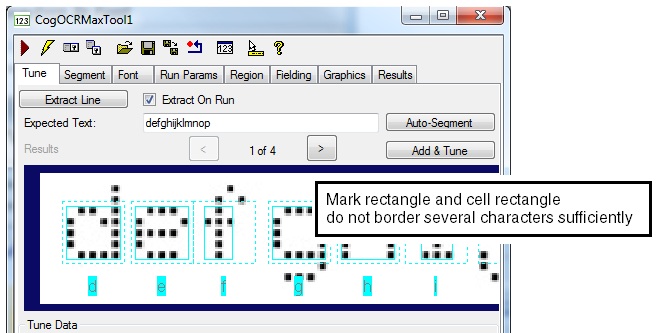
In some cases, the tool will not perform segmentation at all, or not correctly segment the image successfully, as shown in the following example:

If the tool does not display any segmentation results, try adjusting the region graphic and giving it half a character's width around the character string and click Extract Line again. The tool should be able to perform at least partial segmentation before continuing to the next step.
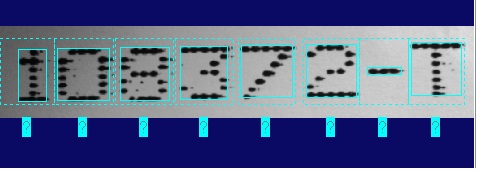
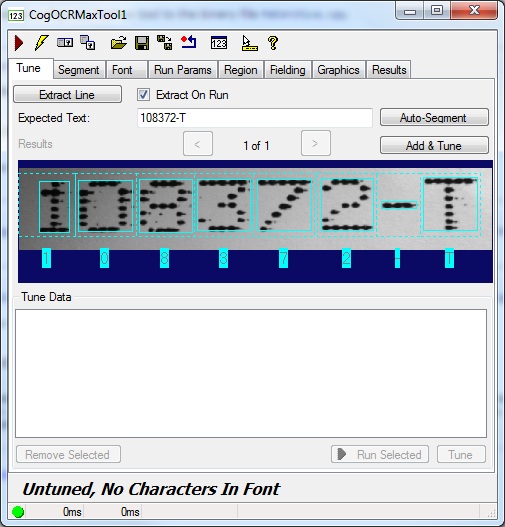
Use the Expected Text field to enter the characters enclosed in the region graphic and click Auto-Segment.
The Tune tab should display the segmented character string with a label under each character, as shown:
In some cases, the tool generates multiple attempts at segmenting the character string, as shown:
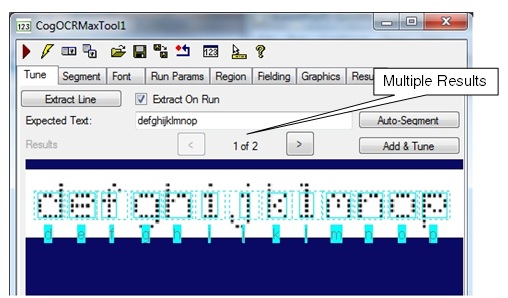
In this case, scroll through the results and choose one that shows the best attempt at segmentation before proceeding to the next step.
An OCRMax tool uses mark rectangles and cell rectangles to define the boundary around each character, as described in the topic Choosing Segmentation Parameters. As shown in the previous image, the segmentation process might not determine the best dimensions for these rectangles for all characters. See the section Changing Mark and Cell Rectangles for details on how to use the graphical user interface to change the dimensions of these rectangles.
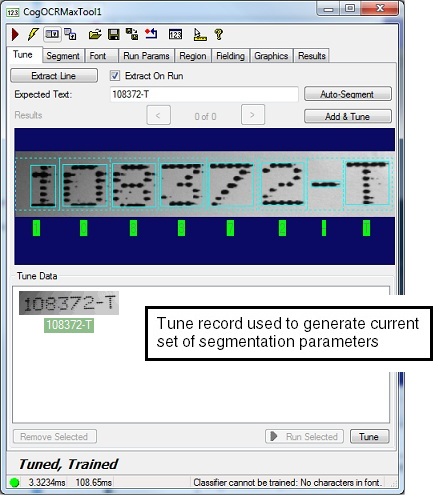
Click Add & Tune.
This adds the characters from this image to the current font, trains the font for use, and uses auto-tuning to determine the best settings for segmentation parameters in order to reliably locate the characters in this image. The Tune tab indicates characters that are members of the font in green, and displays the tune record used to generate the settings for the segmentation parameters, as shown:
The section Working with Tune Data describes how to work with the tune data shown in the Tune tab.
Acquire another image of character strings you want the application to be able to classify.
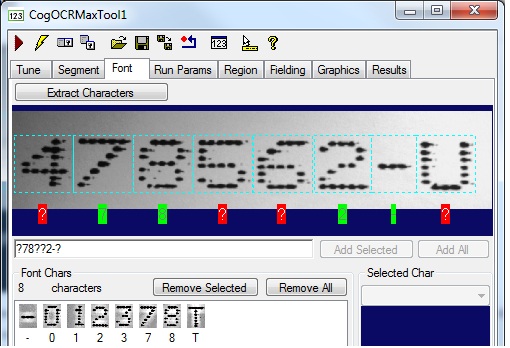
The tool might recognize characters already in the font, while displaying unknown characters in red, as shown:
Click on the red "?" label for any unknown character and enter the name for this character using the keyboard.
Do this for all the unknown characters in the image.
You also have the option of using the Extract Line field and entering the entire string of characters visible in this string.
- Click Add & Tune to add these new characters to the current font.
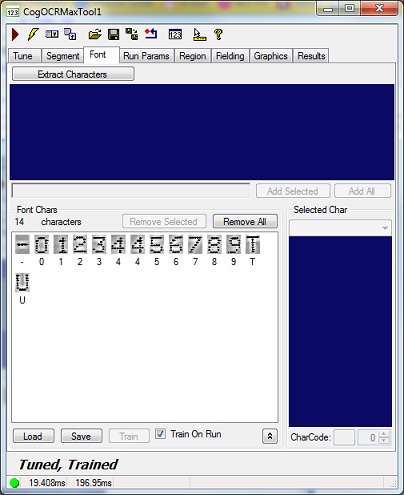
Continue acquiring images and adding new characters to the current font until all the characters you need the tool to recognize are displayed on the Font tab:
Multiple instances of the same character indicate that the character appeared differently in various sample images, probably because of rotation or skew.
Run the tool on a series of test images and verify that the tool provides a sufficient read rate.
You may need to adjust run parameters such as Accept Threshold and Confidence Threshold to generate the read rate you require depending on your production environment.
Working with Tune Data
The Tune tab of the OCRMax edit control allows you to build a font using sample images of character strings your application will classify. Each time you click Add & Tune, the tool generates a tune record of the image, its UTF32 encoded text, and the locations in the image where the characters were found.
The bottom half of the Tune tab displays the collection of tune records for this tool under Tune Data. For example, the following figure shows an OCRMax edit control that currently stores three tune records:
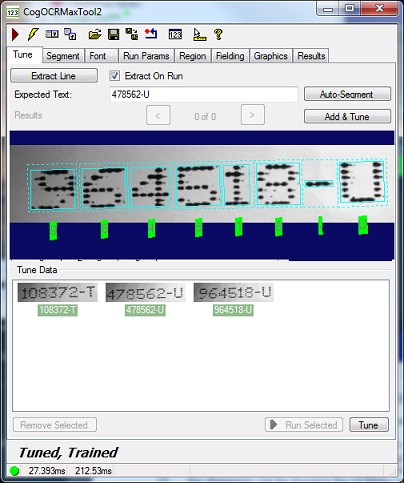
The appearance of the tune record indicates its relationship to the current set of segmentation parametrs:
Records with no background color (clear) indicate that the current segmentation parameters were not tuned using this record.
If the record represents a valid character string for your application, click Tune to auto-tune the segmentation parameters using the characteristics of this tune record.
- Records with a green background indicate that this tune record was used to generate the current set of segmentation parameters.
- Records with a red background indicate that the characters in this tune record could not be identified using the current set of segmentation parameters.
Use the options under Tune Data to manage the current set of tune data:
- If a tune record does not represent a valid sample character image for your application, select it and click Remove Selected.
- To test the current set of segmentation parameters on an existing tune record, select it and click Run Selected.
- To perform auto-tune with using the qualities of all the current tune records, click Tune.
Tune and Train State Diagram
As you add characters to the font, use the auto-tune capabilities the tool supports, and work with tune data, the OCRMax tool can switch between various states of being tuned and being trained, as shown:
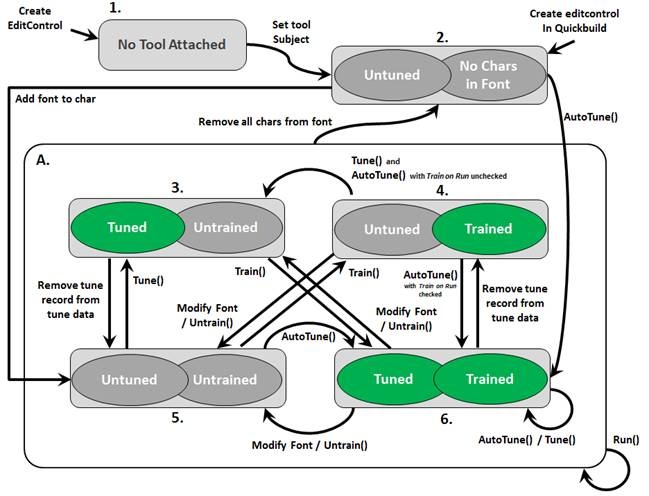
The tool must be trained with an OCR font before it can be used. Tuning is optional but can normally provide the best set of segmentation parameters for classifying the character images your application is likely to acquire.
Changing Mark and Cell Rectangles
As you use the Auto-Segment feature of the Tune tab you may notice that the tool does not determine the best settings for the mark rectangles and cell rectangles that define the border for each character, as shown in the following example:
Before adding these characters to the font, click on the graphic and adjust the rectangles accordingly. Fit the mark rectangle so that it specifies the physical extents of the character, and the cell rectangle so that its height is sufficient to encompass every character in the string, as shown in the following example:
See the section Mark Rectangles and Cell Rectangles for more information.
In general, Cognex recommends the Tune tab for creating a new font file. The OCRMax edit control, however, allows you to create a font file using the Font tab. Be aware that creating a font using the Font tab does not support auto-tuning the segmentation parameters or fine control over the mark and cell rectangles that surround each character.
You might choose to use the Font tab if you are setting segmentation parameters manually, or if you need to add a one or a few characters to an existing font file without changing the current segmentation parameters. In addition, be aware that while the auto-tuning feature can add or remove characters as needed from the font file, any characters you add using the Font tab will not be removed during the auto-tune operation.
Finally, adding new characters through the Font tab causes the OCRMax tool to become untuned, where the segmentation parameters have not been set automatically based on the current set of tuning data from recent images. Tuning an OCRMax tool is optional, and your application can deliver sufficient read rates without using the auto-tuning capabilities the tool supports.
To add new characters to an existing font using the Font tab, perform the following steps:
- Give the OCRMax tool a sample image of the characters you want to add to the font.
- Adjust the region of interest as necessary to surround the character string.
Click Extract Characters.
The tool might classify some characters while labelling unknown characters in red, as shown:
- Select an unknown character
- Click on the red "?" label for any unknown character and enter the name for this character using the keyboard.
Click Add Selected to add this new character to the existing font.
Do this for all the unknown characters in the image.
Click Train or run the tool on the current image with the Train on Run option enabled.
The tool will not classify any characters without a trained font file.
Continue acquiring images and adding new characters to the current font until all the characters you need the tool to recognize are displayed on the Font tab:
Run the tool on a series of test images and verify that the tool provides a sufficient read rate.
You might need to select the Segment tab and adjust various segmentation parameters manually, as described in the topic Choosing Segmentation Parameters.
Fielding allows you to specify one or more characters against a subset of all the characters in the trained font. Fielding can improve the overall performance of the tool by allowing it to disregard much of the trained font. Fielding can generate more reliable results but can take more time to analyze each character string.
As an example, consider the following character strings that end in either "-T" or "-U":
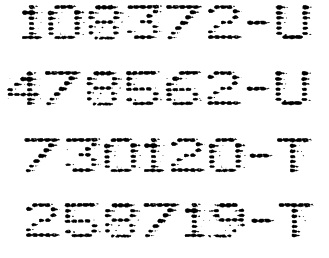
You can use fielding to specify a field string that limits the classification to the following:
- A numeric character for one of the first six positions
- A dash (-) character
- The letter "T" or "U" at the end of the string
To use fielding to classify these types of strings, perform the following steps:
- Select the Fielding tab of the OCRMax edit control.
- Enable the Field String checkbox.
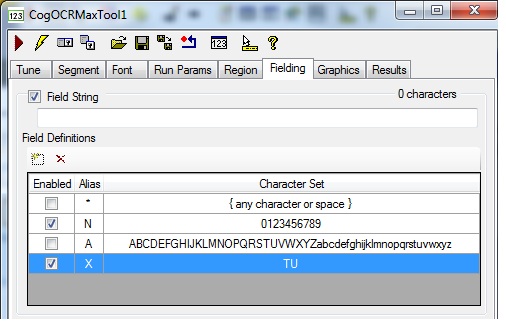
Click the Add New button, highlighted in the following figure, to add a new Field Definition to the tool:
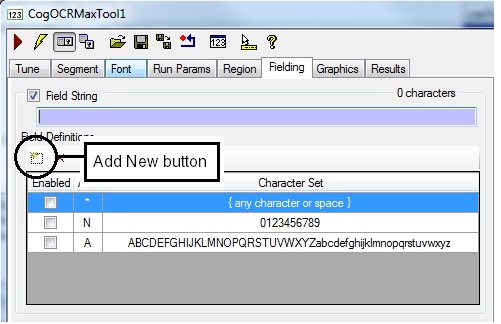
The edit control adds a new Field Definition with a default alias of X:
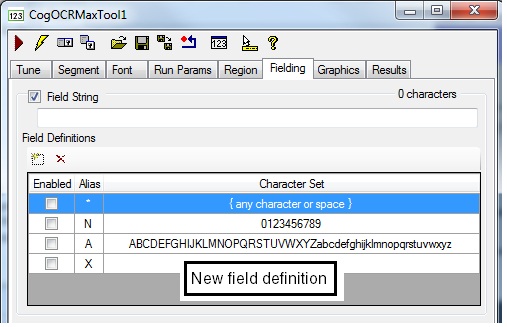
Select the new field definition and specify a Character Set of "TU":
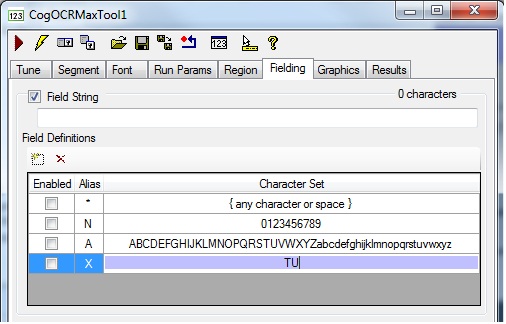
Enable the Field Definitions for N (any numeral) and X (the letters "T" and "U" exclusively):
Enter a Field String of NNNNNN-X:
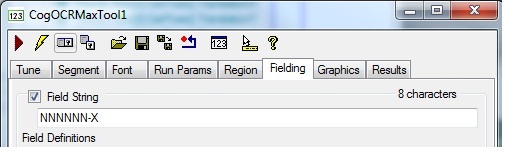
This Field String matches the form of all the strings the tool must classify.
Run the tool on a series of test images and verify that the tool provides a sufficient read rate.
The Fielding tab offers additional parameters for the field string, including support for field strings of variable length: See the topic OCRMax Edit Control for more information.
This section contains the following subsections.
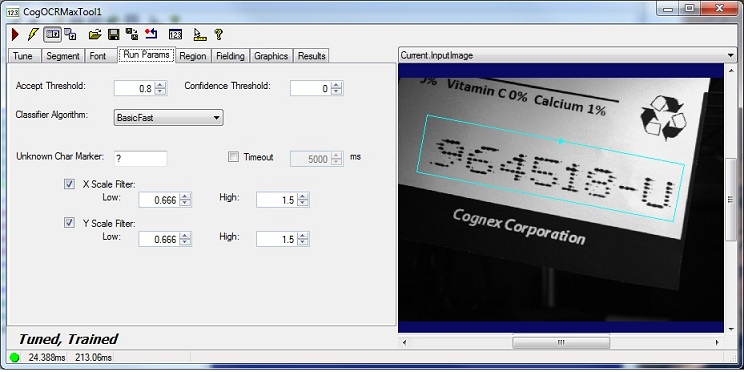
The OCRMax tool supports a set of run parameters that affect how the tool determines the success or failure of any attempt to classify the characters in an image. The following figure shows the default parameters for the Run Params tab:
See the topic for the OCRMax Edit Control for a list of all parameters the tool supports.
Raise the accept threshold when your vision application acquires good images of the character strings you want to classify, with characters of consistently good print-quality, and that exhibit little change in rotation and skew. A high accept threshold can improve the execution speed of the tool. If you set the threshold too high, however, the tool will fail to classify one or more characters in the string.
Lower the accept threshold when your production environment cannot ensure a consistent appearance for each character. If, as you are developing your application, the OCRMax tool fails to classify characters correctly, try lowering the accept threshold.
By default, the confidence threshold is set to 0, so the OCRMax cannot generate confusion results. Increase the confidence threshold if you become concerned that the OCRMax tool classifies character incorrectly, for example verifying that a character key is a “3” when it appears as an “8” in your acquired image.
The algorithm the OCRMax tool uses to classify the character strings in an image from the default BasicFast option. For most applications, however, the BasicFast offers the most consistent results. See the API documentation for the Algorithm for more information.