Unsupervised Type Red Analyze Parameters
The parameters adjust how the tool is trained, and also how the tool processes statistical results. You can open and close the parameters side pane by selecting the tool and then clicking the % icon. You can access additional parameters that provide advanced features by selecting Expert Mode in the Help menu.
Type, Mode, and Network Model Parameters
Sampling Parameters
The Sampling parameters control feature A feature is a visually distinguishable area in an image. Features typically represent something of interest for the application (a defect, an object, a particular component of an object). sampling during training and processing. For more information, see Feature Sampling.
| Parameter | Expert Mode | Description | ||||||||||||||||||||||||||||||||||||||||||
|
Feature Size |
No |
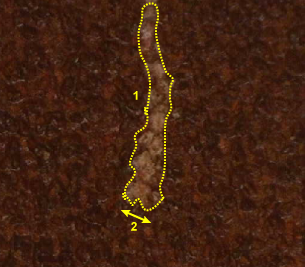
Specifies the typical feature diameter in pixels. The Feature Size is displayed in the lower left of the image, and you can resize it within the image to set a more accurate size. The feature size The subjective size of the image features that you feel are most important for analyzing image content. The feature size determines the size of the image region used for sampling. Only used with Blue Locate, Blue Read, and Legacy type tools. should approximate the size of a typical defect. For elongated defects, such as streaks, smears, scratches and tears, the feature size should approximate the width of the defect.
Feature size strongly influences processing time (n2). In other words,, a Feature Size of 100 is 100 times faster than a size of 10, while a Feature Size less than 15 usually does not yield good results. When setting the Feature Size, consider the following in regards to processing time (Ptime):
Note: The tool sees an area five times larger than the Feature Size setting. However, the level of detail is much higher in the center of the feature than in the periphery. For more information, see Feature Size.
Note: The Iterations parameter provide additional control over sampling at runtime. You can specify that a number of additional interpolated samples are collected in regions with detected defects. This can be useful for images where the range of complexity is highly variable within individual images.
|
||||||||||||||||||||||||||||||||||||||||||
|
Color |
No |
Specifies the number of color channels to use when sampling the image. When set to 1, color images are converted to greyscale. The following values are available:
Note:
|
||||||||||||||||||||||||||||||||||||||||||
| Border Type | Yes |
Specifies how pixels on the outside of the image are sampled. Adding an additional mask at the boundaries of the image highly reduces the false detection rate.
|
||||||||||||||||||||||||||||||||||||||||||
| Masking Mode | Yes |
Specifies how a mask is applied to the sampled image. A mask is used to limit areas of the image processed by the tool. Masks can be set after training, however, setting them before training helps the learning phase.
|
||||||||||||||||||||||||||||||||||||||||||
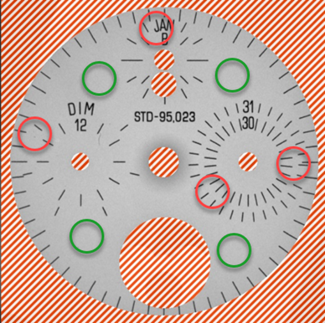
| Centered | Yes | This parameter can be used when your inspection contains objects that have a circular symmetry in respect to the center of the view A view of an image is a region of pixels in an image. Tool processing is limited to the pixels within the view. You can manually specify a view, or you can use the results of an upstream tool to generate a view., such that the resulting learned model becomes simpler because the object can be virtually unrolled. | ||||||||||||||||||||||||||||||||||||||||||


Training Parameters
The Training tool parameters control the training process.
| Parameter | Expert Mode | Description | ||||||
|
Training Set |
No |
Specifies the training data set used to create a neural network model. The system only extracts the features of the images that are included in the training set. Click Edit to open a dialog where you can specify the sample sets and the percentage of the labeled images used as training samples. The system selects the training images randomly each time you start training. |
||||||
|
Epoch Count |
No |
Specifies the number of optimization iterations done during training. Use a lower value when your application has limited complexity, or when creating a lower quality model for testing different parameter settings. The tools typically need to see the training image set A collection of images of your specific application. A training image set represents images of a specific part or process acquired in a consistent way using the lighting, optical, and mechanical characteristics of your runtime system. The training image set includes images that represent the range of image appearances that you expect to see in normal operation. data about 50 times, which is the default setting, and is typically sufficient for most standard applications. If you use fewer epochs, the neural network might get stuck in learning, or become unable to accurately solve the problem. However, if you use too many epochs, you risk overfitting Overfitting means that the tool is memorizing the data from the training images, which leads to lower performance when using unseen images.. Note:
|
||||||
| Capacity | No |
Specifies the capacity of the model to account for different degrees of visual complexity. For very simple patterns, use a lower Capacity setting to prevent overfitting. For complex images or objects, use a higher setting to prevent underfitting. |
||||||
| Training Passes | No |
Specifies the number of iterative trainings to perform in order to better cope with statistically difficult problems which show varying complexity across images, and/or within different areas of the images. This parameter helps to guide the tool to more complex areas in the images.
|
||||||
| Low Precision | No | Specifies whether or not the tool creates a low precision model after training. The low precision model is useful for applications where speed optimization is a priority during runtime operation. The results might be different between the two modes. When enabled, a white lightning bolt icon appears in the icon of the tool.
Note: The low precision model requires the Standard or Advanced license, and also requires a GPU with CUDA Compute Capability 6.1 or higher (for more information, visit the NVIDIA website). |


Perturbation Parameters
With the Perturbation parameters, you can allow the tools to generate images that simulate the variations expected during runtime.
For example, if your part rotates by +/-45 degrees, you can set the Rotation parameter, and the software rotates the images during training by that amount. However, image perturbation Perturbation is the process of improving the trained tool tolerance of part and image variation by simulating the effect of specific types of variation. is not a substitute for collecting and training actual images. The image perturbations can only approximate the variations of real parts or scenes.
The Perturbation parameters are common across all of the tools, and you can use these parameters in combination. This way, you can generate more complex images by using the parameters separately, as well as in conjunction.
| Parameter | Expert Mode | Description | ||||||||
|
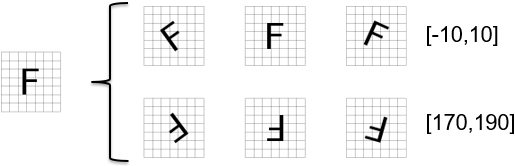
Rotation
|
No |
Specifies the possible orientations, defining a piece-wise uniform distribution from which a perturbing rotation angle is drawn (if set to [0°, 0°], no rotational perturbation is used). For example, with the following settings, [-10°, 10°] or [170°, 190°], the part can be detected between -10 and 10 degrees, or between 170 and 190 degrees. These types of settings are particularly useful if your part can be orientated with a regular orientation, or upside down with a small variation in its angle, but never in between.
|
||||||||
|
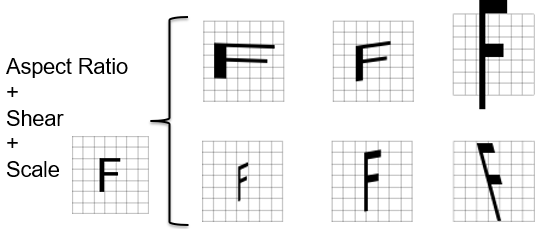
Scale
|
No |
Specifies the normal distribution around 1 from which a perturbing scaling factor is drawn (if set to 0%, it is not applied). For example, a Scale setting of 100%, provides images half the original size to double the original (0.5x to 2.0x the original).
|
||||||||
|
Aspect-Ratio
|
No |
Specifies the normal distribution around 1 from which a perturbing aspect-ratio factor is drawn (if set to 0%, it is not applied). |
||||||||
|
Shear
|
No |
Specifies the normal distribution around 1 from which a perturbing shearing factor is drawn (if set to 0%, it is not applied). |
||||||||
|
Flip
|
No |
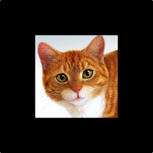
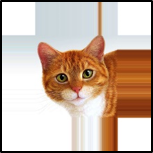
Specifies whether to randomly flip the image during sampling in the horizontal, vertical or both directions. This is useful if the object or surface exhibits the corresponding symmetries. This setting can help to highly increase the quantity of training data.
|
||||||||
|
Luminance
|
No |
Specifies the normal distribution around 1 from which a perturbing luminance factor is drawn (if set to 0%, it is not applied). |
||||||||
|
Contrast
|
No |
Specifies the normal distribution around 1 from which a perturbing contrast factor is drawn (if set to 0%, it is not applied). |
||||||||
|
Invert Contrast
|
Yes | Randomly inverts the contrast in order to simulate contrast reversal in the training samples. |


Processing Parameters
The Processing parameters control the way the tool processes images. Processing with the same models always gives the same results. You do not need to retrain the tool after changing the Processing parameters. You can see the effect after reprocessing the database.
| Parameter | Expert Mode | Description | |||||||||||||||||||||||
|
Sampling Density |
No |
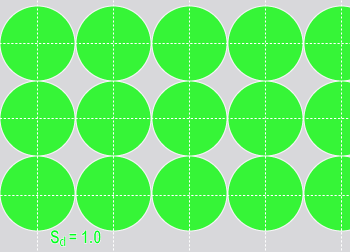
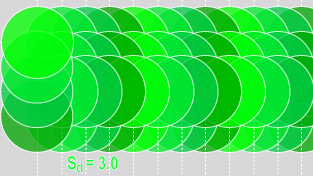
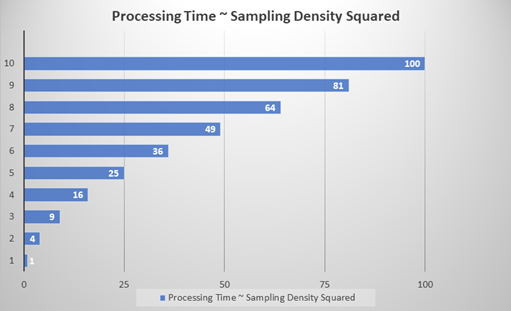
Specifies the density of sampling points with respect to the Feature Size setting. The sampling density The amount by which the sampling point is moved in the image between samples, expressed in terms of the feature size. If the feature size is 100 and the sampling density is 1, the sampling location is advanced by 100 pixels between samples. A sampling density of 4 advances the sampling location by 25 pixels between samples. determines the degree of overlap between adjacent samples. A sampling rate of 1 means that the sampling location is incremented by the feature size between samples. The default sampling rate for most tools is 3, which means that the sampling location is incremented by one third of the feature size. The Sampling Density parameter affects the processing time and the accuracy of the tool. Higher Sampling Density settings are more accurate but significantly increase processing time. The processing time depends approximately quadratically to the Sampling Density (Sd) value. For example, a Sampling Density setting of 1 is approximately nine times faster than a setting of 3 (n2).
|
|||||||||||||||||||||||
| Iterations | Yes |
Specifies the number of times the tool will search locally to find stronger anomalies. In contrast to the Sampling Density parameter, processing time only depends linearly on the number of iterations.
|
|||||||||||||||||||||||
|
Threshold |
No |
Specifies the threshold that determines whether the tool detects and marks regions as good or bad. The tool classifies values below threshold as good, and above the threshold as bad. You can also set the threshold value using the Score graphic in the Database Overview. |
|||||||||||||||||||||||
| Simple Regions | No | Specifies that the tool can only extract "simple regions", in other words, polygons without holes. | |||||||||||||||||||||||
| Region Filter | Yes | Specifies a filter for the tool to use as criteria for found regions. This filters regions from the results that do not match the criteria. If you leave the parameter empty, the tool returns all regions. To apply a region filter, reprocess the tool after setting the filter phrase. Note: The syntax for filters is the same as the syntax used for Display Filters. For more information about constructing the syntax for a filter, see Custom Display Filters.
You can apply region filters to the result of the confusion matrix depending on the setting of the Count dropdown in the Database Overview.
For more information, see Count Options and the Confusion Matrix. |
|||||||||||||||||||||||
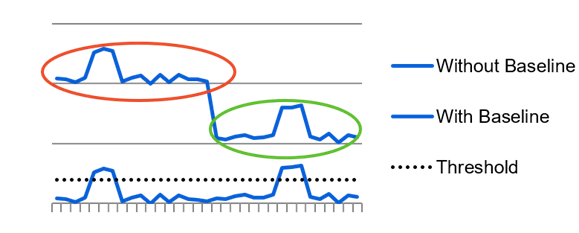
| Use Baseline |
Specifies whether or not the tool uses a weight on the scoring on the different regions of the image, depending on the variation over this region, measured in all images. This parameter lowers the response with the average noise level. This is useful when the view contains multiple distinctive structured areas.
|
||||||||||||||||||||||||