This topic contains the following sections.
- GigE Vision Acquisition Overview
- Get a CogFrameGrabberGigEs Object
- Enumerate the Connected Cameras
- Select a Supported Video Format and Create a CogAcqFifo
- Use the CogAcqFifo to Acquire Images
- GigE Vision Camera Feature Support
- Debugging GigE Vision Applications
- Saving and Restoring Camera State
- Working with Bayer Images
- Managing GigE Vision Bandwidth Use
This section provides information about using GigE Vision cameras with VisionPro and your Visual Studio application. GigE Vision cameras do not use a frame grabber, but rather connect to a Gigabit Ethernet network adapter attached to your computer. For information on configuring your QuickBuild application to use a GigE Vision camera, see the topic Configuring an Image Source.
Note: Be sure to read the GigE Vision Cameras User’s Guide included with your VisionPro kit to learn how to create a camera network, how to connect your camera to the network, and how to assign IP addresses to cameras.
To acquire images from a GigE Vision camera, you use exactly the same techniques that you use to acquire images with a Cognex-supplied frame grabber. The only difference is that the ICogFrameGrabber interface refers to a physical GigE Vision camera, rather than a frame grabber. The steps you follow to acquire images are listed in the following sections.
The first step is to obtain a CogFrameGrabberGigEs object. This object is a collection of individual frame grabber objects, each accessed through an ICogFrameGrabber interface. Each ICogFrameGrabber represents GigE Vision camera that is connected to your computer system.
CogFrameGrabberGigEs cameras = new CogFrameGrabberGigEs();
Once you have created the CogFrameGrabberGigEs object, you can enumerate its contents to obtain an ICogFrameGrabber interface for each connected camera.
The Count property returns the number of GigE Vision cameras that are connected to your system. You can use the Item property (or the indexer in C#) to get an individual camera.
If the cameras have not yet finished negotiating their connection with the network they will not be included in the count, and you will not be able to get a reference to them. Be sure that your cameras are completely powered up, connected to the network, and configured before starting your application.
The Name property of the ICogFrameGrabber interface will return the manufacturer name and model of the camera.
For example, this code:
CogFrameGrabberGigEs cameras = new CogFrameGrabberGigEs();
ICogFrameGrabber camera = cameras[0];

System.Diagnostics.Debug.WriteLine(camera.Name);
Would display this output if you had a Basler scA640-70gc camera connected to your system:
Basler scA640-70gc
Once you have obtained an ICogFrameGrabber interface, you call its CreateAcqFifo function with a supported video format to obtain a ICogAcqFifo.
This release of VisionPro supports the GigE Vision video formats listed in the Camera Support for VisionPro topic.
You create a ICogAcqFifo in the same way as you create a frame grabber-based fifo:
const string VIDEO_FORMAT =  "Generic GigEVision (Bayer Color)";
ICogAcqFifo fifo = camera.CreateAcqFifo(
          VIDEO_FORMAT,
          CogAcqFifoPixelFormatConstants.Format8Grey,
0, true);The generic GigE vision video formats do not specify an image size. To determine the actual size of the acquired image, get the region of interest immediately after creating the acquisition FIFO like this:
ICogAcqROI ROIParams;
int x, y, width, height

ROIParams = myAcqFifo.OwnedROIParams;
if (ROIParams != null)
ROIParams.GetROIXYWidthHeight(x, y, width, height);Once you have created the ICogAcqFifo you use the standard method to acquire an image.
Many commonly used GigE vision camera features are supported directly through VisionPro image acquisition properties.
For features that are not supported directly by VisionPro you can use the ICogGigEAccess interface to get and set features. See the sample code in %VPRO_ROOT%\Samples\Programming\Acquisition\GigEVisionProperties to learn how to do this.
Note: If you use the feature setting and getting methods from within a VisionPro script, you must enclose the calls within a try/catch block. If you do not use a try/catch block, your script may cause your job to time out.
| GenICam Feature | VisionPro Property | Comments |
| AcquisitionMode AcquisitionStart AcquisitionStop | Controlled by the combination of TriggerModelTriggerEnabled andStartAcquire | |
| PixelFormat | Based on video format used | |
| TriggerMode | ICogAcqTrigger | Based on current TriggerModel |
ExposureTime | ICogAcqExposure | |
BlackLevel Gain | ICogAcqBrightnessICogAcqContrast | |
| OffsetX OffsetY | ICogAcqROI | |
| Width Height | ICogAcqROI |
To learn how to use timestamps to detect missed images or missed triggers with a GigE Vision camera see Using Timestamps with GigE Vision Cameras.
GigE Vision cameras require that the application periodically send a network packet, called a heartbeat, to the camera to indicate that the application is communicating with the cameras. If the camera does not receive a heartbeat pulse before a timeout period is over, it closes the connection to the application.
The default heartbeat timeout period is 3 seconds.
When you debug GigE Vision applications, you will want to increase the heartbeat timeout interval so that the camera does not go off line while you're in a breakpoint. You can add this code to your program:
#ifdef _DEBUG // defined for MS Visual Studio debug builds
        // Set timeout to 1 minute (unit is mSec)
        camera.gigECameraAcess.SetIntegerFeature("GevHeartbeatTimeout", 60*1000);
#endifYou can save the state of any features that you change to the camera’s memory by using the camera’s UserSetSave command like this:
camera.SetFeature("UserSetDefaultSelector", "UserSet1");
camera.SetFeature("UserSetSelector", "UserSet1");
camera.ExecuteCommand("UserSetSave");When your application accesses a GigE Vision camera for the first time, it uses the camera’s UserSetLoad to restore the features you set. Although the features listed in the table above are also restored, they are immediately set to the default VisionPro values.
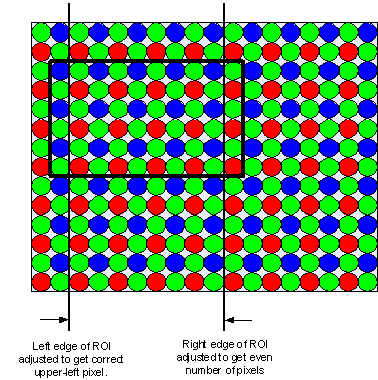
The VisionPro routines that convert Bayer format images expect that the image has an even number of pixels and lines and that the upper left pixel is the start of the Bayer pattern. The VisionPro GigE Vision acquisition software adjusts the region of interest (ROI) to make sure that these conditions are met. The actual ROI of your image may be up to two pixels narrower or shorter then you requested.
If you are using more than one camera on the same network adapter, it’s possible that the cameras’ data rate will exceed the bandwidth of a GigE network. To manage bandwidth in this case, you may be able to adjust the cameras’ frame rate. An example of this technique is shown in the sample program %VPRO_ROOT%\Samples\Programming\Acquisition\GigEVisionProperties. An example of this technique as a QuickBuild job script can be found in %VPRO_ROOT%\Samples\QuickBuild\Script_GigEBaslerscout_Bandwidth_job.vpp.