Locator
The Locator tool identifies and locates specific features or groups of features in an image. Use the Locator tool to label the features and train the model. The trained model generates predictions of where the features are located based on the labels. If there are multiple classes, the tool also predicts the class of each feature.
To set up the Locator tool, go through the following steps:
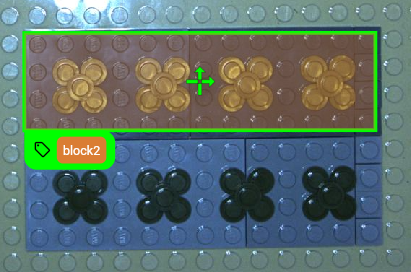
- ROI The Region of Interest (ROI) is the area of the image where the vision tool operates.: Set the ROI to create Views The area of the image that the device operates on is called a view. A view can be the entire image, a user-defined rectangular area of the image, or the output of a tool, depending on the tool. from your images.
-
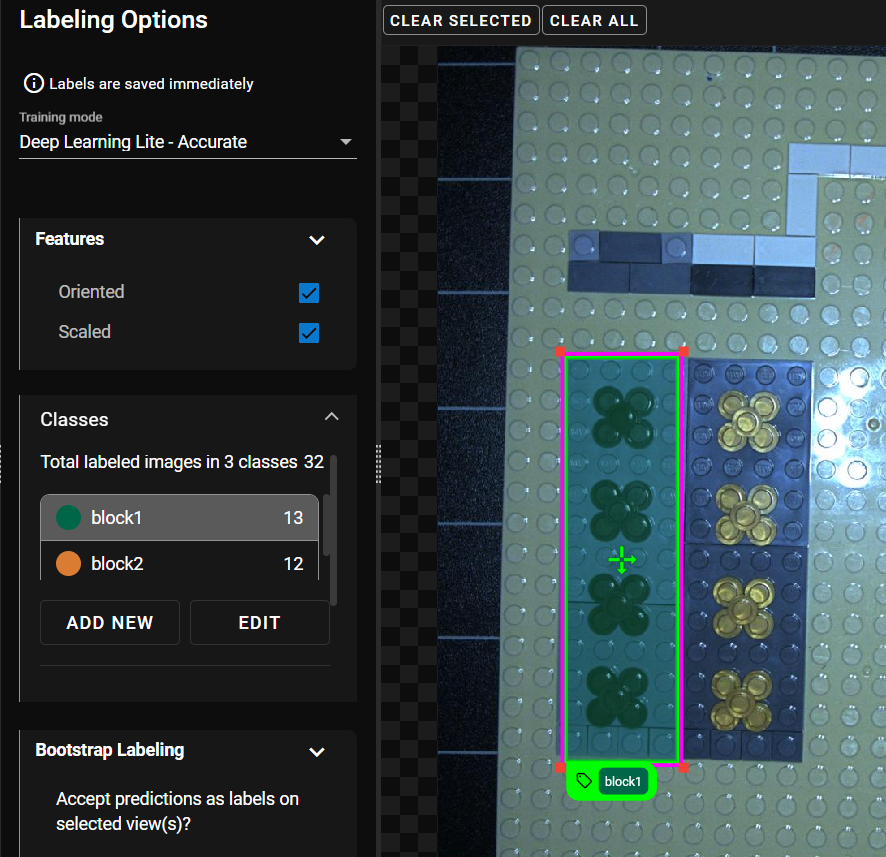
Label: Click on the features you want the tool to locate. Choose the Training Mode.
-
Train: Set the training parameters and click Train Model.
-
Process: Click Process All.
When processing finishes, the results panel shows detailed statistics about the results of the tool.
Before Labeling
The following sections describe the configuration of the tool before you label the features in the images.
-
Change the ROIThe Region of Interest (ROI) is the area of the image where the vision tool operates. by moving, resizing, and turning the blue rectangle on the image. Place the blue rectangle on the part of the image you want to check.
-
To move the ROI, click and drag anywhere inside the blue rectangle.
-
To resize the ROI, click and drag any of the sides or corners of the blue rectangle.
-
To rotate the ROI, click and drag the rotate handle on one side of the blue rectangle.
-
Alternatively, you can adjust the position along the X and Y axes, the width, the height, and the rotation of the ROI with numerical values in the ROI Options section.
-
-
To change the point from where the application calculates the location of the ROI, select Origin or Center.
-
If the tool is in a tool chain after another tool that produces blobs, you can apply a Mask From Blob to narrow down the inspection area. For more information, see Masking.
-
Click Apply ROI when you are done to set the ROI for all the images you uploaded.
-
Select the training mode:
-
Deep Learning Lite - Few Sample (Default): Optimized for standardized objects. Requires only a few images to train.
-
Deep Learning Lite - Accurate: Optimized for rotated and scaled objects. Requires more images to train.
 Deep Learning Lite - Accurate Parameters
Parameter Description Oriented Adjusts the rotation of the label. Scaled Adjusts the size of the label.
-
- Optional: If the images contain features that appear in different rotations, check the Oriented checkbox. Available only with Deep Learning Lite - Accurate .
- Optional: If the images contain features of different sizes, check the Scaled checkbox. Available only with Deep Learning Lite - Accurate .
You can define classes in the Locator tool to apply labels with different classes. The classes can be used to label different features in the views. The Locator tool provides a filter bassed on the classes to the downstreamA downstream tool requires a previously configured upstream tool and its configuration as input. The tool is placed after its upstream tool in the toolchain. tools.
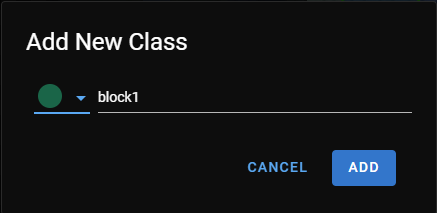
To add one class, do the following:
-
Click Add New under the under the Classes section in the Label step.
-
In the pop-up, select the color of the class and enter a name.
-
Click Add.
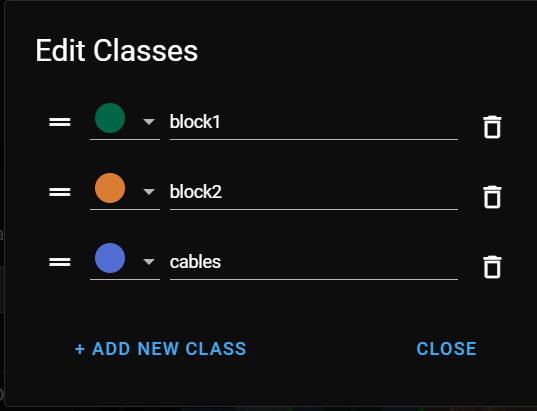
To add multiple classes at once, do the following:
-
Click Edit under the under the Classes section in the Label step.
-
In the pop-up, click Add New Class to add new classes. A new entry appears in the list.
-
Select the color and enter a name for each class.
-
Click Close if you have all the classes.
Labeling and Training the Tool
The following sections describe the processes for labeling Labeling is the process of marking features or defects in images, or categorizing the images into classes. Labeling is crucial for training Deep Learning Lite and Deep Learning Standard tools because the labels serve as training material to guide the tools how to function correctly. features, training the tool, and viewing the results.
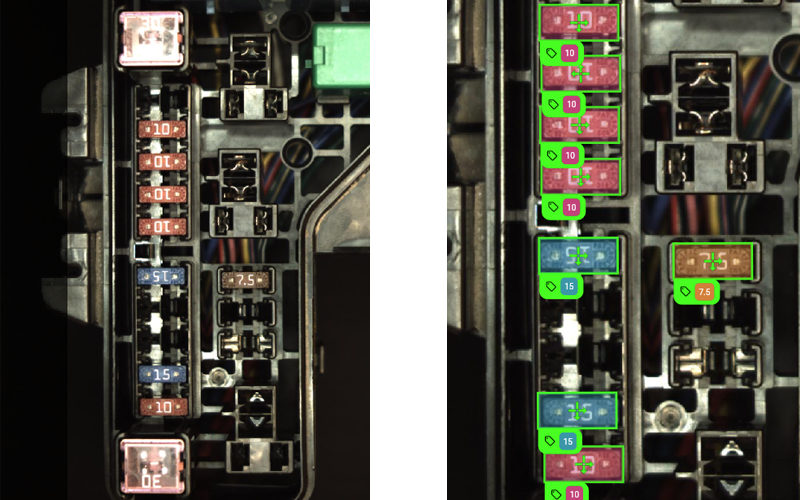
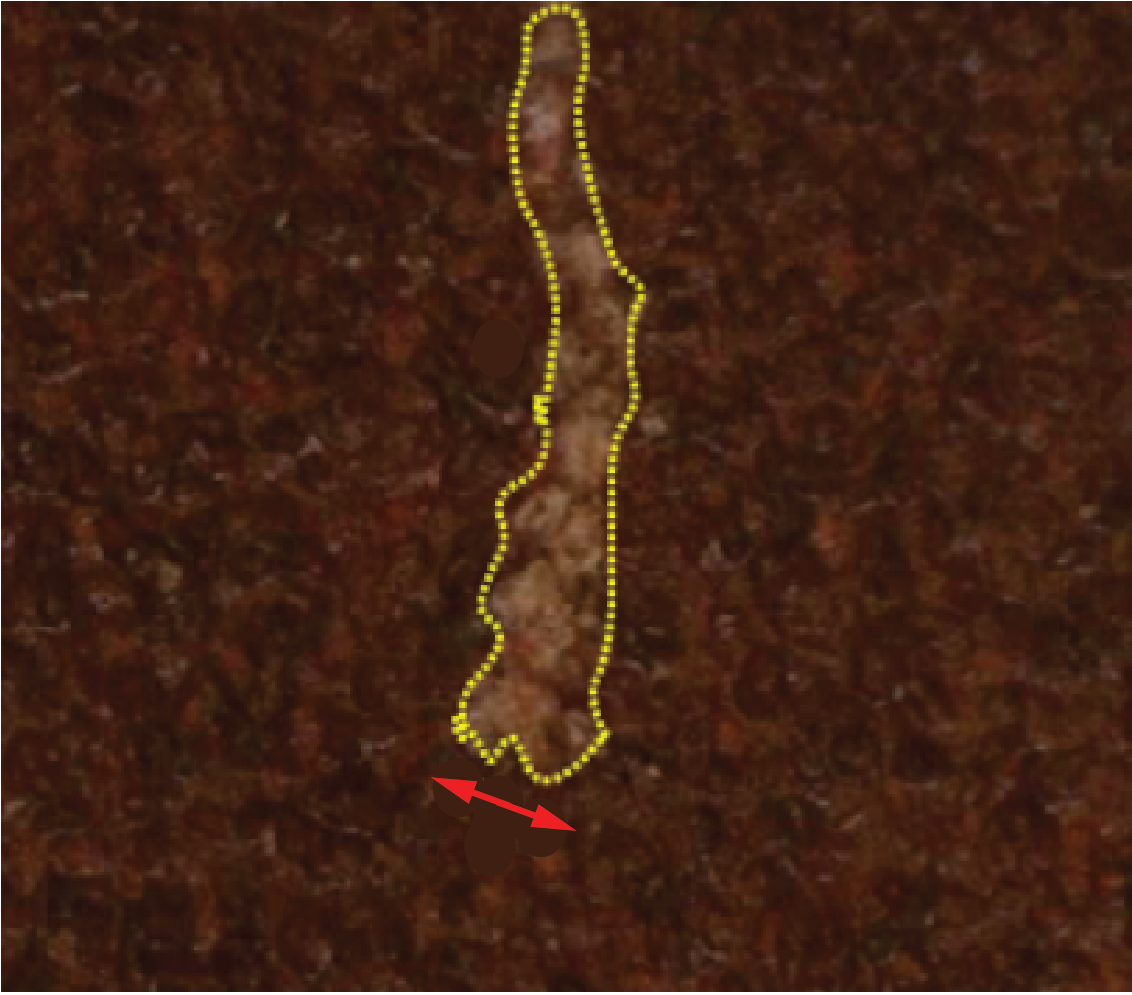
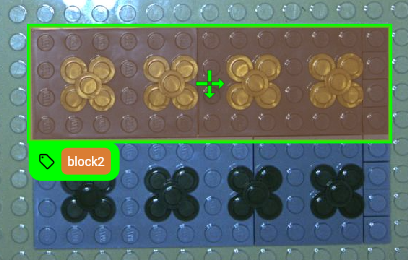
In the Label step, mark the features you want the Locator tool to find. For more information on labelingLabeling is the process of marking features or defects in images, or categorizing the images into classes. Labeling is crucial for training Deep Learning Lite and Deep Learning Standard tools because the labels serve as training material to guide the tools how to function correctly., see Label.
To label features, do the following:
-
Click on the class you want to use and click on a feature you want to label as that class.
-
Drag the corners of the label rectangle to match the size of the feature.
-
Optional: Click and drag the bottom of the rectangle to rotate it to match the orientation of the feature. Make sure to line up the downward and rightward arrow on the label rectangle with the bottom and the right side of the feature.
-
With the same class selected, click on all features in the image that you want to label as the same class. Adjust the size and rotation if necessary.
-
Click on the next class and label all the features that share the same class, and repeat this process until you label all the classes.

-
To change the class of an existing label, select the label in the image, then click on the class on the left-hand side.
Note: If you have a label highlighted and want to continue labeling another class, add the label first, otherwise, the class of the highlighted label changes. -
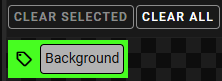
To delete labels, do one of the following:
-
Select the label in the image then click Clear Selected above the image.
-
Right-click the label.
-
Click Clear All above the image. This deletes all labels in the image.
-
If you want to label features in the Locator tool without multiple classes, use the default class that the tool provides when you create the tool.
To label features without multiple classes, do the following:
-
Click on a feature you want to label as that class.
-
Drag the corners of the label rectangle to match the size of the feature.
-
Optional: Click and drag the bottom of the rectangle to rotate it to match the orientation of the feature. Make sure to line up the downward and rightward arrow on the label rectangle with the bottom and the right side of the feature.
-
To delete labels, do one of the following:
-
Select the label in the image then click Clear Selected above the image.
-
Right-click the label.
-
Click Clear All above the image. This deletes all labels in the image.
-
If the image you want to include for training does not contain features, click Label As All Background to label the image as background. Images labeled as background cannot contain labels.
After the Label step, proceed to the Train step to train the model.
-
Adjust the Training options. The Training mode you selected in the Label step impacts the parameters available.
Deep Learning Lite - Few Sample Training Parameters
Choose between two training variants:
-
Accurate: Optimized for accuracy with large datasets.
-
Fast: Optimized for fast processing speed at runtime.
Deep Learning Lite - Accurate Training Parameters
Parameter Description Resize Parameters Feature Size specifies the typical feature diameter in pixels. Resize it within the image to set a more accurate size. The Feature Size approximates the size of a typical located element. For elongated elements, the Feature Size approximates the width of the feature.
Feature Size strongly influences processing time. A Feature Size of 100 is 100 times faster than a size of 10, while a Feature Size less than 8 usually does not yield good results. When setting the Feature Size, consider the equation in regards to processing time (Ptime):
Ptime ~ F2
Epochs Specifies the number of optimization iterations done during training. Use a lower value when your application has limited complexity, or when creating a lower quality model for testing different parameter settings.
The tools typically need to see the training data about 40 times, which is the default setting. This setting is sufficient for most standard applications.
If you use fewer epochs, the neural network modelEach AI tool is a neural network model. A neural network model mimics the way biological neurons work in the human brain. The neural network model consists of interconnected layers of artifical neurons, called nodes, and they have multiple layers. Neural network models excel at tasks like image classification and pattern recognition. can get stuck in learning, or become unable to accurately solve the problem. However, if you use too many epochs, you risk overfittingThe more training epochs that are used for training, the more accurately the network model responds to the training set images. After a certain amount of training, however, the improved performance of the network model on the training data is accompanied by poorer performance on unseen images..
Note: Temporarily reducing the Epochs parameter also makes the training time shorter. -
-
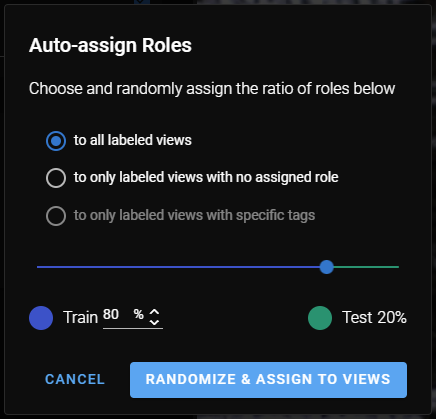
To auto-assign roles to images, click Auto-Assign Roles. A pop-up window provides you with options for how to assign roles:
See the Label section for more information.
After clicking Process All in the Process step, the tool provides the following in the results panel:
-
Number of parts found
-
For each part found:
-
Confidence score
-
X and Y position
-
Angle and rotation
-
Predicted class
-
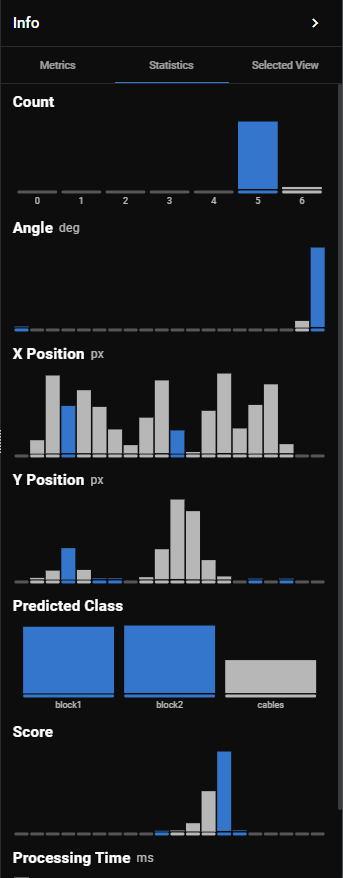
For information on how to read the tables and diagrams, see Metrics and Statistics.
The results of the Locator tool provide a base for the ROIThe Region of Interest (ROI) is the area of the image where the vision tool operates. in the downstreamA downstream tool requires a previously configured upstream tool and its configuration as input. The tool is placed after its upstream tool in the toolchain. tools. Multiple results on a view yield multiple ROIs.
The classes used in the Locator tool provide a filter in the downstream tool. Select the appropriate class in the downstream tool to see the views that are labeled as that class.
Refining
The following sections provide best practices to refine the model if the tool makes inaccurate predictions. Review the results of the trained model after the Process step and adjust the labels or the training parameters.
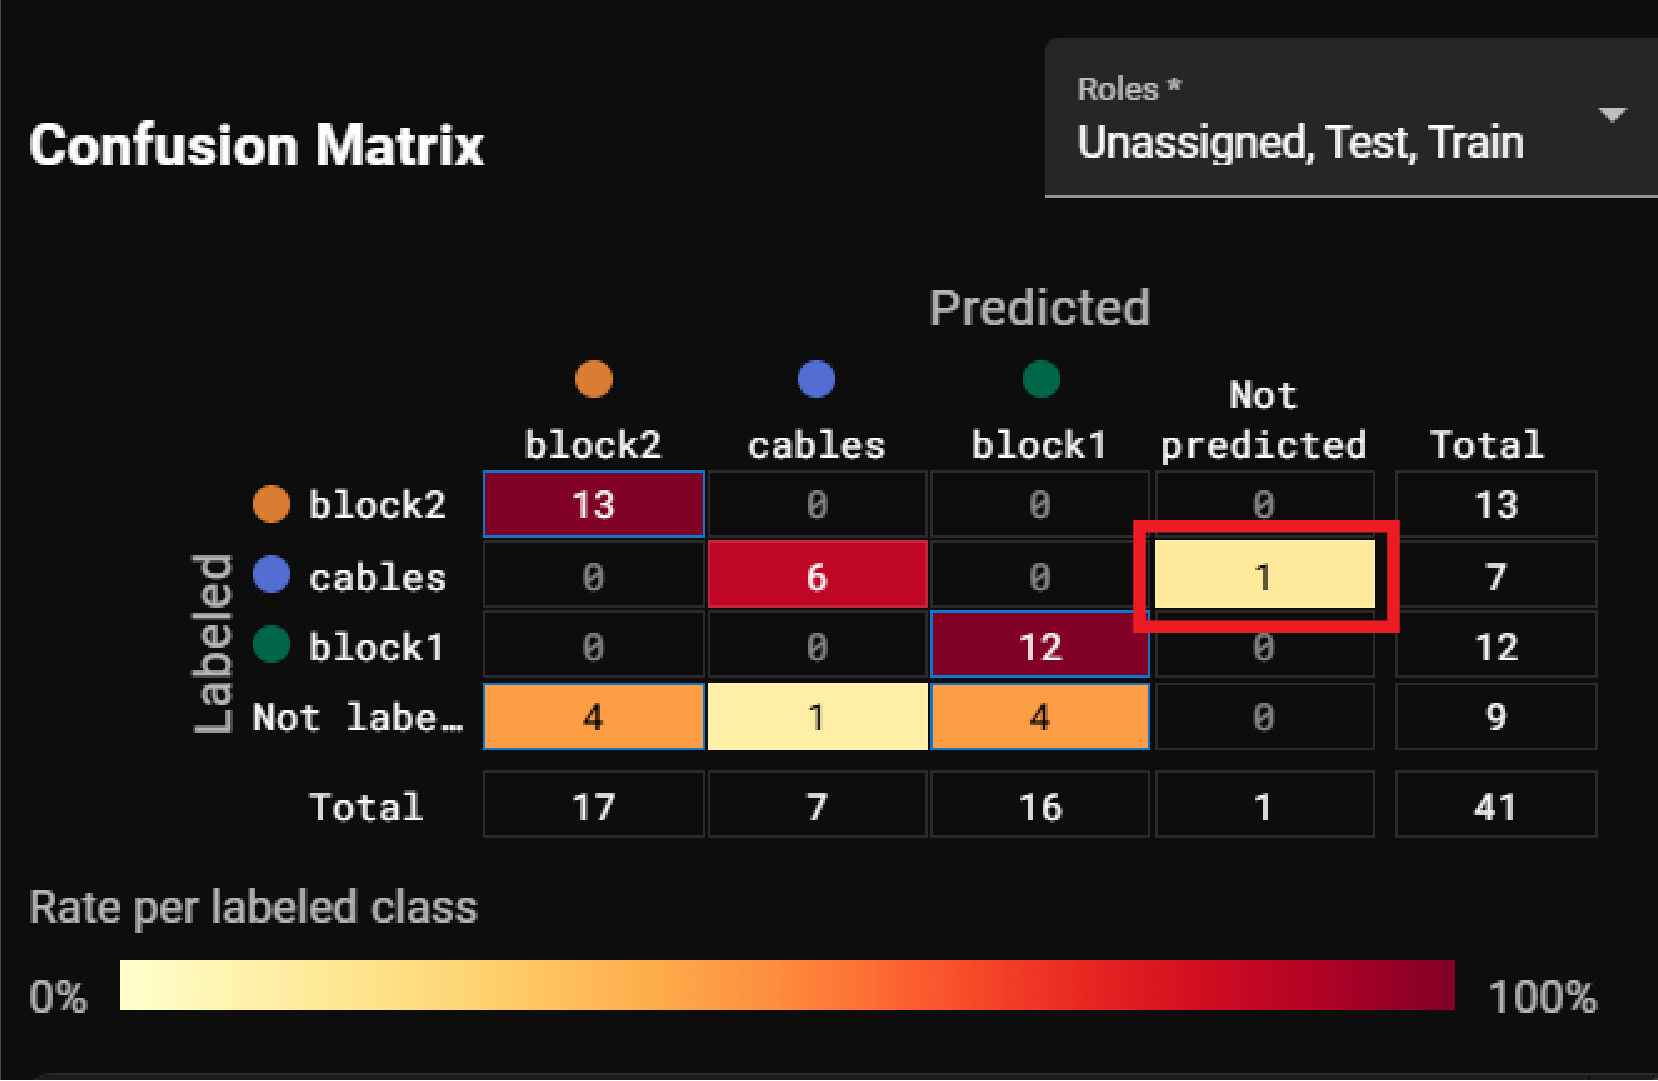
You can refine the labelingLabeling is the process of marking features or defects in images, or categorizing the images into classes. Labeling is crucial for training Deep Learning Lite and Deep Learning Standard tools because the labels serve as training material to guide the tools how to function correctly. or the training parameters to improve the accuracy of the predictions. The filters and the confusion matrix can help you find the images where the labels and predictions do not match. After filtering, the view panel on the left-hand side only displays the filtered images and you can view them to see where the model makes different predictions from the labels.
For more information, see Process and Metrics and Statistics
To filter for images that contain mismatches, open the Mismatches filter dropdown on the left-hand side of the UI and select one of the following options:

-
Unmatched Labels: This option filters for images where the model makes predictions for features that you did not label.
-
Unmatched Predictions: This option filters for images where the prediction does not match your labeling.
-
All Mismatches: This option filters for unmatched labels and unmatched predictions.
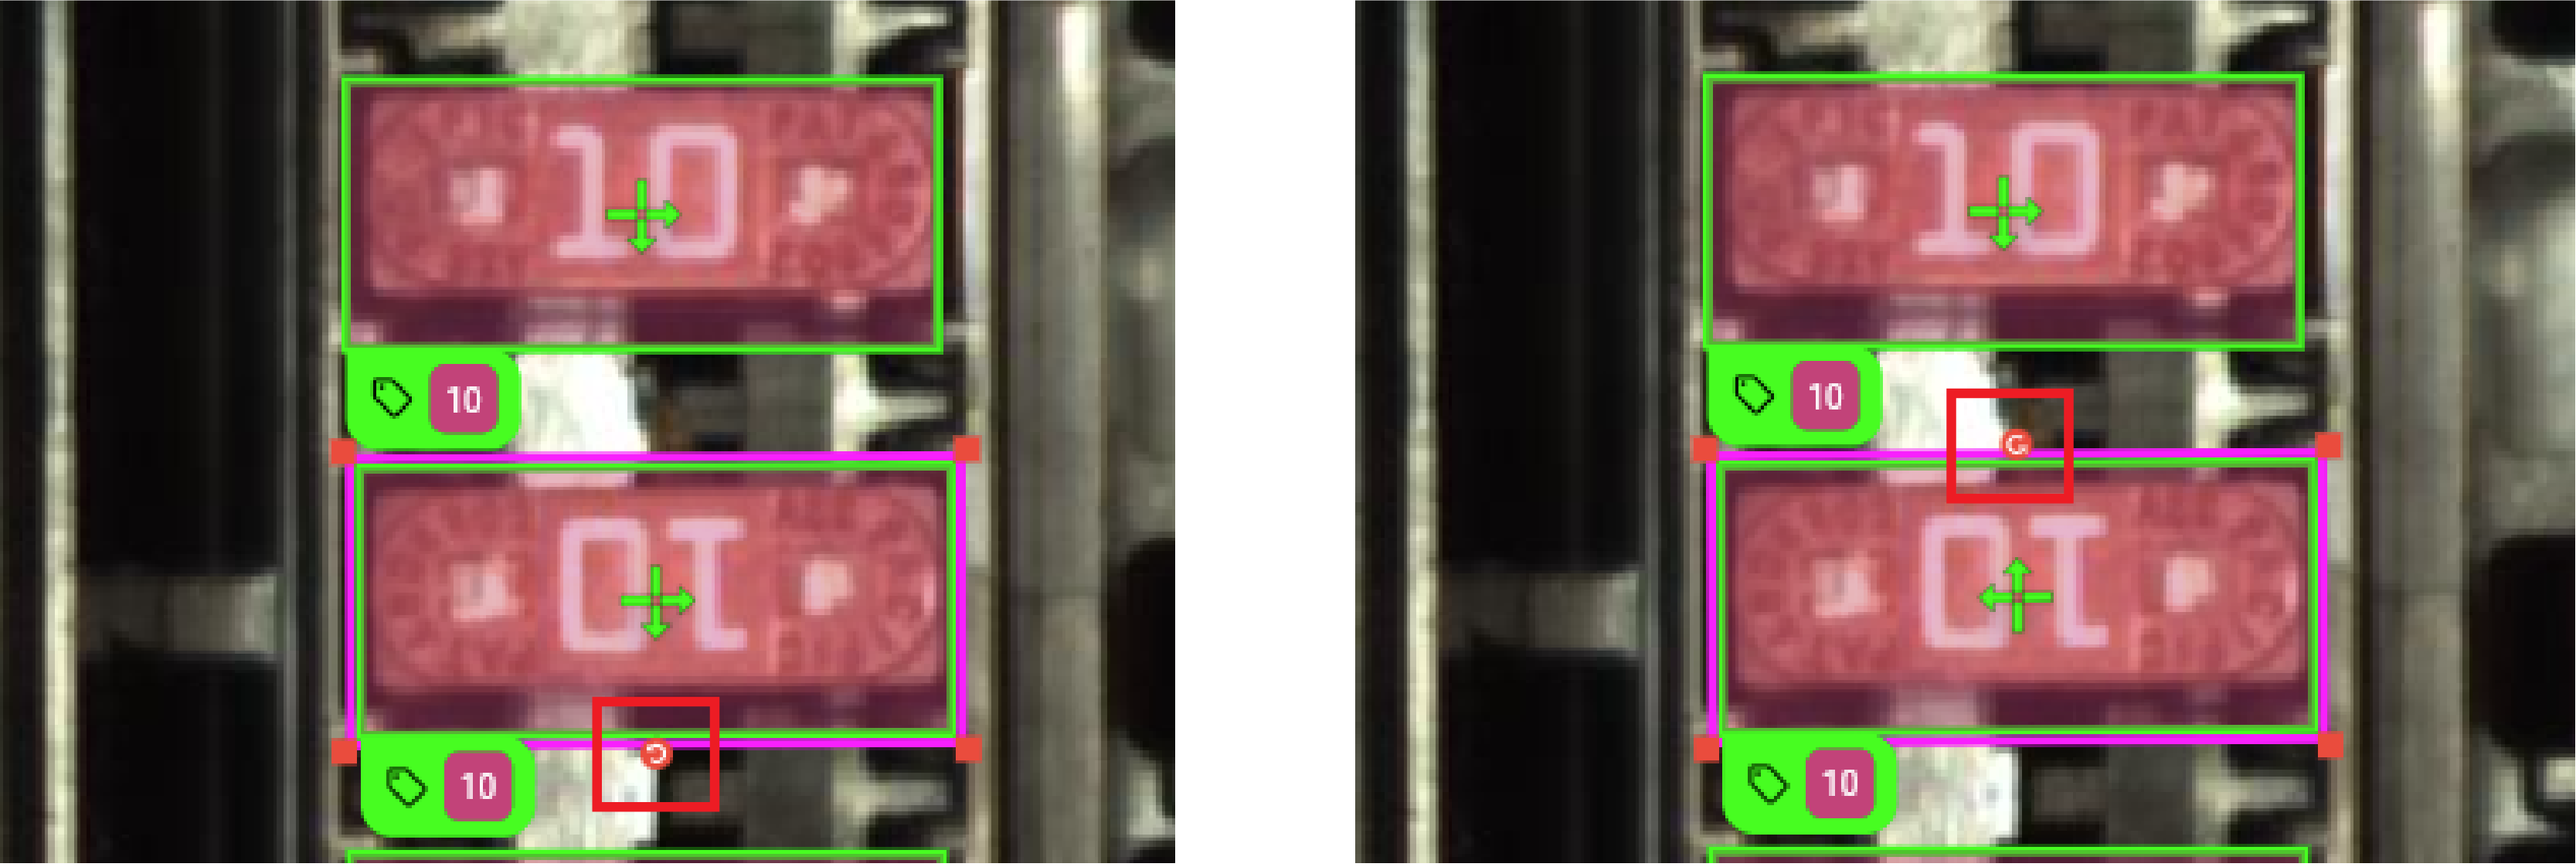
To find the images with mismatched labels or predictions based on classes, click on the number in the confusion matrix that represents a mismatched label or prediction. For more information, see Metrics. For example, in the following image, you can click the number in the Not predicted column of the cables row to find the image where a cable is labeled but the model does not make a prediction:
When you review the images, you can turn off the labels and the predictions in the overlay with the checkboxes under the image view:
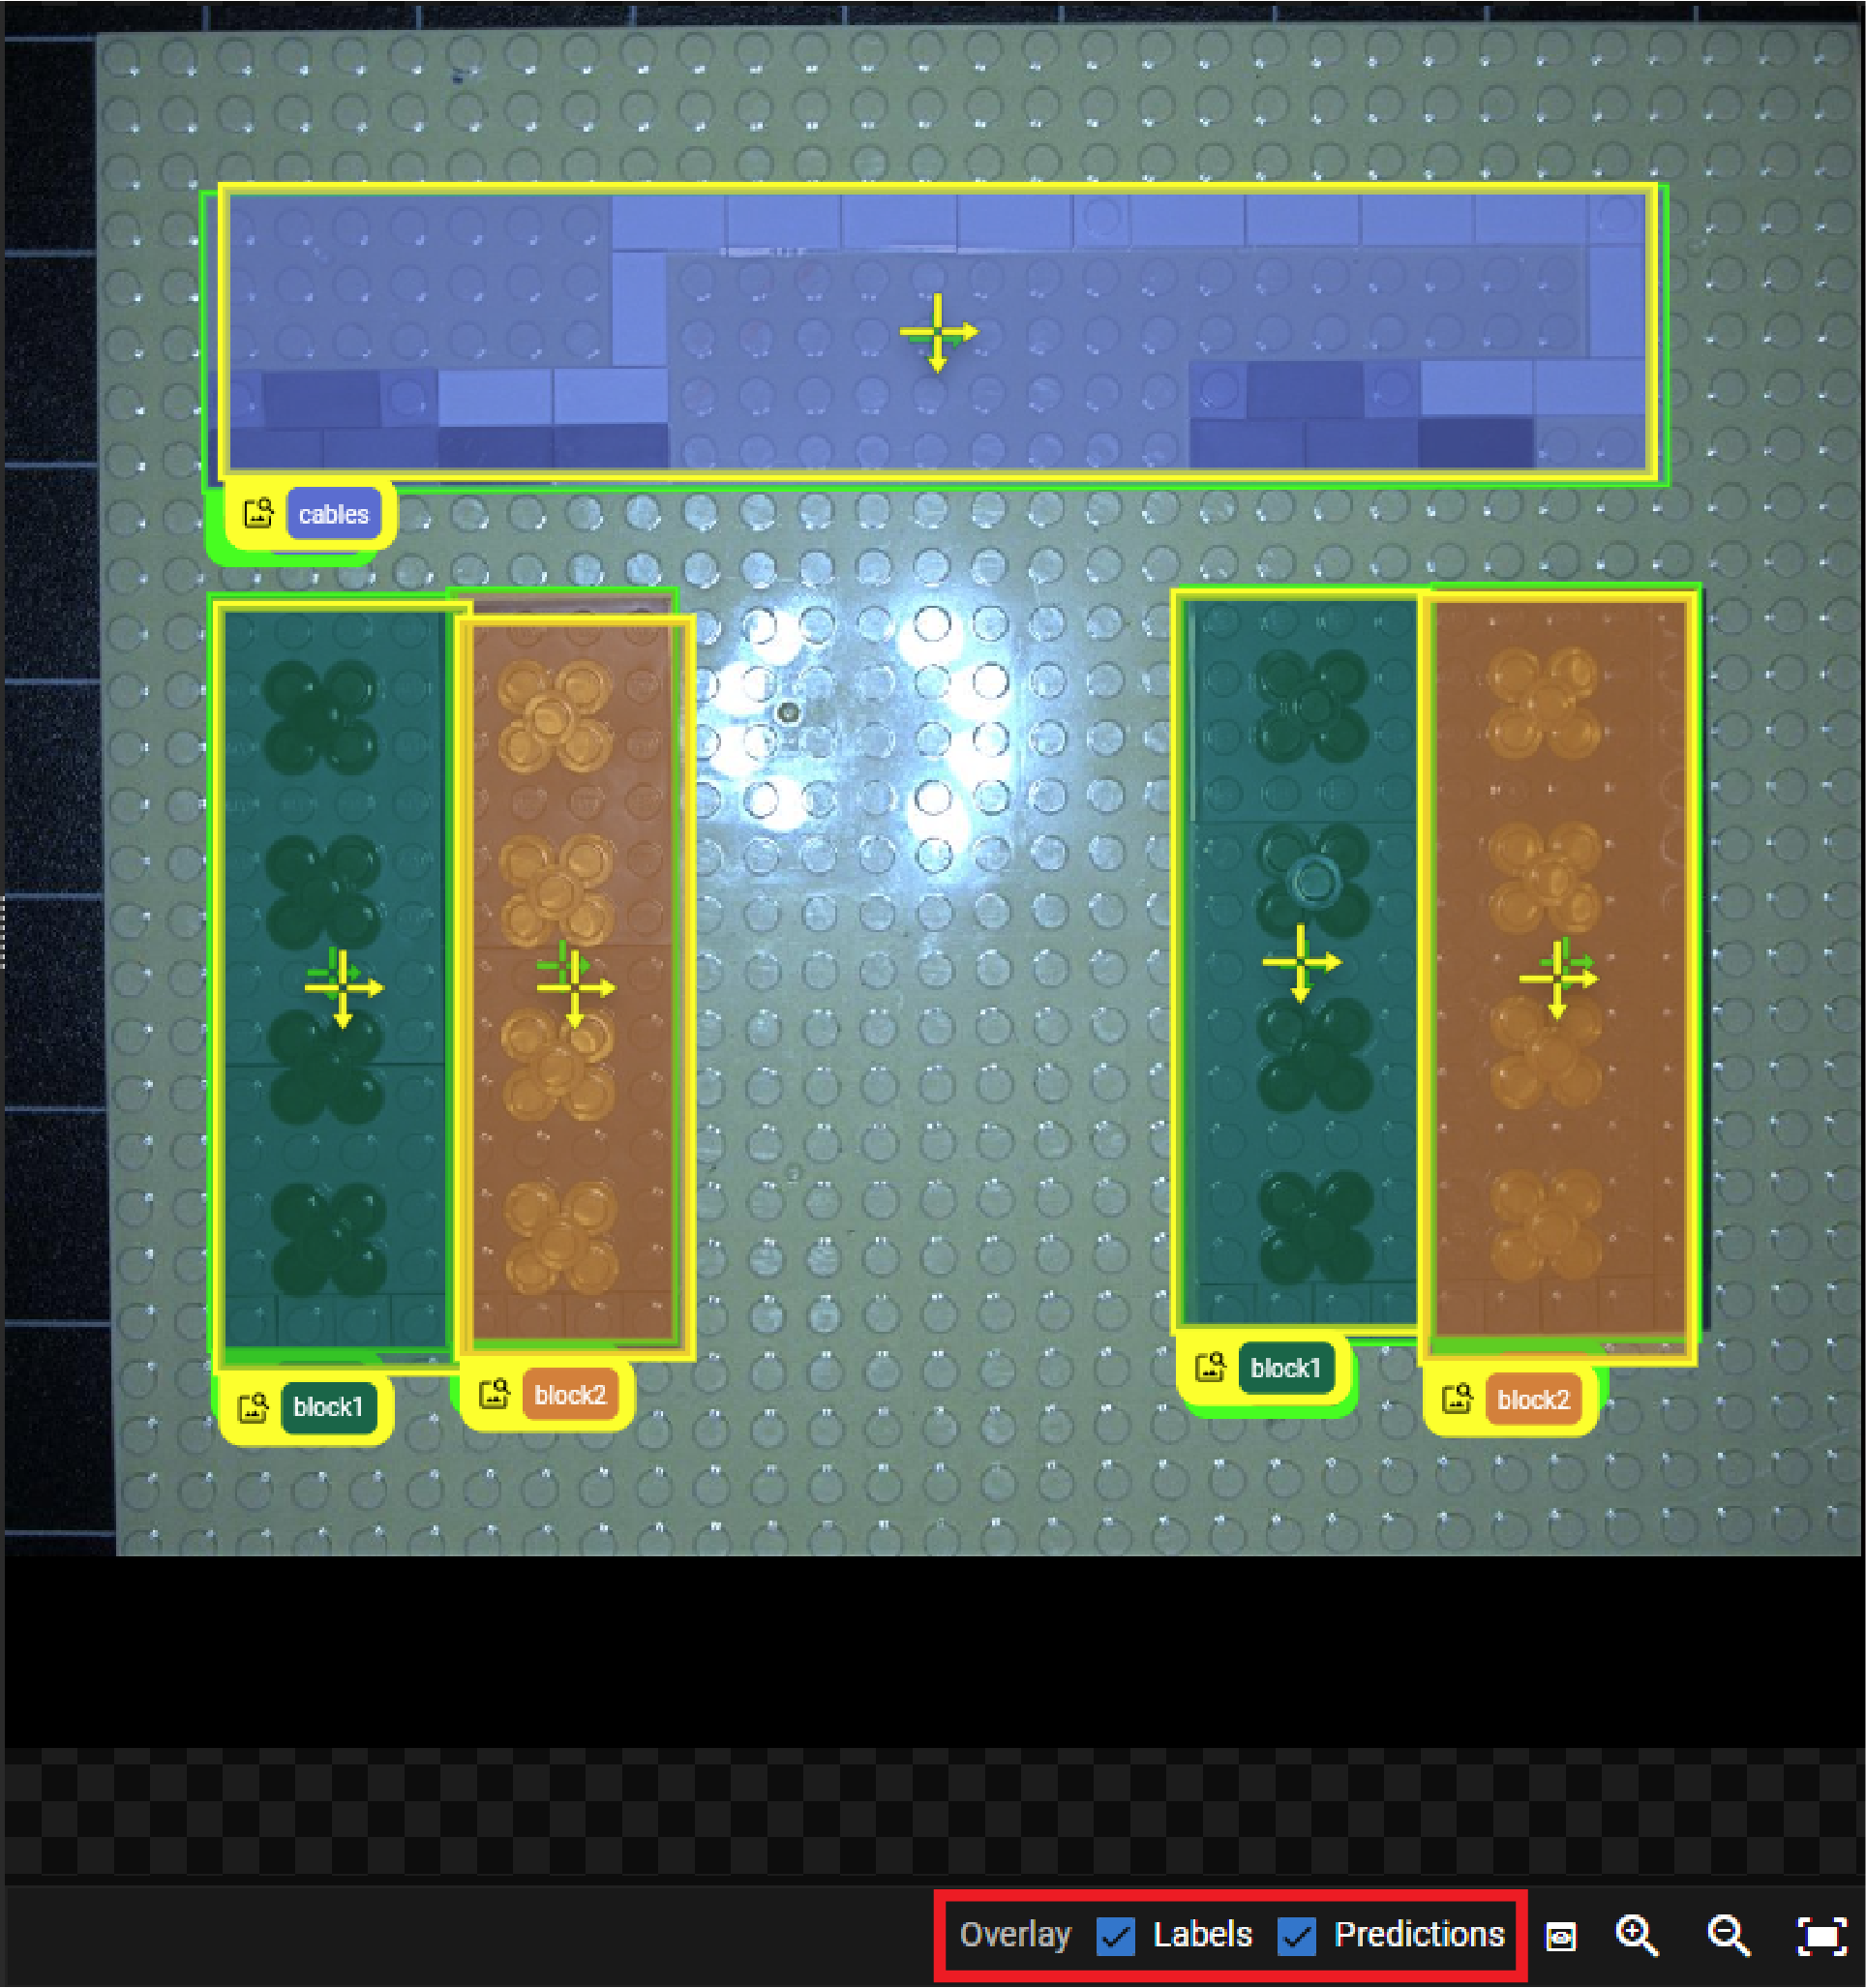
This helps with visual clarity when labels and predictions overlap.
Depending on the features and the number of classes, the Locator tool might need more images with features to learn from.
To add more images, do the following:
-
Optional: Select Deep Learning Lite - Accurate for the Training mode if you have Deep Learning Lite - Few Sample selected.
It is necessary to use the Deep Learning Lite - Accurate training mode if you have a large set of images.
-
Find more images in the view panel that include features in greater variance and label the features.
For example, if you want to locate a certain defect, try to include images where the same defect appears in different shapes.
-
Click Train to go to the training step.
-
Click Auto-Assign Roles to assign roles to the new images.
-
Click Train Model.
The Locator can have a hard time recognizing features if the features appear in different orientations in images.
To rotate the feature labels, do the following:
-
Select Deep Learning Lite - Accurate for the Training mode if you have Deep Learning Lite - Few Sample selected.
-
Check the Oriented checkbox under Features.
-
Find the images with mismatched labels and the features that are rotated differently.
-
Click on the label, drag the bottom of the rectangle, and rotate the label until the arrows match the bottom and right side of the feature.
-
Click Train to go to the training step.
-
Click Train Model.
If you use Deep Learning Lite - Accurate for the Training mode, then the Epochs parameter is available in the training step. The Epochs parameter specifies the number of optimization iterations done during training.
Adjust the number of epochs based on your application:
-
If you have less complex features, use fewer epochs.
-
If you have more complex features, use more epochs.
The tools typically need to see the training data about 40 times, which is the default setting. This setting is sufficient for most standard applications.