This topic contains the following sections.
The Color Match tool provides a graphical user interface to the CogColorMatchTool, which you use to compare the average color in a runtime image ROI to one or more colors you specify as parameters. The output is a score in the range 0 through 1 for each color parameter, with the highest score being the best color match. This section presents an example that uses the QuickBuild graphical user interface and the CogColorMatchTool to build an application that performs a quality control check on a Post-it Flags package. The application uses a color image of a flags package and checks each package compartment to make sure it contains flags of the correct color.
In an actual application packages to be checked might be transported on a conveyer belt that passes a color camera where an image is captured. The image is analyzed by the vision application we will develop here to see if the package should be accepted or rejected.
In the following example we show you one approach for verifying that each flag package contains the correct color flags, and in the correct positions. It is a confidence check that the flag package was manufactured correctly. There are other methods using this same color tool that would work equally well. In explaining the example, we don't exhaustively describe all of the color tool features and options, we only describe the features we use. For a complete description of all of the CogColorMatchTool features and options, see ColorMatch Tool Control Reference. Also, for information about how this tool works, see ColorMatch Tool Theory.
In your deployed application the image source will be a color camera connected to a Cognex frame grabber, or a FireWire color camera. However, for this example we will use the image database file C:%VPRO_ROOT%\VisionPro\Images\color_bookmarks.bmp from the VisionPro installation.
- Double-click the Image Source item in the QuickBuild window.
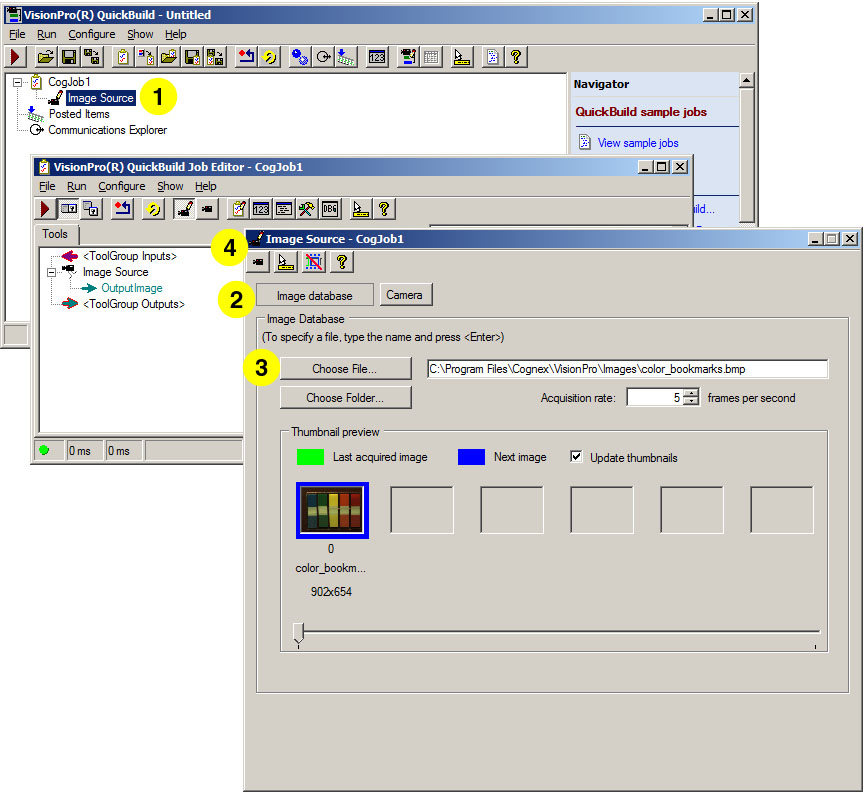
QuickBuild opens a QuickBuild Job Editor dialog and then an Image Source dialog.
- When the Image Source dialog opens, click Image database to acquire from an image database. (This option is selected by default.)
- Click Choose File to select an image database file.
Select the file C:/Program Files/Cognex/VisionPro/Images/color_bookmarks.bmp.
- Click the Live Display button in the dialog.
A live display window opens and displays the image.
- Close the live display window and the Image Source dialog.
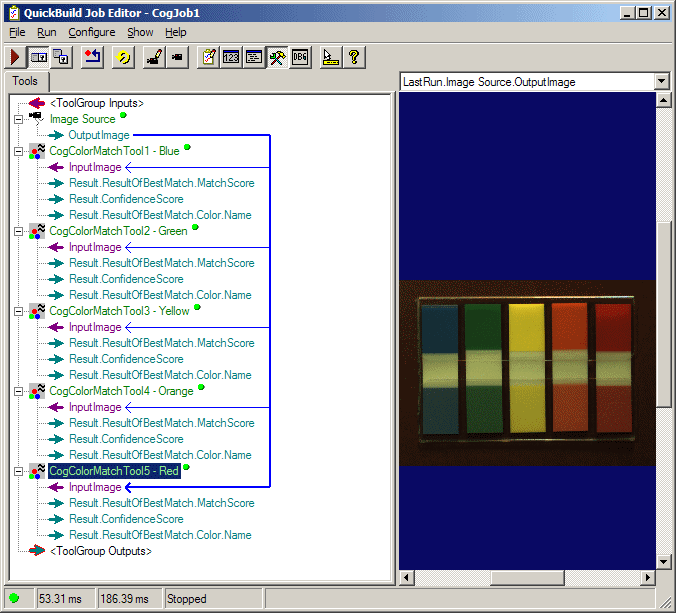
At this point your job has only the image source in it. (The Image Source is a special kind of tool that is only available within in QuickBuild.) You can run the job to see how an image appears in the tool group window.
- Click the Run button in the tool group's tool bar.
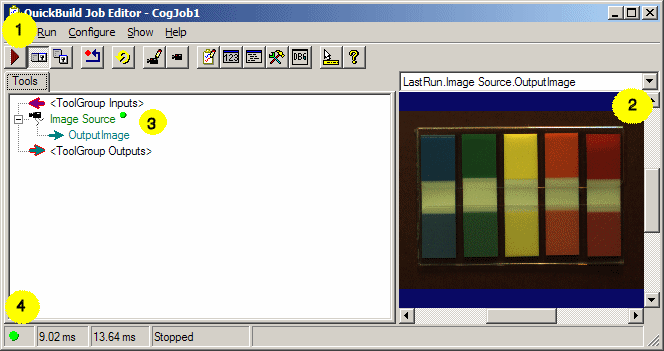
- The image acquired from the image database file appears in the display area. Right-click in the image display area to bring up a menu that allows you to adjust the image size.
- When you run a tool, a small green dot next to the tool indicates that it ran successfully.
- When all the tools in a job have run successfully, a green dot appears in the lower left corner of the Job Editor.
The CogColorMatch Tool finds the average color in a ROI of the run-time image. This ROI is the same for all images so in a real application it is required to register and align each image before running the tool. One way to do this is to configure a CogPMAlignTool and a [T:Cognex.VisionPro.CalibFix .CogFixtureTool] ahead of CogColorMatch Tool. However, to simplify this example we have omitted the alignment steps and have focused on using the CogColorMatch Tool. For a working example, see the following sample code that is part of your release: C:\Program Files\Cognex\VisionPro\Samples\Programmatic\Color\SimpleColorMatch.
For this application we wish to inspect the five colored flags in each package. Each of the flags is a different color and each is in a unique location. We will need to configure five copies of the CogColorMatch Tool, each with a different ROI.
- Click the toolbox icon to open the toolbox.
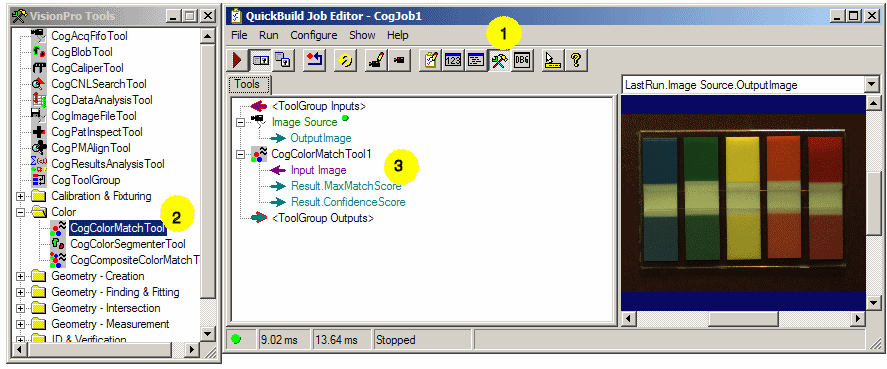
- When the toolbox appears, select the CogColorMatch Tool and drag it to the Job Editor.
- A new CogColorMatch Tool appears under the Image Source.
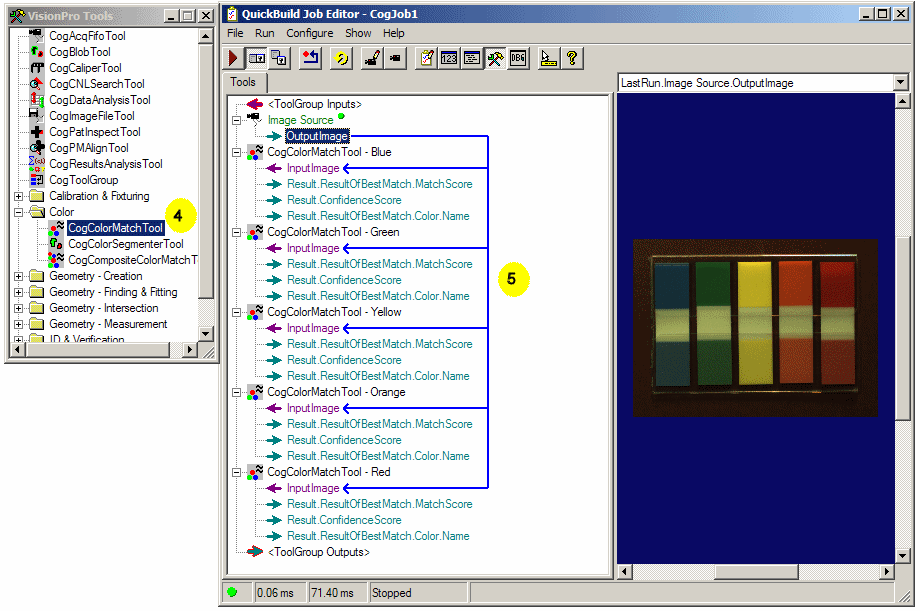
- Repeat this step four more times to configure five CogColorMatch tools. Right-click on each tool and rename it to indicate the color the tool will attempt to identify.
- Click on the OutputImage of the Image Source and drag it to the InputImage
of the first CogColorMatch Tool to link the source image with the tool. Repeat for the other four tools.
This tells the CogColorMatch Tool to use the image source for its input image.
There is no requirement to train the CogColorMatch Tool. You define the run-time parameters with the Colors, Region, and RunParams tabs in the dialog. After running the tool, the results are presented on the Result tab. These dialog tabs are described in the following sections.
- Select the Colors tab. Here you define the colors you wish to search for in run-time image ROIs you define.
In this application we configure each CogColorMatch Tool to find the color of a specific flag,
and compare the color found to the five flag reference colors in our known good sample.
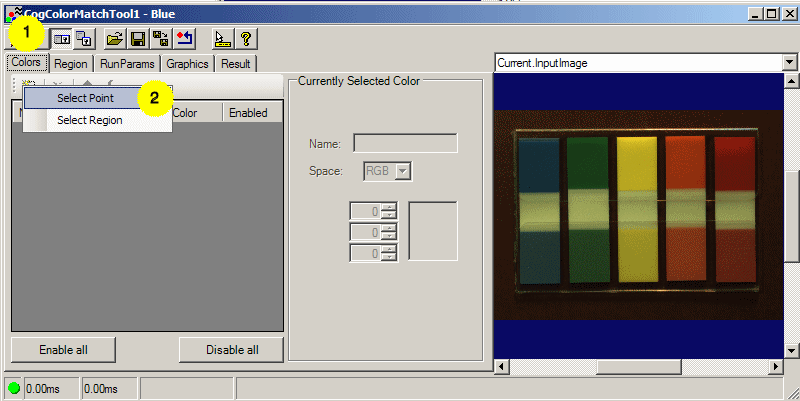
- Click on the Add new color icon and then Select Point in the drop down window. Since the colors are consistent everywhere on the flag, any point will do. If the target was a pattern of colors, or colors that varied over the ROI, you should use Select Region.
- In the Current Input Image use your mouse pointer to move the cross marker over the blue flag.
- Click Accept and blue color then appears in the color table.
- In the Currently Selected Color dialog you can enter a meaningful name for the color as we have done in the example below.
- Repeat these steps so that all five flag colors are in the color table.
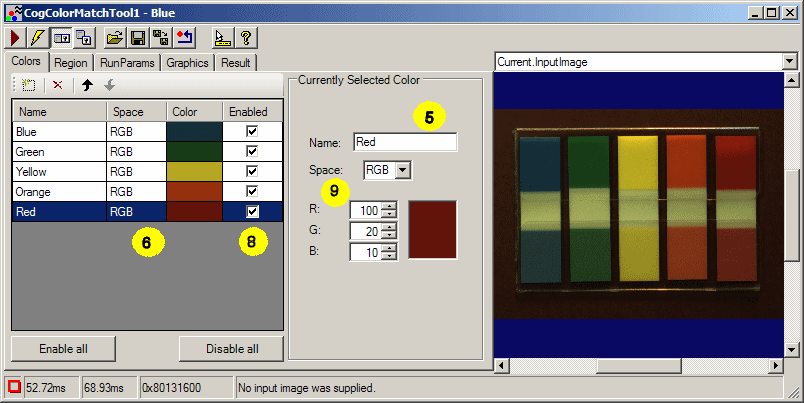
- Now repeat this procedure for each CogColorMatch Tool so that each tool will score its result against all five expected colors.
- Note that when you have multiple colors in your reference list as we do here, each color can be enabled and disabled individually by clicking the check boxes in the Enabled column. The Enable all and Disable all buttons can be used to enable and disable the entire group. Only enabled colors are used when you run the tool.
- Also, dialog controls allow you to change the color Space, and to set a specific color by entering its three components, RGB or HSI. This example uses RGB color space.
- In the CogColorMatchTool1 - Blue select the Region tab. Here you define the region of interest (ROI) where the tool will measure the color in run-time images.
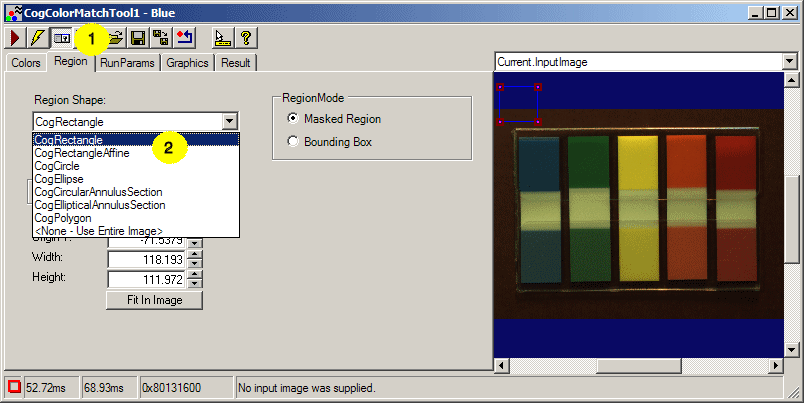
- From the Region Shape pull down menu, select the CogRectangle. A cyan rectangle appears in the current image.
- Use your mouse to resize the rectangle and to position it over the blue flag (see below).
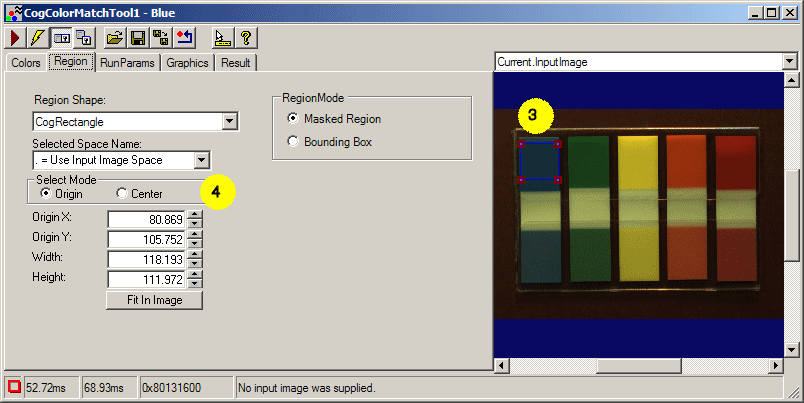
- Note that you can also position the run-time ROI by entering its size and position explicitly into the dialog.
- You will need to repeat the steps above for each of the five color tools to define the run-time ROI each tool will use to measure the run-time flag colors.
- Select the RunParams tab. Do not change the defaults on this tab. We want the tool to calculate a score based on the distance in RGB space between the specified color, and the run-tme image color. R, G and B values are equally weighted.
- In the QuickBuild Job Editor click on the Run icon to run the entire job. A green dot beside each color tool indicates the tool ran successfully.
- Open CogColorMatchTool1 - Blue and select the Result tab.
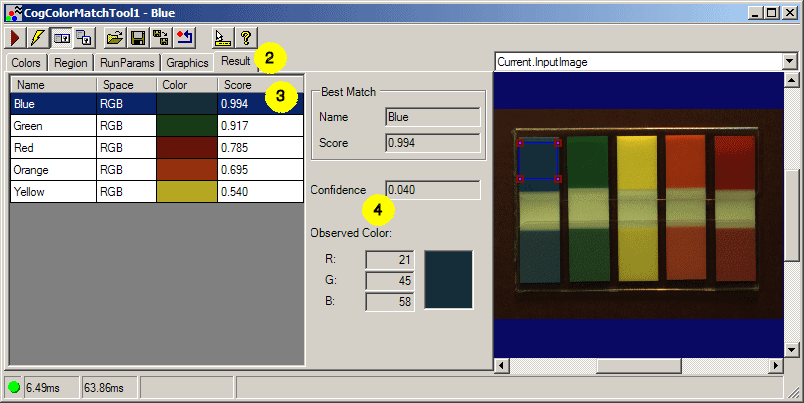
- A result appears in the table for each color you have enabled. Each result includes a Score in the range 0 through 1.0, where higher numbers
indicate a better match to the run-time ROI average color. In this example application each tool tests for all five expected flag colors and the highest score indicates the closest match.
Lower scores indicate no match.
The screen shot above for the CogColorMatchTool1 - Blue shows that the blue color received the highest score indicating that the measured flag was blue. Notice that green also received a high score. This is because green color and blue color extracted from the image have low intensity and low saturation, therefore they are relatively close in color space, and the tool score is a measure the color space distance between the reference color and the run-time ROI average color.
- For this result, the Confidence score is very low, indicating that the blue score is not significantly larger than the green score.
In color space, yellow is the color most distant from the other reference colors used in this application. The results for the yellow tool are shown below.
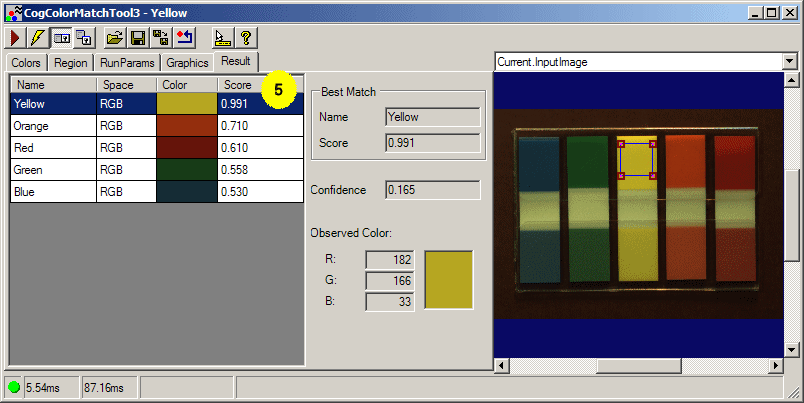
- CogColorMatchTool1 - Yellow shows a significantly high score for the color yellow, with a much higher Confidence score than the blue tool.
Check each of the five tools to ensure that each tool found the correct color, and compare their confidence scores relative to the color match scores.