WebHMI: A Functional Overview
Using WebHMI, you create a web page to host your Cognex Designer applications on internal (secured) networks. WebHMI is not intended to be a replacement for WPF HMI.
In the case of WebHMI, the deployed application acts as the web server. Others can connect to this web server using a web browser (a web client) over the internal network, assuming necessary firewall ports have been opened on the machine where the project was deployed.
An instance of a Web Server can be prevented from starting because:
-
The port specified (in WebHMI Settings) is being used by another application.
- Your web server instance is unregistered.
Either of these conditions may result in display of a warning page or a start-up error indicating that the web server failed to start.
Follow these procedures to ensure your Web Server instance is registered to the correct port and starts successfully.
Register and Enable a Web Server Instance
WebHMI applications are hosted on port 80 by default.
Using the Project Settings dialog box, complete these steps to ensure proper configuration of your Web Service instance.
- In the left-pane Explorer, navigate to System > Settings and double-click Settings. The Project Settings dialog opens.
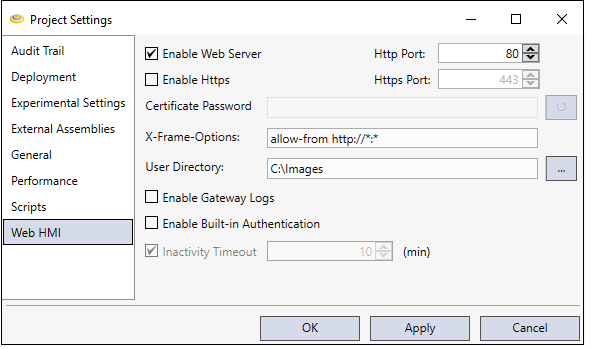
- In the Project Settings dialog, select WebHMI.
- Select Enable Web Server.
-
Enter the Port number you want to host Web Services, or accept the default of Port 80.
Note: The Web Server will not work with Google Chrome and Mozilla Firefox if the port is set to 79. When using those browsers, configure a different port number. - While logged-in as Administrator, click Register Port.
- Optionally, change the default User Directory that is selected when users work with the WebHMI interface.
- If finished, click Apply and OK. For advanced security configuration, continue with the following sections:
- Enable Authentication and Configure Permissions
- Enable HTTPS for WebHMI
Enable Authentication and Configure Permissions
When hosting and creating Web pages and services with WebHMI, you can choose whether or not to enable authentication.
When you enable authentication, you create a secured environment that requires users to log-in with a selected user name and password when they use the WebHMI hosted application.
To define user names and passwords, along with access privileges, use the procedure below to work with the User Configuration dialog box, accessible from System > Users in the Explorer pane.
You associate each Username and Password with an integer of your choice which you enter in the CurrentAccessLevel field.
The CurrentAccessLevel field has no built-in permissions. You programmatically define permissions by using CurrentAccessLevel to enable and disable controls on web pages.
To enable authentication for a Web Server instance, do the following:
- Follow the steps in Enabling a Web Server by Registering/Editing Port Number, above, to open the Project Settings dialog.
- In the Project Settings dialog box, select Enable Built-in Authentication.
- Optionally, enhance security by defining an inactivity timeout setting, which specified the number of time in minutes that the WebHMI session can remain active before lock-out by the log-in dialog. To set a timeout value, do the following:
- Select Inactivity Timeout.
- Enter the timeout limit value in minutes in the (min) drop-down box, or use the arrows on the right-side of the box to advance or decrement the value by one minute.
- Click Apply and OK.
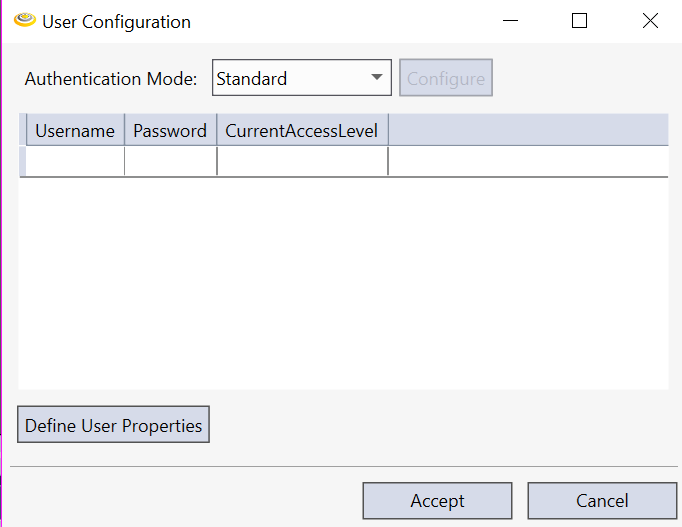
- In the left-pane Explorer, double-click System > Users to open the User Configuration dialog box.
- Select the Authentication Mode you want to use, either Active Directory or Standard.
- Define each Username, along with associated Password and CurrentAccessLevel that you want to assign to the user. After you complete each user entry, press ENTER and a blank row appears. When you finish adding all users, proceed to the next step.
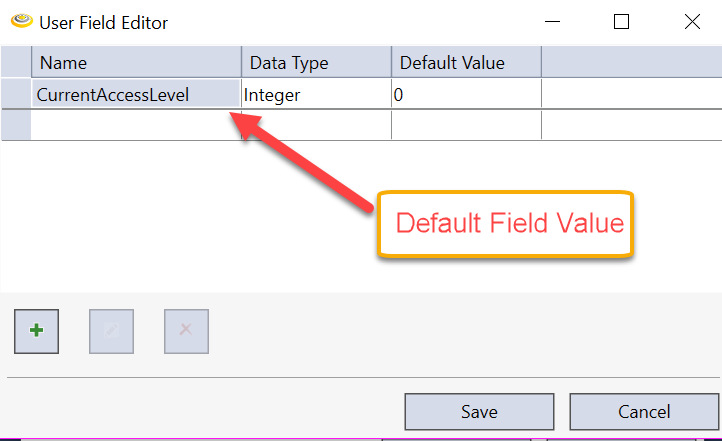
- Optionally, define other fields besides CurrentAccessLevel. To do this, click Define User Properties. The User Field Editor dialog box opens. In the User Field Editor, a default field entry exists that defines CurrentAccessLevel as Data Type of Integer with a Default Value of 0. Do not delete this default field unless you plan to define another field instead of CurrentAccessLevel in the User Configuration dialog and authentication code you will create. Define any other tags you plan to work with. Use the plus icon (+) to add tags, the pencil icon to edit field values, and the X icon to delete tags. When finished, click Save to save the field entries you have defined,
Enable HTTPS for WebHMI
Designer enables the WebHMI by default and can serve HMI content over http to your browser. Perform the following steps to enable WebHMI to serve pages encrypting data over an https connection:
-
In Designer, open Project Settings and select Web HMI.
-
Check Enable Https to enable the Https port . Cognex recommends you keep the default value of 443.

-
Click Apply and/or OK.
-
Save the project.
-
Deploy the project. See the topic Deploying a Cognex Designer Project for details.
-
Run the deployed project.
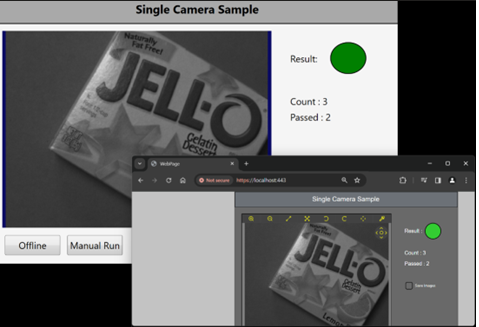
The deployed project allows you to open a web browser and access the WebHMI by entering https://localhost:443 into the browser address bar.
Type Limitations in JavaScript Web HMI
When creating JavaScript for Web HMI, be aware that only specific types are compatible in Web HMI instances. The range of data types available in C# are not available in Web HMI.
In summary:
- WebHMI Pages only use JavaScript
- WPF HMI Pages only use C#
- Tasks only use C#.
For an overview of type compatibility in Web HMI, compared to native C# applications, see WebHMI: Type Compatibility .
Displaying Records, Graphics and Tables Using WebHMI
You can host most display data or applications created with Cognex Designer on a Web Page using WebHMI. For a detailed description of these steps, see An End-to-End WebHMI Application.
- Register and Enable a Web Server instance using the procedure above.
- Optionally, enable authentication and configure permissions using the procedure above.
- Create an application with Cognex Designer and verify that it runs successfully in Test Mode.
- Using the Toolbox, create a Display, a Recorded Image Viewer instance, a Database, or a Table
- Bind the function, property, or query to the Display, Viewer, Database, or Table. See An End-to-End WebHMI Application.