Saving Images
The VisionPro Display has the ability to save the images that it is displaying, by taking a screen capture of what is being displayed and saving it to a file.
To save an image associated with a VisionPro Display, do the following:
- Within a Task, add and configure a Device to acquire or load images, and a VisionPro Tool Block to perform vision tasks on the images.
- Create a folder to store the saved images.
- In the Designer Project directory (C:\Users\<user_name>\Documents\Cognex Designer\Projects\<Project_Name>), create a folder for the saved images (e.g. "SavedImages").
- Add a tag that will be used to associate the path and file name of the saved images.
- In the Tag Manager, add a tag (e.g. "PathFileName") with a String Data Type.
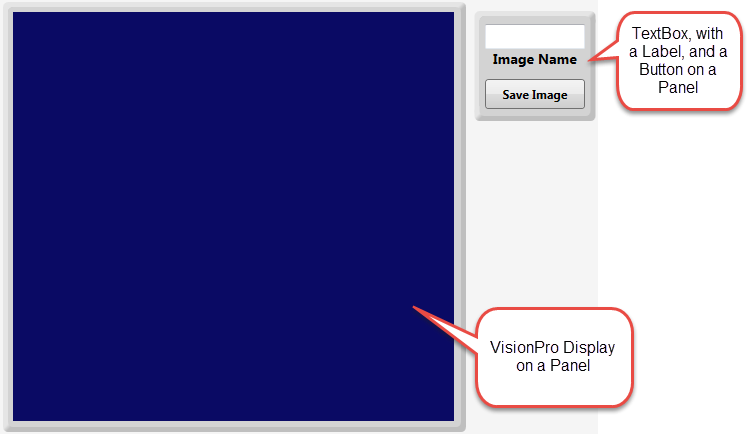
- Configure the Page with a VisionPro Display, a TextBox to enter a filename for the image, and a Button to initiate the save action.
- Add either a VisionPro Display, and set the Subject property to either an image output by a Device or a Tool Block.
- Add a TextBox.
- Add a Button, and in the Text property enter "Save Image".
- Right-click the Button, and from the menu, select the OnClick script point.
In the Script Editor for the OnClick script, add the following code:
$PathFileName = $System.Info.ProjectPath + "\\SavedImages\\" + $Pages.Page.TextBox.Text;
$Pages.Page.VisionProDisplay.Save(true, $PathFileName);
Note: When the fitImage argument is set to True, the unscaled image and graphics will be saved (however, the graphics are clipped at the image boundary). When it is set to False, only the image, as it currently displayed, will be saved.
- Enter Test Mode and enter a name for the image and press the Save Image Button. The image file should appear in the specified directory.