Deploy Your Vision Application to the Web
As you probably know by now, when you create a new vision application from pre-defined Project Types (as was the case in this Getting Started tutorial as well), Cognex Designer creates a set of preconfigured Task Blocks, Script Blocks, and two HMI pages as well (one local and one published).
To supply the ready-made HMI WebPage, Cognex Designer registers and enables a Web Server instance on your local computer using Port 80 as the default "listening" port. When you enter Test Mode, the WebHMI opens by default in the Web Browser tab of Cognex Designer. This is virtually identical to the Run Mode tab, which displays the client-side (local) HMI.
See the WebHMI: Functional Overview, Compatible Types, and an Example topic for more information on how to enable a Web Server on your local PC and host a WebHMI.
Modifying Your WebHMI for Deployment
On this procedure, you will modify the WebHMI WebPage of the project for live deployment. The steps of this are similar to the steps of modifying the client-side (local) HMI, as was done in the Configure the HMI topic. Perform the following steps to add additional web page control elements to the published WebHMI:
- Add a label to the WebHMI for displaying the total number of blobs counted.
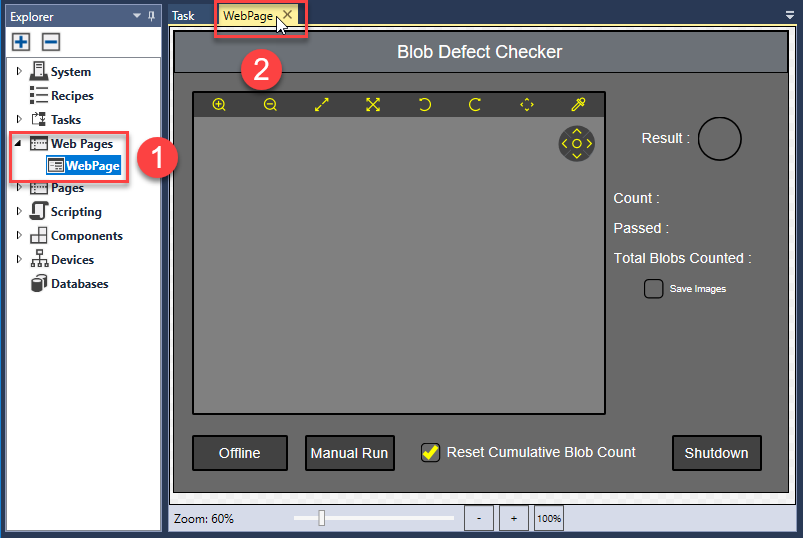
In the Project Explorer, double-click Web Pages > WebPage (1). The WebPage HMI page then opens in a new tab (2).
From the Toolbox pane, drag Controls > Label on to the WebPage.
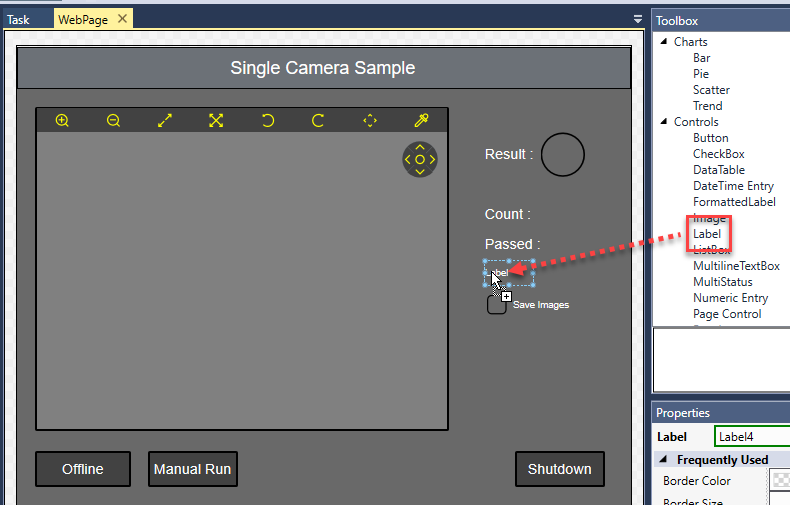
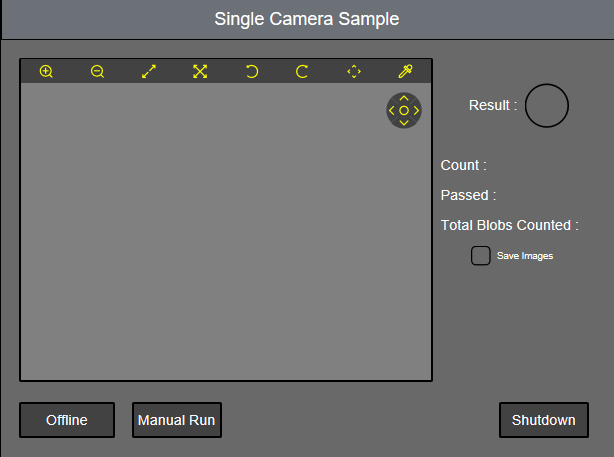
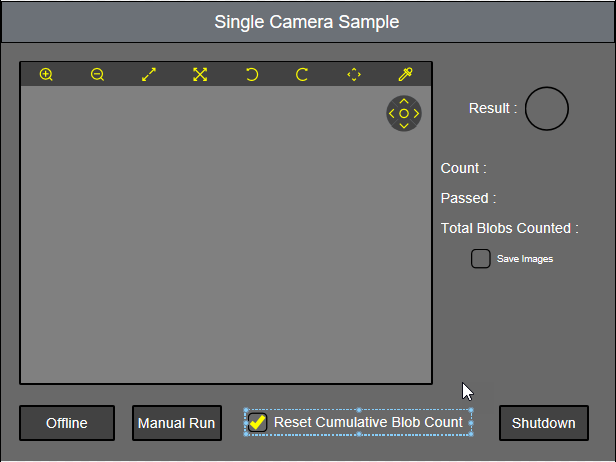
Customize the label to read Total Blobs Counted : , using the same techniques you used to rename labels in the local HMI. Once you are done, the WebHMI page should look similar to the below example:
- Replicate the expression in the local HMI that increments $Blob_Count_Cumulative in the Web HMI as follows:
- In the Project Explorer, click Pages > SingleCamera to open your local HMI.
Select the Total Blobs Counted : label (1), then in the Properties pane, click the
 (Expression Builder) button next to the Frequently Used > Text field to open the Expression Builder.
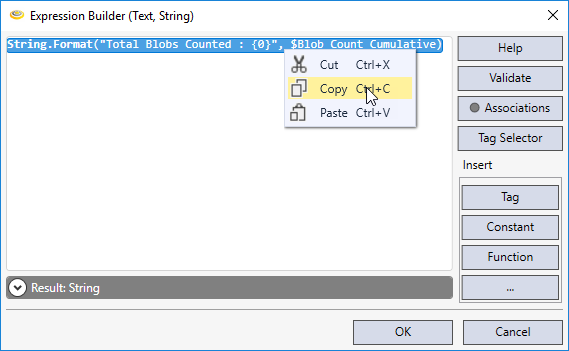
Copy the expression (String.Format("Total Blobs Counted : {0}", $Blob_Count_Cumulative)) by selecting it and right-clicking Copy. Then, click OK to close the Expression Builder.
- Click the WebPage tab again to return to the published HMI web page.
Select the Total Blobs Counted : field that you just created on the WebHMI (1). Then, in the Properties pane, click the
(Expression Builder) button next to the Frequently Used > Text field (2) to open the Expression Builder.- Paste the copied expression in the WebHMI's Expression Builder by selecting it and right-clicking Paste. Click OK to close the Expression Builder when you are done.
- Create a checkbox to reset $Blob_Count_Cumulative as follows:
- From the Toolbox pane, drag Controls > Checkbox to the WebPage. The WebHMI checkbox looks slightly different from the local HMI checkbox.
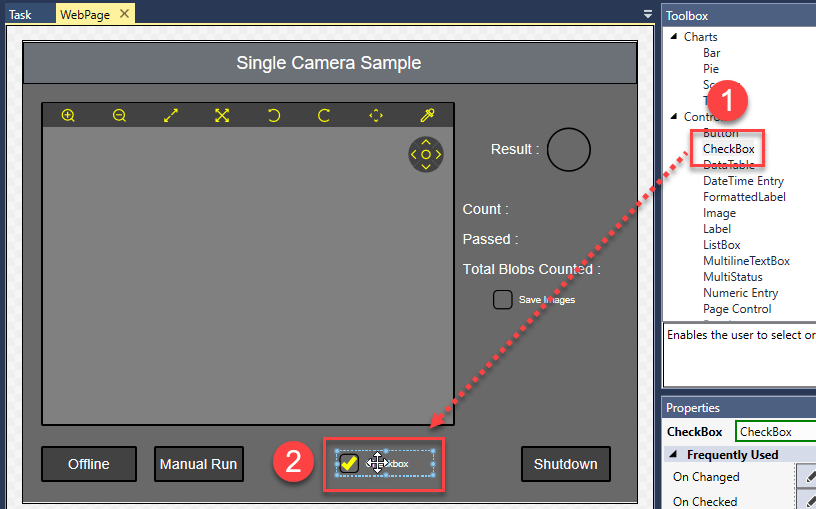
- In the Properties pane for the selected Checkbox, modify Frequently Used > Text to read: Reset Cumulative Blob Count.
Adjust the font size and location of the checkbox as needed. The configured checkbox should look similar to the below example.
- With the Checkbox still selected, click the
 (Edit Action) button in the Frequently Used > On Checked row. A Script Editor window titled CheckBox.Checked opens.
 Copy the following JavaScript code into the script:
$Blob_Count_Cumulative = 0;
- Click the
 (Check Script) button to validate the script. If a green stripe appears on the line of code, it is validated and ready for use.
 - Close the CheckBox.Checked script.
- From the Toolbox pane, drag Controls > Checkbox to the WebPage. The WebHMI checkbox looks slightly different from the local HMI checkbox.
- Test your WebHMI interface and application before deploying it as follows:
- Click the Task tab, then click
 .
. - Execute the project either through the Project > Run option, by clicking the
 (Run) button of the toolbar above the Task Editor, or by pressing F5.
 - Click the Web Browser tab to open the published WebHMI page you just updated.
- Click the Manual Run button on the web page to accumulate more test data. Notice how the configured labels are updated with each run.
- Click the Reset Cumulative Blob Count checkbox to ensure it operates as designed (that is, it resets the value of the Total Blobs Counted label upon enabling it).
- Click the Shut Down button to terminate your application. Alternatively, click the Project > Stop menu, the
 (Stop) button in the toolbar above the project web page, or press F5.
- Click the Task tab, then click
- Rename the title of the WebHMI page as follows:
- Select the title Single Camera Setup on your WebPage.
- In the Properties pane, in the Frequently Used > Text field, replace Single Camera Setup with an appropriate title such as Blob Defect Checker.
- Save your project for the final time by clicking File > Save All.
Deploying Your Application to the Web
Deploy the completed project on the web as follows:
- Click Project > Deploy. Complete the selections and click OK. See Deploying a Cognex Designer Project
- Click Accept to dismiss the Deployment Successful dialog box.
- Once your project has been deployed successfully, and an icon to run your project has been placed on your desktop, click OK to dismiss the Deployment Successful dialog box.
Finally, host your packaged deployment executable on either a PC running Cognex Designer with an WebHMI: A Functional Overview or in a production environment with an Apache Web Server on the back-end.
Congratulations! You managed to set up a new vision application!