This topic contains the following sections.
The OCVMax tool edit control provides a graphical user interface to the CogOCVMaxTool tool, which you use verify that one or more character strings in an image contain the expected characters at each position. Vision applications typically use OCV to verify lot codes, date codes, expiration dates, and other information printed on products or packaging.
The OCVMax tool edit control allows you to select a font file, specify a character string to verify, and modify an array of image search parameters for successfully locating both the entire string and individual characters within the string in each acquired image. The following figure shows an OCVMax tool edit control:
The edit control offers the following features:
- A row of control buttons along the top of the control
- A set of function tabs for selecting the proper font, specifying the character string, modifying search parameters, and viewing results
- An image display window for displaying acquired images and graphical results of the OCVMax tool
Use QuickBuild to create a CogOCVMax tool. A new CogOCVMax tool appears with an input terminal for the InputImage and output terminals for results indicating whether all the character positions in the arrangement have been verified along with an overall verification score for the string, as shown in the following figure:
To include the edit control in your custom vision application, you must first add it to your Visual Studio.NET development environment. See the topic Adding Edit Controls to Visual Studio for more information.
| Button | Description | Function |
 | Run | Search the Current.InputImage for the configured character string and perform an OCVMax verification of the characters it contains. |
 | Local image display | Open or close the local image display window. An OCVMax tool supports the following image buffers:
|
 | Floating image display | Open one or more floating image windows, which support the same image buffers as the local image display window. |
 | Open | Open a VisionPro persistence (.vpp) file that contains a set of saved properties for this vision tool object type. VisionPro reports an error if you try to open a .vpp file for another object type. |
 | Save | Save the current properties of the vision tool to a VisionPro persistence (.vpp) file. The edit control allows you to choose between saving the vision tool with or without its image buffers and tool results. |
 | Save As | Save the current properties of the vision tool to a new VisionPro persistence (.vpp) file. |
 | Reset | Reset the vision tool to its default state. The tool gives you a choice between resetting to the default-constructed state, which is appropriate when you are using it in a Visual Studio.NET application, or its template-initialized state, which is appropriate for QuickBuild applications. |
 | Show Floating Results | Open a separate results window with the same contents as seen in the Results tab. |
 | Show ToolTips | Enable or disable the display of tooltips for individual items in the edit control. |
 | Help | Open this VisionPro online help file. |
Use the Font tab to select the font used in the character string you want to verify. The following figure shows the default Font tab:
Use the following controls to select the correct font for your character string:
| Control | Description |
[P:P:Cognex.VisionPro.OCVMax.CogOCVMaxFont.FontName] | Click Browse to open a dialog box that lets you select a file containing a single font or multiple fonts. Be aware that you cannot select a font from the /WINDOWS/Fonts directory. If you need a font file from that directory, first copy it to any other directory and select it from there. An OCVMax tool can load the following font file types:
|
| GetAvailableFontNames | If you choose a font file containing multiple fonts, select the particular font file you want to use. If the font file you chose contains only one font, this field displays Single Font File. |
The edit control displays each character key in the font. Enable those character keys that can appear in the character string you want to verify. Restricting the set of keys to just the characters that can appear in the character string prevents the tool from comparing the characters you want to verify with irrelevant characters, which reduces the amount of possible confusion and improves the overall performance of the tool. Use the following buttons to select specific groups of character keys all at once:
You must enable punctuations marks individually. | |
| Polarity | Choose whether the characters in the string are dark on a light background or light on a dark background. |
| Tune After Train | Perform the tuning operation after the tool has been trained with the character string you want to verify. |
| Train | Train the OCVMax tool with the character string you want to use. You must specify the character string on the Text tab before you can train the tool. |
Use the Text tab to specify the character string you want to verify. The following figure shows the default Text tab:
| Control | Description |
| SetText | Enter the character string you want to verify, as it appears in the Current.InputImage. Once you have entered the string, click Adjust Position to position the graphics representing the character string over the actual string in the Current.InputImage. |
Use the following parameters to modify how the tool displays the graphics representing the string you want to verify over the Current.InputImage:
| |
| Noise Level | Specify the amount of background noise surrounding the character string you want to verify in the Current.InputImage. The OCVMax tool expects the character strings in the run-time images to have the same noise level. |
| Registration Mode | Check Clean Print to use [T:P/ProgrammingReference/html/Cognex.VisionPro.OCVMax.CogOCVMaxCharacterRegistrationConstants] mode registration. This requires images with consistent grey levels and no defects, but provides faster operation. |
| Tune After Train | Perform the tuning operation after the tool has been trained with the character string you want to verify. |
| Train | Train the OCVMax tool with the character string you want to use. You must specify the character string on the Text tab before you can train the tool. |
Use the Wildcards tab to establish the key set the tool uses to know which characters can be expected at every position in the character string. The following figure shows an example Wildcards tab:

| Control | Description |
| Position | Use the button bar below these characters to choose which position in the string you want to define a key set of wildcards, or multiple character keys. |
| GetKeysetCharacters | View the character keys currently enabled for this position in the character string. |
| Key Selection | Select all the valid characters for this position in the character string. Be aware that specifying a mix of wildcard characters that contain both blank and non-blank characters is not recommended and can seriously impact the performance of an OCVMax tool. |
| Actions | By default, additional character keys you enable apply only to the selected character position. If you select All Positions, then any additional character keys you enable apply to all positions within the string. |
| Selected Keys | Use the Add and Delete keys to modify the set of valid character keys for the currently selected position. |
| VerificationType | Set the type of verification to be performed on the associated character position. When set to Normal, the OCVMax tool will determine that each character is either Verified, Confused, or Failed. This is the default verification type for the tool. If set to Always, the OCVMax tool will always return a Verified result for each character in the string, but will determine which character in the font most closely matches the character in the image |
Use the Image Params tab to set the search mode you want the OCVMax tool to use, set the accept threshold for locating the character string, and enable additional degrees of freedom depending on how the character strings in the images you acquire can vary from image to image. The following figure shows the default Image Params tab:
| Control | Description |
| Search Mode | Choose a search mode the OCVMax tool will use to locate the character string in each image. |
Accept Threshold | Set the accept threshold for locating the entire string within the image. |
Additional Search Parameters | The tool supports the following degrees of freedom in an effort to reliably locate the character string in successive images:
The tuning operation can generate good starting values for these additional search parameters, but you should modify them as necessary based on testing the OCVMax tool with sample images of the character string you want to verify. |
Use the Character Params tab to specify search parameters the OCVMax tool can use to locate individual characters within the string. The following figure shows an example Character Params tab:

| Control | Description |
Search Parameters | The tool supports the following character search parameters:
|
Confusion | The Character Params tab displays the confusion matrix for this character string, and allows you to modify the following confusion matrix parameters: |
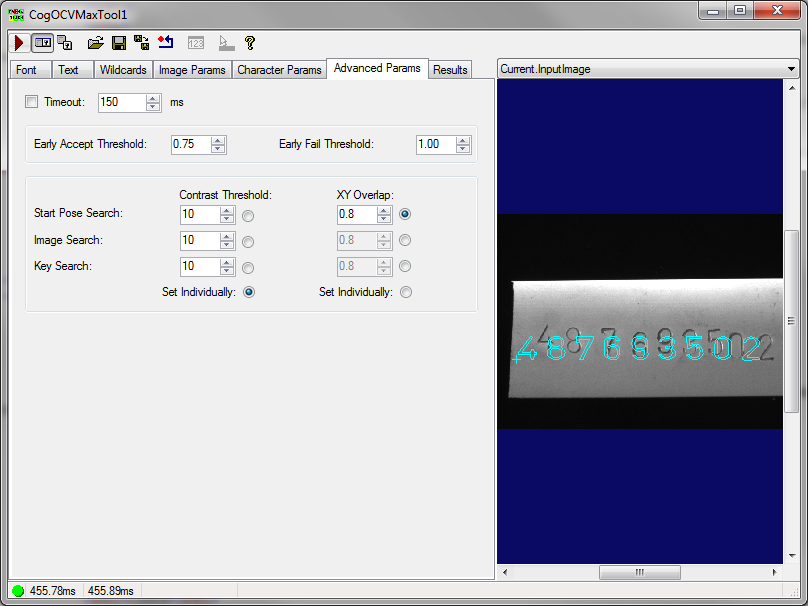
Use the Advanced Params tab to enable a run timeout or to set advanced parameters that can improve the overall performance speed of the tool. The following figure shows the default Advanced Params tab:
| Control | Description |
| TrainTimeoutEnabled | Enable a run timeout. |
| TrainTimeout | If Timeout Enabled is checked, this is the maximum allowable time in milliseconds. If the time limit is exceeded, the tool will report that none of the characters passed verification. |
| EarlyAcceptThreshold | The threshold for early acceptance of a potential line match as the true instance of the line in the image. If the percentage of character keys in the line that match (i.e. are verified or confused) is above this threshold, no further searching for the line is performed. This speeds up the search process when the user knows that there will not be spurious characters in the runtime image (for example when it is known that the only text in the image will be the string to be verified). |
| EarlyFailThreshold | The threshold for early failure of a potential line match as the true instance of the line in the image. If the percentage of character keys in the line that match (i.e. are verified or confused) is below this threshold, the section of the image containing the potential line will not be considered any further. This speeds up the search process when you know that the image should be clean, with no missing or badly damaged characters. |
Defines the minimum acceptable contrast for a pattern instance for any of three types of searches: | |
This is the amount of XY overlap above which two results are considered to be the same for any of three types of searches: |
Use the Results tab to view the results of the last run of the OCVMax tool. The following figure shows an example Results tab:
| Control | Description |
The tab displays the following results:
| |
Character Results | The tab displays results for each character in the string. If for any reason a character fails to verify, the corresponding cell in the Diagnostic column displays a hint regarding which degree of freedom you should enable or increase in range on the Character Params tab:
|