The first step in building a vision application is defining a set of vision tasks that the application must perform on every acquired image. After defining the vision tasks, you can then select which tools you need to perform each task and the order in which they execute.
For example, an application might perform an inspection of diskettes as they pass by on an assembly line to ensure that the label has been properly positioned. The following vision tasks need to be completed for this type of an application:
- Acquire an image of a diskette as it passes under the camera.
- Locate the edge on both sides of the diskette.
- Locate the edge on both sides of the label.
- Measure the distance between the edge of the diskette and the edge of the label on both sides of the diskette.
- Determine whether the distance between the edges falls between some small, predetermined range. If not, the diskette has been manufactured incorrectly.
This type of straight-forward application can be solved by just a few vision tools contained within a single tool group. Other applications, however, might require more vision tools and the overall vision task becomes more complicated.
For example, the following tool group contains the vision tools for an application that inspects an image of a thermometer, locates the indicator arrow inside, and performs other measuring actions relevant to the vision task the application is designed to solve:
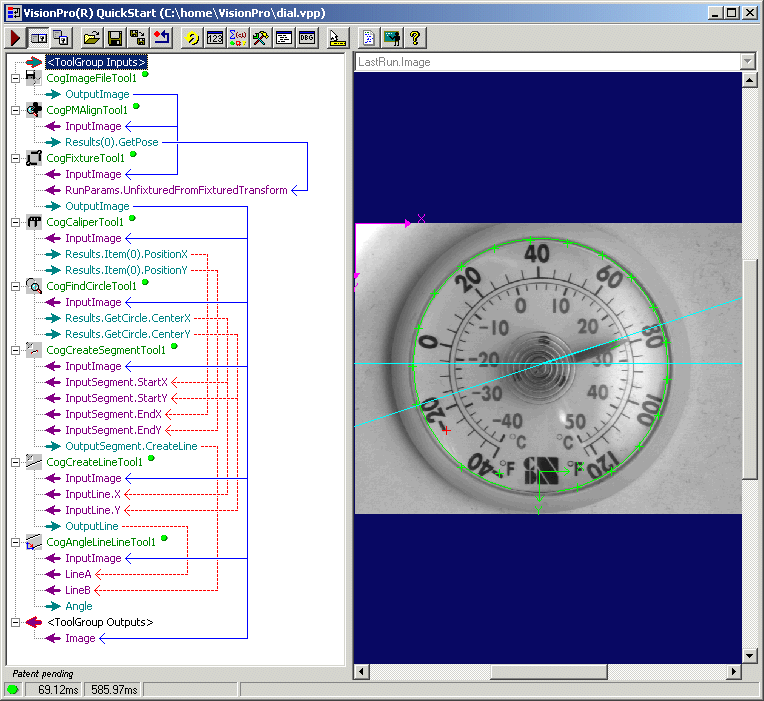
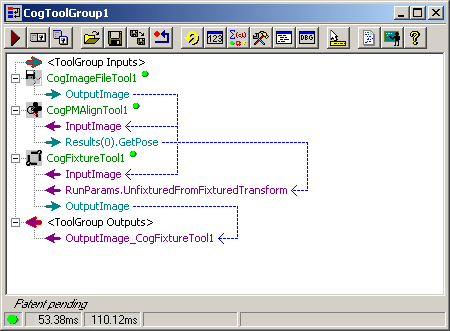
The first three vision tools in this application capture an image of a thermometer, locate a unique feature inside the image, and then base a Fixture tool relevant to this feature so that all subsequent vision tools analyze the correct portion of the image. For maintenance and troubleshooting purposes, it might be beneficial to move these three vision tools inside a second tool group, nested inside the main tool group. The following figure shows this second tool group:
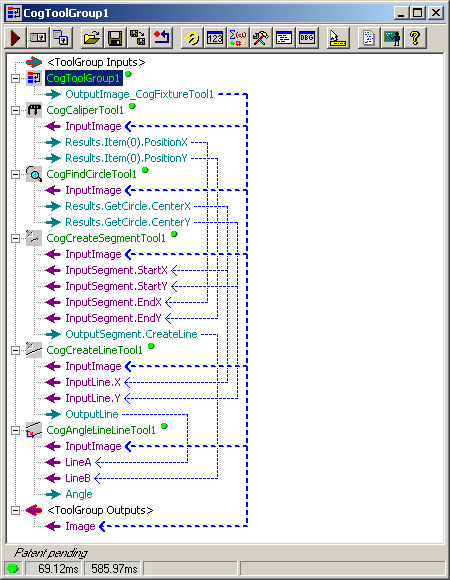
This second tool group exposes its OutputImage_CogFixtureTool property, which can be passed to the InputImage property of all subsequent vision tools, as shown in the following figure:
To add a nested tool group to a new application, perform the following steps:
- Double-click the CogToolGroup tool in the tool group toolbox.
- Double-click on the tool group to open it in its own tool group edit control.
- Open a tool group toolbox from the nested tool group edit control and create the tools you want it to contain.
- Create the necessary data links between the tools.
- For the ToolGroup Outputs property of the nested tool group, expose those output properties that are necessary to the main tool group. Within the main tool group, the entry for the nested tool group will update automatically to show the same output properties.
- Use the exposed output properties of the nested tool group to connect to the input properties of the vision tools that require the data.
To add a nested tool group to an existing application, perform the following steps:
- Double-click the CogToolGroup tool in the tool group toolbox.
- If necessary, move the new tool group up within the main tool group to a logical location.
- Double-click on the tool group to open it in its own tool group edit control.
- Select and drag the desired tools from the main tool group into the new tool group edit control. If you select several tools and drag them to the new tool group together, they retain their data links. Individual tools you drag from one tool group to another lose their data links.
- Reconnect the data links to the tools within the new tool group.
- For the ToolGroup Outputs property of the nested tool group, expose those output properties that are necessary to the main tool group. Within the main tool group, the entry for the nested tool group will update automatically to show the same output properties.
- In the main tool group, create the data links from the exposed output properties of the nested tool group to those input properties of vision tools that require the data.