This topic contains the following sections.
The Copy Region tool allows you to perform a number of copy operations on a single image or on two separate images:
In addition, you can use a Copy Region tool to create a mask image for use with other vision tools.
The Copy Region tool accepts all supported image types including 16-bit encoded images, allowing you to use and generate images with a bit depth of 8-bits, 10-bits, 12-bit, 14-bits and 16-bits.
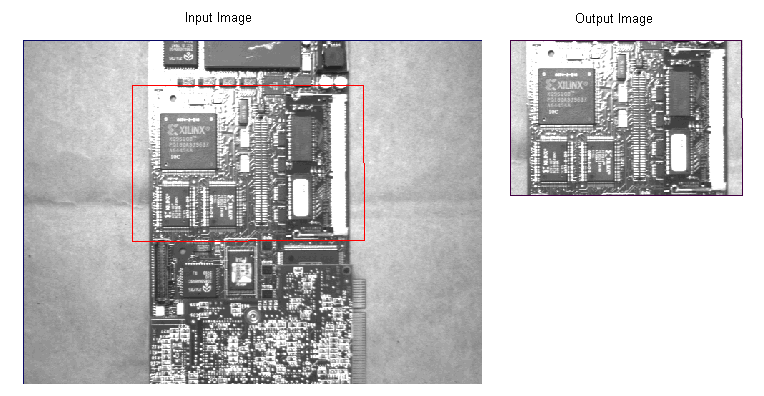
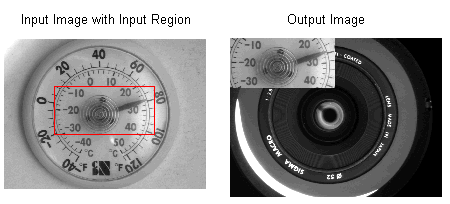
A vision application might be interested in only part of an input image. Such an application might use a Copy Region tool to copy some defined region of an input image into an output image, and then make that output image available for analysis by other tools. The bounding box around the input region determines the size of the output image. For example, the following figure shows a defined region of an input image and the output image it generates with the Copy Region tool:
The tool performs a pixel by pixel copy operation, with no scale changes and no rotation.
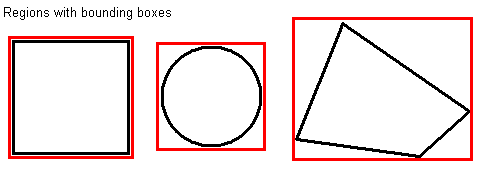
You can choose from a variety of region shapes when selecting the portion of the input image you want to copy. By default, the tool uses a rectangular region and provides you with a graphic to change the location and size of the region in your input image. If necessary you can choose to use another shape for the region, such as a circle, an ellipse, a polygon, and so on.

Regardless of which region shape you use, the Copy Region tool surrounds the region with a bounding box, which determines the overall size of the output image. The following figure shows the same regions as the previous figure and includes a bounding box for each:
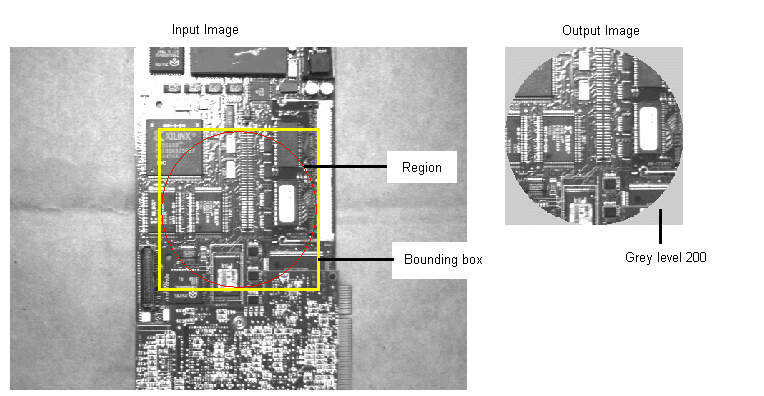
By default, the tool uses a bounding box with an adjust mask, which means that pixels outside the input region but within the box can either be filled with a constant value or left uninitialized. For example, the following figure shows the enclosing rectangle around a circular input region, and the output image where the pixels outside the region are filled with a grey value of 200:
The second option is to leave the pixels uninitialized. This type of copy operation executes faster than an operation where the pixels outside the region are filled with a constant grey or color value, and can safely be used when the application will examine only those pixels inside the input region. The choice of not filling in these pixels has a greater implication when you are copying an input region into an existing image, as described later in this topic.
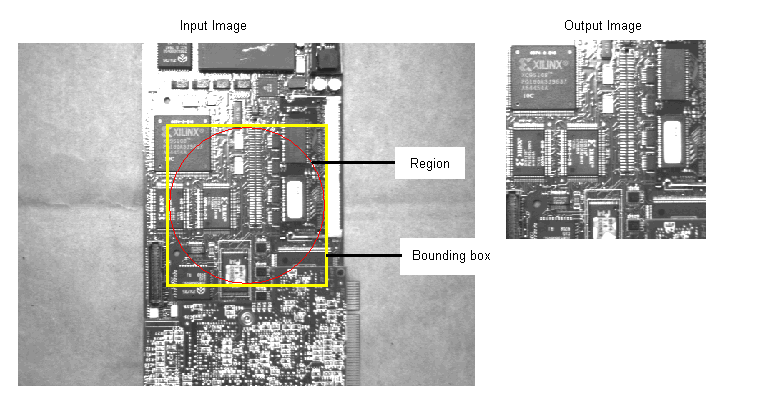
You can also choose to use a pixel aligned bounding box with no adjust mask. The output image then contains all the pixels within the bounding box without regard to the shape of the input region, as shown in the following figure:
The Copy Region tool supports both greyscale and color images. Greyscale images supports a pixel range of 0 through 255, while color images can be provided in either RGB (red, green, blue) or HSI (hue, saturation, intensity) format.
The format of the input image determines whether you can specify fill values as greyscale or color. If you are using color images, the Copy Region tool provides three panes of color values for you to specify. If the color image is in RGB format, the planes correspond to red, green, and blue respectively. Likewise, if the color image is in HSI format, the planes correspond to a setting for hue, saturation, and intensity.
The Copy Region tool can be used to copy the input region of an input image into an existing destination image, producing a new output image that represents a combination of the two. For example, the following figure shows an input image with a defined input region, a destination image from an AcqFIFO tool, and the output image the Copy Region tool can produce by copying the pixels of the input region into the destination image:
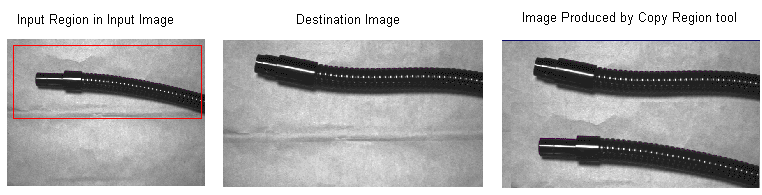
As a result of the copy operation, the Copy Region tool not only produces a new output image but also modifies the contents of the supplied destination image. In the previous example, the output image produced by the AcqFIFO tool now contains the same contents as the output image produced by the Copy Region tool.
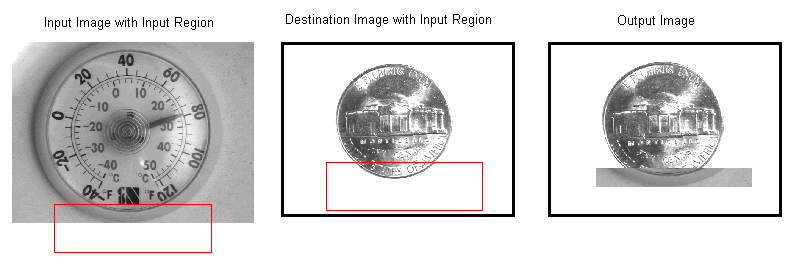
If you locate the input region outside the border of the input image, or target the region outside the borders of the destination image, the Copy Region tool will clip the portion of the input image that it copies. For example, the following figure shows how the tool clips the portion it copies to the destination image because the input region lies partly outside the borders of the input image:
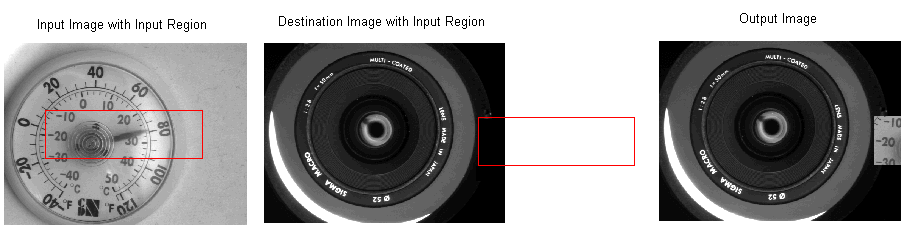
In a similar manner, the tool ignores any portion of the input region that is located outside the borders of the destination image, as shown in the following example:
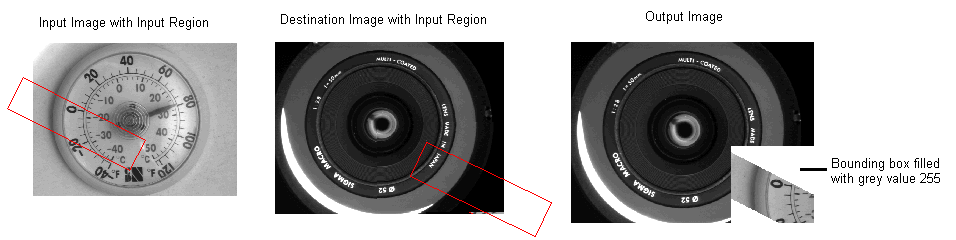
If you choose to fill the bounding box around the input region with a constant grey or color value, the tool will fill that portion of the bounding box common to both the input image and the destination image, as shown in the following example:
By default, the Copy Region tool copies the input region of the input image to the upper-left corner of the destination image, as shown in the following figure:
Most applications that copy the contents of an input region to a destination image need to define an alignment for the copy operation. By enabling alignment, you can control exactly where the tool copies the input region in the destination image, as the tool allows you to define an image coordinate that the tool will use to align both the input image and the destination image before the copy operation. For example, if you define the coordinate (0, 0) in the input image and the coordinate (150, 150) in the destination image, the tool will align the point (0, 0) of the input image to the point (150, 150) of the destination image before generating an output image.
For example, the following figure shows an input image with an input region located at the origin. The tool has been configured to use an alignment of (0, 0) for the input image and (150, 150) for the destination image, so the output image contains the pixels copied from the input region starting at the coordinate (150, 150). A point marking the alignment of the images has been enabled for the output image.

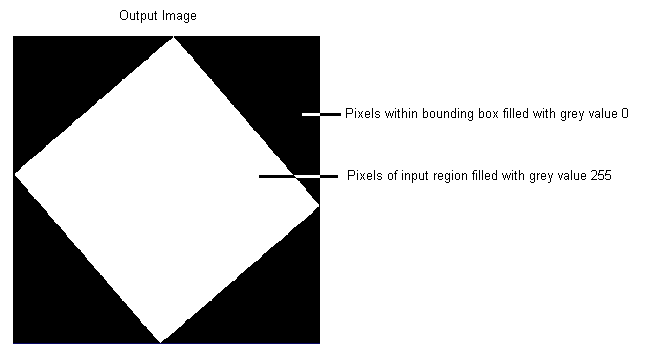
The Copy Region tool can also be used to create mask images for use with other vision tools such as the Blob tool. Instead of copying pixel values from the input image, the tool can use the dimensions of the input region to fill the output image with a constant grey value. By using a grey value of 255, and filling pixels outside the default bounding box with a value of 0, the tool generates output images as shown in the following example:
The tool does not require an input image to create output images for use as masks.