The VisionPro Imaging Device interface provides a way for manufacturers of cameras, frame grabbers, and other devices that generate digital images to provide VisionPro applications with direct access to those images. Image acquisition using an imaging device is similar to image acquisition using a Cognex frame grabber or GigE Vision camera.
See the following sections for more information:
VisionPro image acquisition is based on a modular architecture, with separate acquisition modules for each type of supported image acquisition device. Your VisionPro installation comes with a module for each type of Cognex frame grabber, a module for GigE Vision cameras, and a module for third-party imaging devices.
The imaging device module provides an open interface that third-party manufacturers can use to provide transparent access to their image acquisition equipment. A manufacturer must implement an Imaging Device Adapter that conforms to the Cognex-defined Imaging Define interface and provides access to the manufacturer's device using the manufacturer's SDK and API. The following figure represents an overview of VisionPro acquisition system modularity.
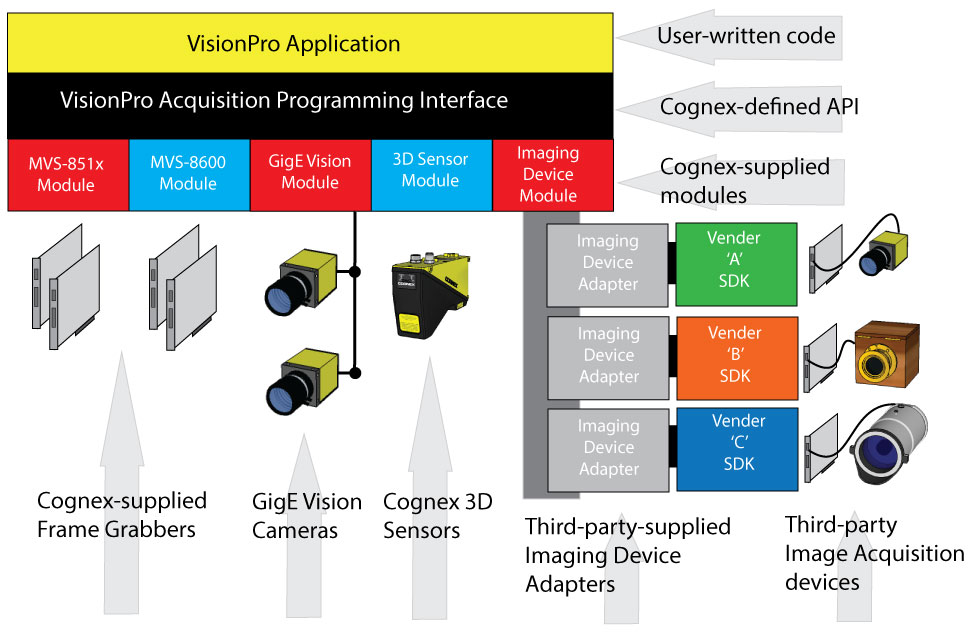
A single PC can contain any number of imaging device adapters. The VisionPro application uses the normal VisionPro acquisition interface to query the available devices, instantiate a device, configure it, and acquire images from it.
Note: The specific details of the Imaging Device Adapter interface are available from Cognex for the use of qualified third-party developers. Contact your Cognex sales representative for information on obtaining this information.
Use exactly the same techniques that you use to acquire images with a Cognex-supplied frame grabber to acquire images from an imaging device in your Visual Studio VisionPro application. The only difference is that the ICogFrameGrabber interface refers to the imaging device rather than a frame grabber.
See the following sections for more information:
- Get a CogFrameGrabberImagingDevices Object
- Enumerate the Connected Cameras
- Set the Imaging Device Video Format
- Use the CogAcqFifo to Acquire Images
- Trigger Models
- Pixel Formats
- Setting Imaging Device Properties
- Feature Access
- Acquiring Large Images with an Imaging Device
- Troubleshooting Issues When Using an Imaging Device
The first step is to obtain a CogFrameGrabberImagingDevices object. This object is a collection of individual frame grabber objects, each accessed through an ICogFrameGrabber interface. Each ICogFrameGrabber represents an imaging device.
CogFrameGrabberImagingDevices cameras = new CogFrameGrabberImagingDevices();
Once you have created the CogFrameGrabberImagingDevices object, you can enumerate its contents to obtain an ICogFrameGrabber interface for each connected camera.
The Count property returns the number of imaging device cameras that are connected to your system. You can use the Item property (or the indexer in C#) to get an individual camera.
The Name property of the ICogFrameGrabber interface returns the name of the device.
Imaging devices do not use video formats, but because the VisionPro acquisition programming model does, VisionPro defines a special null video format for use with imaging devices. The format name is “Cognex NullFormat”.
Once you have obtained an ICogFrameGrabber interface, you call its CreateAcqFifo function with the "Cognex NullFormat" video format to obtain a ICogAcqFifo.
You create a ICogAcqFifo in the same way as you create a frame grabber-based fifo:
Note: For imaging devices, the cameraPort parameter is ignored and should always be set to zero.
const string VIDEO_FORMAT =  "Cognex NullFormat";
ICogAcqFifo fifo = camera.CreateAcqFifo(
          VIDEO_FORMAT,
          CogAcqFifoPixelFormatConstants.Format8Grey,
0, true);The specific properties of the acquisition FIFO such as the image width and height are determined by the imaging device itself upon creation of the FIFO. To determine the actual size of the acquired image, get the region of interest immediately after creating the acquisition FIFO like this:
ICogAcqROI ROIParams;
int x, y, width, height

ROIParams = myAcqFifo.OwnedROIParams;
if (ROIParams != null)
ROIParams.GetROIXYWidthHeight(x, y, width, height);Once you have created the ICogAcqFifo you use the standard method to acquire an image.
You specify the trigger model for imaging device acquisition the same way as for other acquisition: you select from manual, automatic, or semi-automatic triggering. It is the responsibility of the Imaging Device Adapter (supplied by the third party) to properly map the calls you make to StartAcquire and CompleteAcquire to the appropriate operations. Keep in mind that if you are using a device that does not support external triggers, you should specify manual triggering.
You can use AcquiredPixelFormat to determine the pixel format that the imaging devices uses to acquire images. You can use OutputPixelFormat to specify the pixed format of the image returned by CompleteAcquire. A specific imaging device may provide native support for various pixel types. For more information, refer to the documentation supplied with your imaging device.
Imaging devices can represent any type of underlying device, and the device, in turn, may support an unlimited range of properties. In order to support this range of device capabilities, the imaging device interface allows the creator of an Imaging Device Adapter to expose a set of named features. The imaging device interface allows you to set the value of each feature.
A limited set of common properties are set through the standard VisionPro acquisition properties interface:
| Property | VisionPro Class |
| Exposure | ICogAcqExposure |
| Contrast | ICogAcqContrast |
| Brightness | ICogAcqBrightness |
| Region of Interest | ICogAcqROI |
| Triggering | ICogAcqTrigger |
To allow you to set any property supported by any imaging device, ICogImagingDeviceAccess provides a pair of methods GetFeature and SetFeature that let you get and set the value of any named property supported by the imaging device.
Refer to the documentation supplied with the imaging device to determine what properties it supports.
All property names and values are read and set as strings. In all cases, refer to the documentation for your third-party imaging device for the available properties and their legal values.
Note: If you use the feature setting and getting methods from within a VisionPro script, you must enclose the calls within a try/catch block. If you do not use a try/catch block, your script may cause your job to time out.
Cognex recommends the following guidelines if you are using an imaging device to acquire images larger than 100 MBytes:
Use a supported 64-bit operating system.
Supported 32-bit operating systems do not support enough memory space to hold more than one or two large images.
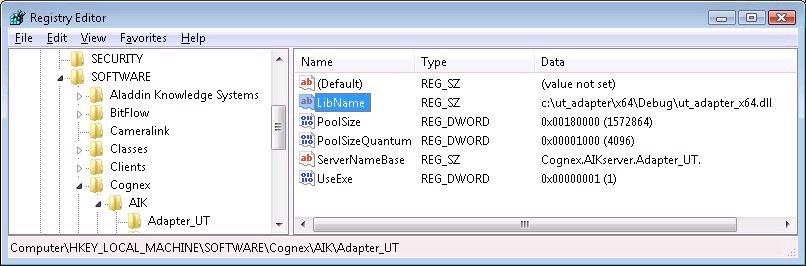
Determine the number of images your application will have in memory at any particular time (4 is a good minimum value) and multiply this by the size of each acquired image to determine the pool size required by your vision application. If it is greater than 2 GBytes, you must modify the registry values for PoolSize and PoolSizeQuantum. The actual size of the pool will be (PoolSize * PoolSizeQuantum). For example, the following figure shows the registry settings for a 6 GByte image pool:
Ensure you have enough physical memory, which should exceed the sum total of the following:
- Memory required by the imaging device image pool
- Memory required by the imaging device adapter to buffer images. For example, some adapters will reserve space for several images in addition to the pool memory to support DMA of images to memory.
- Memory used by the operating system, the vision application and its data structures. This total should be at least 1-2 GBytes, but more may be needed if you have large models or trained images.
If you are using an imaging device and experience problems such as the hardware not being visible or QuickBuild stop responding, Cognex suggests the following:
- On Windows Vista, vision applications that use an imaging device must be run with administrative privileges. Cognex recommends you right-click on the program shortcut for the vision application and choose run as Administrator.
- Locate the aikserver.exe or aikserver_x64.exe program in the VisionPro /bin directory, raise the Properties window and ensure that Run this program as an administrator is enabled on the Compatabilities tab.
- Run regedit.exe and look for the HKEY_LOCAL_MACHINE\SOFTWARE\Cognex\AIK\Errors key. Errors which cannot be reported using an exception will be logged here. If the error indicates "Unable to allocate image pool memory", adjust the PoolSize value in the registry entry for your imagine device.