This topic contains the following sections.
The MVS-8600 LVDS configuration, which corresponds to Configuration 1 described in the section Loadable Software I/O Configurations of the MVS-8600 Hardware Manual, lets you use the following camera combinations.
This configuration uses an LVDS encoder when you are using a line scan camera.
| Frame Grabber | Area Scan Cameras | Line Scan Cameras |
| MVS-8601 | 1 | – |
| – | 1 | |
| MVS-8602 | 1 or 2 | – |
| 1 | 1 (must be connected to camera port 0) |
VisionPro reads the MVS-8600 I/O configuration from the VisionPro.ini file in the Windows or WINNT directory. To use the LVDS configuration for your MVS-8600 series frame grabbers, make sure these lines appear in VisionPro.ini:
[CogFrameGrabber8600 #0]
IOConfig = LVDS
The following picture shows an MVS-8600 frame grabber.
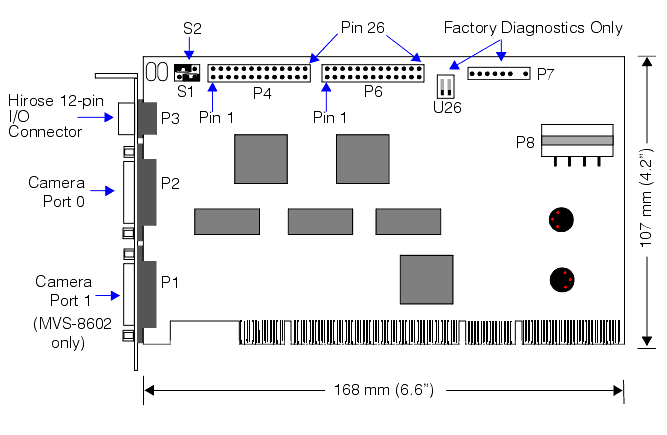
The Hirose HR10 connector at P3 connects to an I/O Connection Module (part number 800-5885-1) which provides you with screw terminals to connect to tiggers, strobes, and encoder devices.
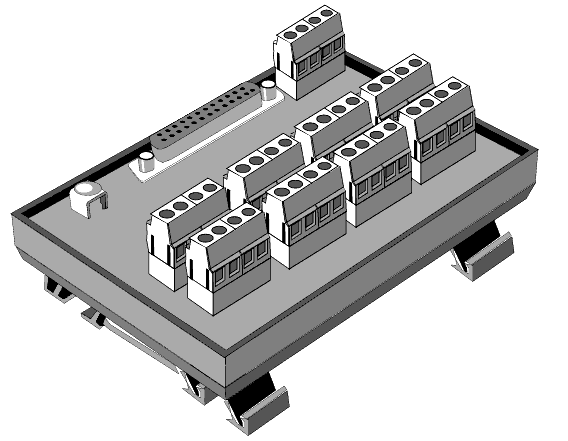
Each configuration uses a different cable to connect the Hirose HR10 connector to the I/O Connection Module. For the LVDS configuration, you must use cable part number 300-0539.
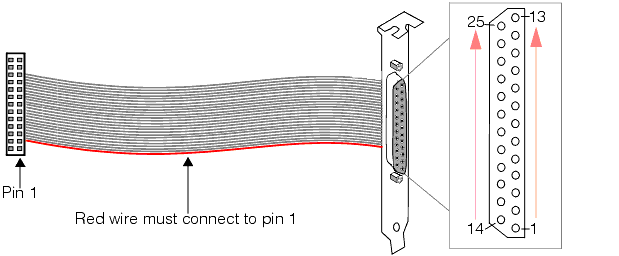
The P4 and P6 connectors on the MVS-8600 connect to your computer's back plane with one or two I/O extension cables (part number 300-0240) which provides you with DB-25 connectors that give you access to other I/O lines as well as some of the same signals that the HR10 connector provides.
In the LVDS configuration, the MVS-8600 provides 8 programmable input lines. Four lines come from the P4 connector, and the other four come from the P6 connector.
In the following table, the positive pin is given first, then the negative. For example, "3 (+) and 4 (-)" means that pin3 is positive, and pin 4 is negative.
| Software Input Line | Signal Name | P4’s 300-0240 Pins on DB-25 | P6’s 300-0240 Pins on DB-25 |
| 0 | OPTO_IN_0± | 3 (+) and 4 (-) | – |
| 1 | OPTO_IN_1± | 3 (+) and 5 (-) | – |
| 2 | OPTO_IN_2± | 11 (+) and 12 (-) | – |
| 3 | OPTO_IN_3± | 11 (+) and 13 (-) | – |
| 4 | OPTO_IN_4± | – | 3 (+) and 4 (-) |
| 5 | OPTO_IN_5± | – | 3 (+) and 5 (-) |
| 6 | OPTO_IN_6± | – | 11 (+) and 12 (-) |
| 7 | OPTO_IN_7± | – | 11 (+) and 13 (-) |
In the LVDS configuration, the MVS-8600 provides 8 programmable output lines. Four lines come from the P4 connector, and the other four come from the P6 connector.
In the following table, the positive pin is given first, then the negative. For example, "3 (+) and 4 (-)" means that pin3 is positive, and pin 4 is negative.
| Software Output Line | Signal Name | P4’s 300-0240 Pin on DB-25 | P6’s 300-0240 Pin on DB-25 |
| 0 | OPTO_OUT_0± | 15 (+) and 16 (-) | – |
| 1 | OPTO_OUT_1± | 1 (+) and 2 (-) | – |
| 2 | OPTO_OUT_2± | 9 (+) and 10 (-) | – |
| 3 | OPTO_OUT_3± | 22 (+) and 23 (-) | – |
| 4 | OPTO_OUT_4± | – | 15 (+) and 16 (-) |
| 5 | OPTO_OUT_5± | – | 1 (+) and 2 (-) |
| 6 | OPTO_OUT_6± | – | 9 (+) and 10 (-) |
| 7 | OPTO_OUT_7± | – | 22 (+) and 23 (-) |
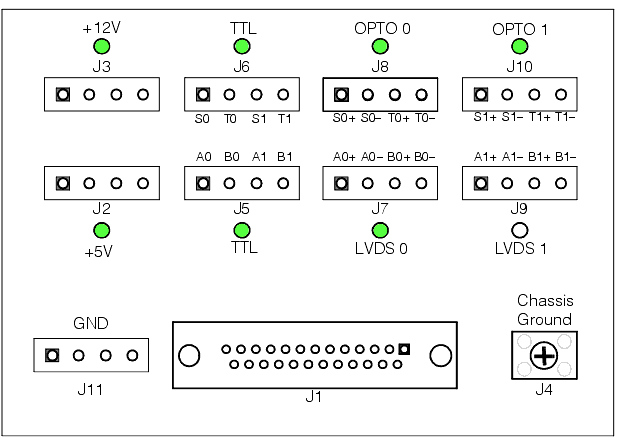
Triggers, strobes, and encoder outputs are available through the I/O Connection Module. Some of the signals from the I/O Connection Module are also duplicated in the P4 and P6 connectors.
| Signal | Description | Replicated on ... |
| S0 | Strobe for camera port 0 | P6, DB-25 pin 6 |
| T0 | Trigger for camera port 0 | P6, DB-25 pin 20 |
| S1 | Strobe for camera port 1 | P6, DB-25 pin 7 |
| T1 | Trigger for camera port 1 | P6, DB-25 pin 25 |
| A0+ | LVDS encoder camera port 0 | P4, DB-25 pin 6 |
| A0- | LVDS encoder camera port 0 | P4, DB-25 pin 7 |
| B0+ | LVDS encoder camera port 0 | P4, DB-25 pin 20 |
| B0- | LVDS encoder camera port 0 | P4, DB-25 pin 25 |