The Colormap control lets you modify the color display of 8-bit and 16-bit greyscale images and range images (acquired from DS1000 series sensors) by applying a color map you specify to them.
You can specify a Colormap Range of Interest (Colormap ROI) to zoom into a range of pixel values and ignore pixel values beyond this range. The specified color map will be compressed into this range.
Range images are displayed using a Visible Pixel Mask, which shows missing pixels with a specific color. You can specify a predefined or any custom color as the color for missing pixels. You can also hide the Visible Pixel Mask, which results in missing pixels being shown in black.
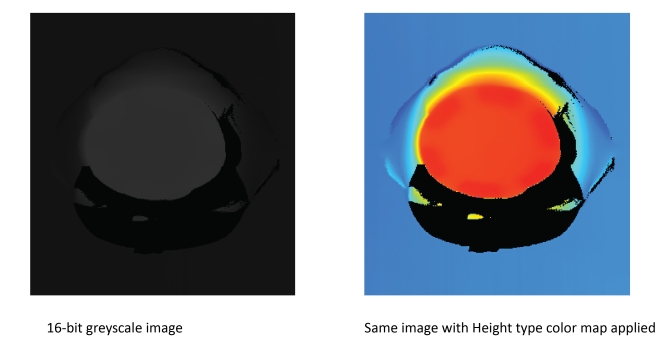
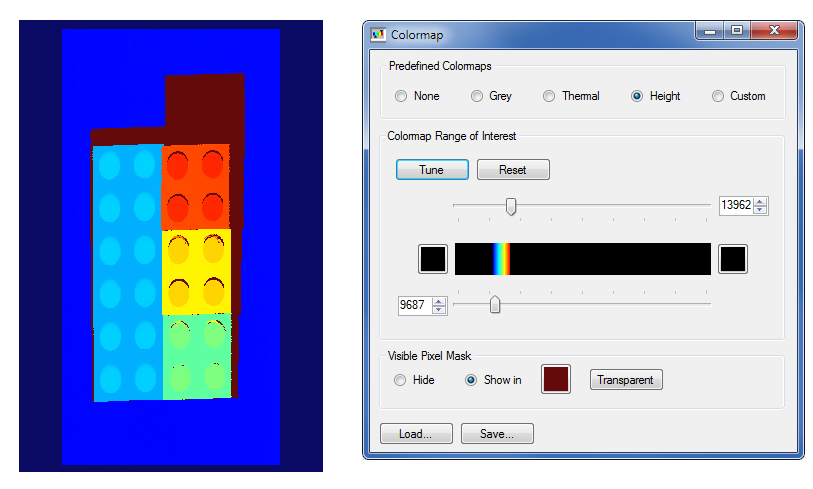
The following figure shows a 16-bit greyscale image and a Height type color map with a moderately narrow Colormap Range of Interest applied to it.
You can specify 8-bit or 16-bit color maps.
In the API, you can use the CogDisplayColormap class to specify a color map (separate from the CogDisplay class). This is a reusable control that you can integrate into your application.
If you are using the CogDisplay class, you can use the Colormap related members of the class to specify and handle color maps.
To specify a color map, right-click in the image window (of the Image Source, any Cog Tool, or the floating display) and select Colormap...
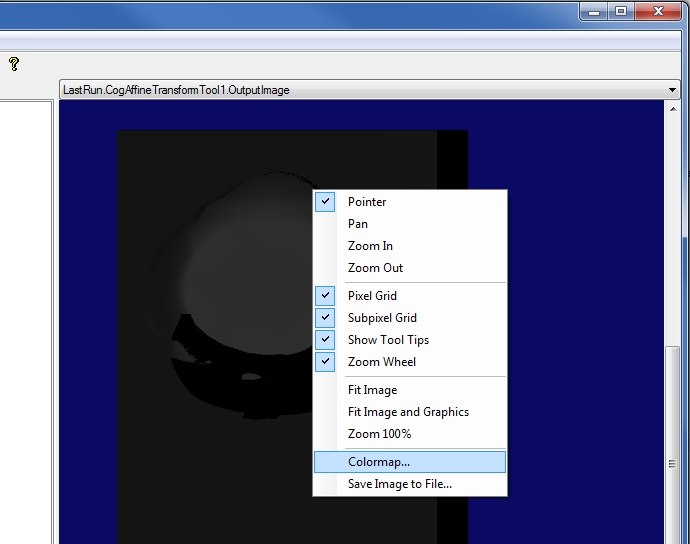
Specify the color map settings in the Colormap... control window.

The min/max range in the color map is automatically set based upon the type of image that is being displayed. For 8-bit images, the range is 0-255; for 16-bit CogImage16Grey images and CogImage16Range, the range is 0-65535.
You can save your color map settings into an XML file for later use by clicking Save... and load it by clicking Load...
You can specify the following color map types or no color map:Grey - linear black-to-white mapping
If you save a color map you created using the Grey setting, then the saved XML file will not contain individual color definitions but the following tag only as the indication of the color map type:
<ColorMapPredefined>Grey</ColorMapPredefined>
Thermal - industry standard smooth gradient blue->purple->red->yellow->white mapping, used for thermal cameras
If you save a color map you created using the Thermal setting, then the saved XML file will not contain individual color definitions but the following tag only as the indication of the color map type:
<ColorMapPredefined>Thermal</ColorMapPredefined>
Height - industry standard smooth gradient blue->cyan->yellow->red mapping, used for images that are either 2D height images or 3D images
If you save a color map you created using the Height setting, then the saved XML file will not contain individual color definitions but the following tag only as the indication of the color map type:
<ColorMapPredefined>Height</ColorMapPredefined>
Custom - custom color map you set by using the existing 8-bit or 16-bit colormap API (SetImage8GreyColorMap and SetImage16GreyColorMap) or by manipulating individual colors in a saved/loaded XML color map file
If you save a color map as Custom, then the saved XML file will contain individual color definitions and the following tag as the indication of the color map type:
<ColorMapPredefined>Custom</ColorMapPredefined>
When you load a color map file of any type, its type will automatically be recognized and selected once loaded. The Colormap ROI can only be set in the Colormap... pop-up window if the Grey, Thermal, or Height color map type is selected.
You can specify the Colormap Range of Interest (Colormap ROI) with an upper limit and a lower limit of pixel values. The color map will be applied to the pixel values between these limits. The pixel values beyond these upper and lower limits are clipped and substituted by the upper and lower clip colors you specify.
You can specify the Colormap ROI's limits by using the associated track bars or by entering the pixel values in the associated fields.
The following figure shows various Colormap ROI specifications and their results on the same image.
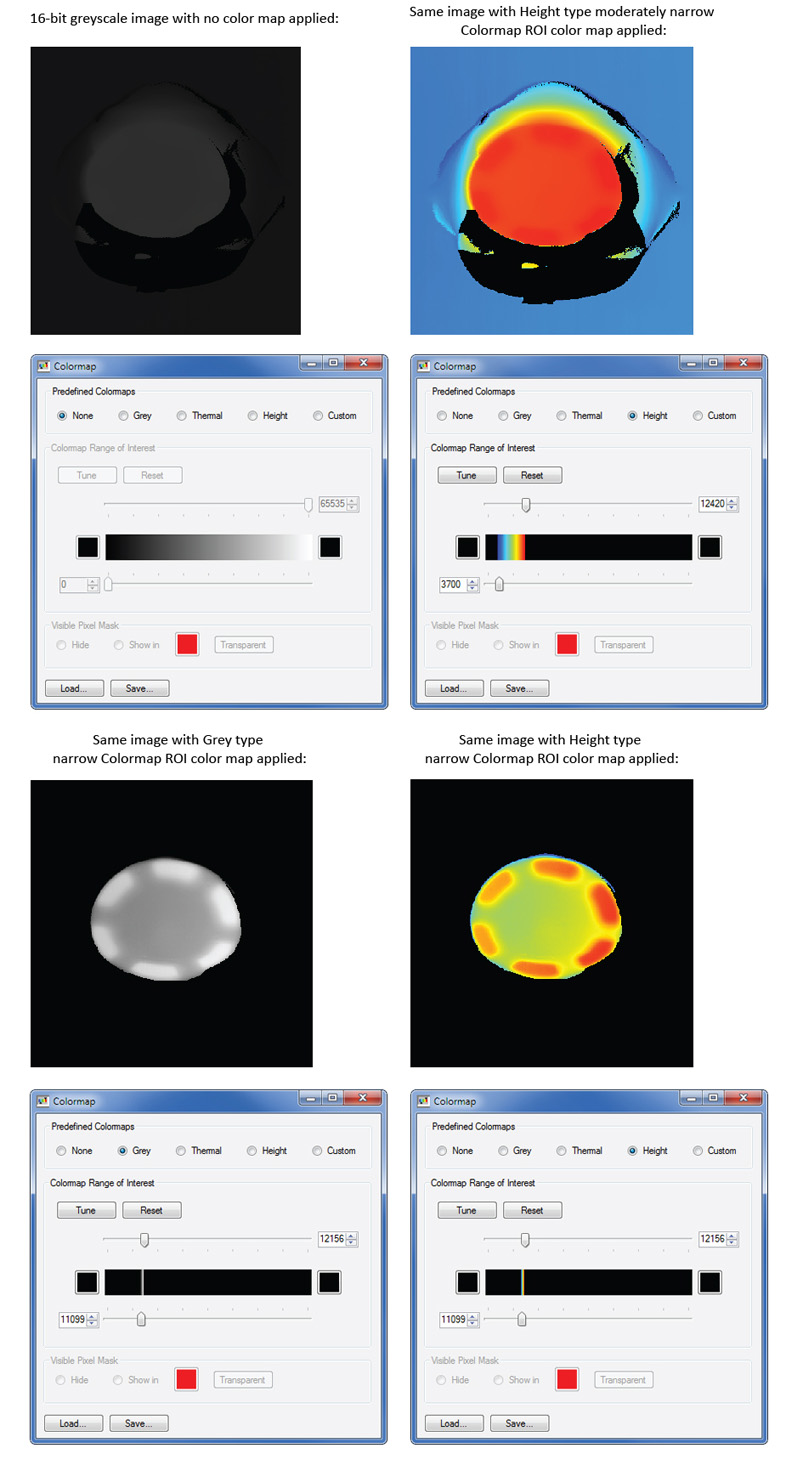
You can have the Colormap control automatically find and set as the Colormap ROI the range in which there exist pixel values in the image by clicking Tune. In other words, tuning lets you select the range of pixel values and create a Colormap ROI automatically in a lossless manner. Note that, especially in the case of 16-bit images, the tuning operation may be time expensive depending on the size of your image for example.
You can bring the Colormap ROI back to its original state by clicking Reset.
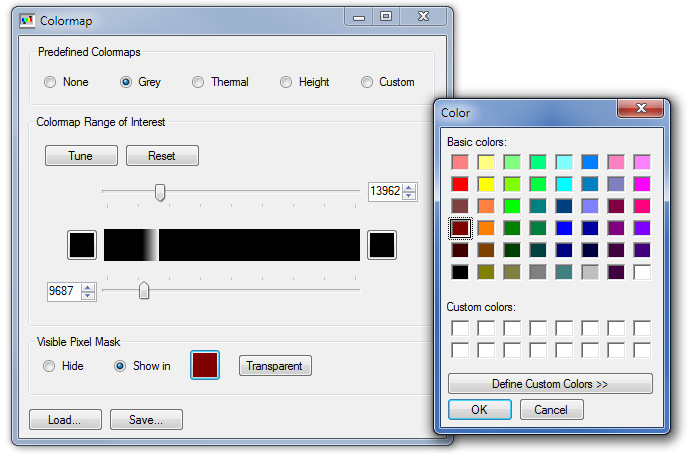
- You can use the ColorMapLowerClipColor and ColorMapUpperClipColor properties to specify the lower and upper clip colors of the color map.
- You can use the ColorMapLowerRoiLimit and ColorMapUpperRoiLimit properties to specify the lower and upper limits of the color map's range of interest.
- You can use the ColorMapPredefined property to specify the predefined color map on this display object.
You can also use the methods of the CogDisplay class to save and load color map files and manipulate color maps.
See the methods of the CogDisplay class.
- For range images, you can use the VisiblePixelMaskEnable and VisiblePixelMaskColor properties to enable and specify the color for the Visible Pixel Mask.
When a colormap is set on a CogDisplay, it will save automatically its information into the VPP file that is saved.
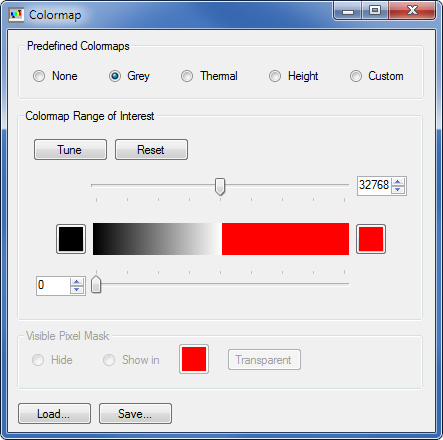
The following is the content of a Grey type color map XML file generated while a 16-bit image was displayed:
<?xml version="1.0" encoding="utf-8" ?>
<CogDisplayColormap>
  <Version>1.0</Version>
  <ColorMapPredefined>Grey</ColorMapPredefined>
  <ColorMapLowerRoiLimit>0</ColorMapLowerRoiLimit>
  <ColorMapUpperRoiLimit>0.500007629510948</ColorMapUpperRoiLimit>
  <ColorMapLowerClipColor>Black</ColorMapLowerClipColor>
  <ColorMapUpperClipColor>Red</ColorMapUpperClipColor>
  <VisiblePixelMaskEnable>True</VisiblePixelMaskEnable>
  <VisiblePixelMaskColor>Black</VisiblePixelMaskColor>
</CogDisplayColormap>
The following figure shows the associated settings in the Colormap... pop-up window.
The following is the content of a color map XML file saved with the same Colormap... window settings but as Custom type this time:
<?xml version="1.0" encoding="utf-8" ?>
<CogDisplayColormap>
  <Version>1.0</Version>
  <ColorMapPredefined>Custom</ColorMapPredefined>
  <ColorMapLowerRoiLimit>0</ColorMapLowerRoiLimit>
  <ColorMapUpperRoiLimit>0.500007629510948</ColorMapUpperRoiLimit>
  <ColorMapLowerClipColor>Black</ColorMapLowerClipColor>
  <ColorMapUpperClipColor>Red</ColorMapUpperClipColor>
  <VisiblePixelMaskEnable>True</VisiblePixelMaskEnable>
  <VisiblePixelMaskColor>Black</VisiblePixelMaskColor>
  <Colors>
    <Color>#000000</Color>
    <Color>#000000</Color>
        ...
    <Color>#000000</Color>
    <Color>#010101</Color>
    <Color>#010101</Color>
        ...
    <Color>#010101</Color>
    <Color>#020202</Color>
    <Color>#020202</Color>
        ...
    <Color>#020202</Color>
        ...
    <Color>#FEFEFE</Color>
    <Color>#FEFEFE</Color>
    <Color>#FF0000</Color>
    <Color>#FF0000</Color>
        ...
    <Color>#FF0000</Color>
  </Colors>
</CogDisplayColormap>For the Colormap ROI and Visible Pixel Mask specifications for the previously shown range image about a LEGO® block, the following is the content of the color map XML file:
<?xml version="1.0" encoding="utf-8" ?>
<CogDisplayColormap>
  <Version>1.0</Version>
  <ColorMapPredefined>Height</ColorMapPredefined>
  <ColorMapLowerRoiLimit>0.147814145113298</ColorMapLowerRoiLimit>
  <ColorMapUpperRoiLimit>0.213046463721675</ColorMapUpperRoiLimit>
  <ColorMapLowerClipColor>Black</ColorMapLowerClipColor>
  <ColorMapUpperClipColor>Black</ColorMapUpperClipColor>
  <VisiblePixelMaskEnable>True</VisiblePixelMaskEnable>
  <VisiblePixelMaskColor>Maroon</VisiblePixelMaskColor>
</CogDisplayColormap>