The ViDiEL OCR tool edit control provides a graphical user interface to the OCRTool API, which you use to train an application to find and identify characters in your run-time images.
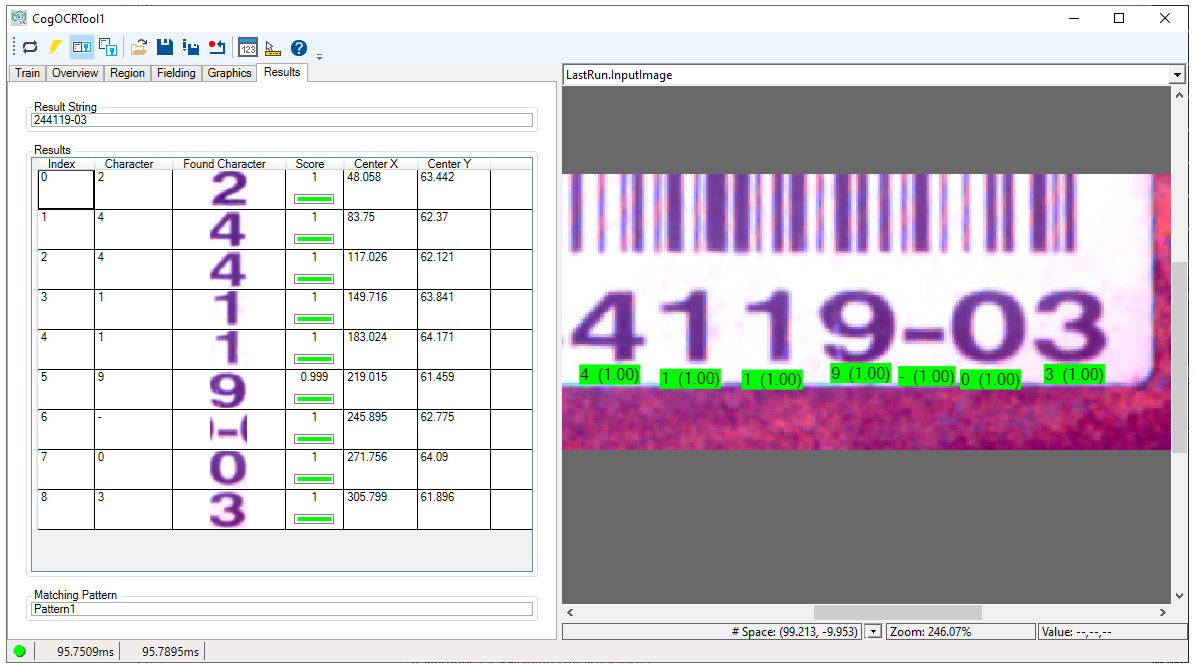
For example, the following figure shows an OCR tool edit control showing a result string and assorted properties of each found character in the image:
The edit control offers the following features:
- A row of control buttons at the top provide access to the most common operations.
- A set of function tabs allow you to train the tool with images from the camera or image database, as well as view results from acquired images.
- An image display window contains the images you use to train the tool or the latest acquired image you want to classify.
To include the edit control in your custom vision application, you must first add it to your Visual Studio .NET development environment. See the topic Adding Edit Controls to Visual Studio for more information.
See the topic Using a ViDiEL OCR Tool for details on how to train a ViDiEL OCR tool.
See the following sections for more information:

The following table describes the function of each button:
| Button | Description | Function |
 | Run | Examine the Current.InputImage to identify the characters it contains. You must train the tool before it can run successfully. |
| Electric mode | Toggle electric mode, where the tool executes automatically when particular configuration parameters change. In electric mode, a lightning bolt appears next to every electric property. | |
 | Local image display | Open or close the local image display window. An OCR tool supports the following image buffers:
|
 | Floating image display | Open one or more floating image windows, which support the same image buffers as the local image display window. |
 | Open | Open a VisionPro persistence (.vpp) file that contains a set of saved properties for this vision tool object type. VisionPro reports an error if you try to open a .vpp file for another object type. |
 | Save | Save the current properties of the vision tool to a VisionPro persistence (.vpp) file. The edit control allows you to choose between saving the vision tool with or without its image buffers and tool results. |
 | Save As | Save the current properties of the vision tool to a new VisionPro persistence (.vpp) file. |
 | Reset | Reset the vision tool to its default state. The tool gives you a choice between resetting to the default-constructed state, which is appropriate when you are using it in a Visual Studio.NET application, or its template-initialized state, which is appropriate for QuickBuild applications. |
 | Show Floating Results | Open a separate results window with the same contents as seen in the Results tab. |
 | Show ToolTips | Enable or disable the display of tooltips for individual items in the edit control. |
 | Help | Open this VisionPro online help file. |
Use the Train tab to acquire images from a file, a folder, or an image database and train the tool with the current set of found characters:
See the topic Using a ViDiEL OCR Tool for a detailed description on using this tab to train an OCR tool. The tab contains an assortment of options for training a character set:
| Feature | Description |
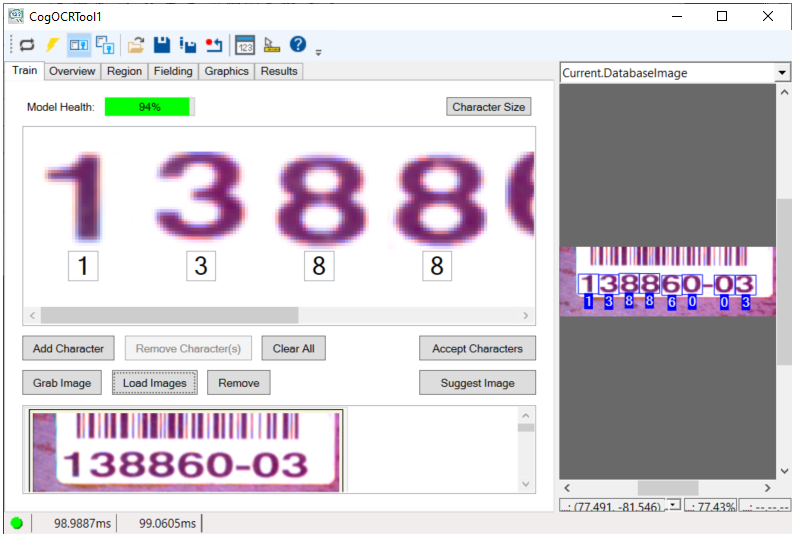
| Model Health | .A score for the confidence you can have that the tool will recognize characters in your acquired images. Higher scores for Model Health indicate an increased expectation of accuracy for the tool |
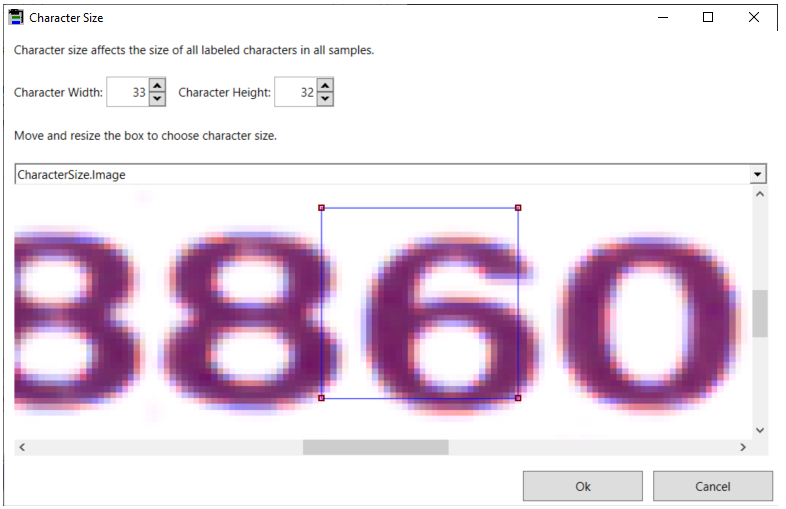
| Character Size | Opens a pop-up window with interactive graphics for you to specify the size (height and width) for the characters in your images.
 |
Add Character | Places an interactive graphic over your input image and allows you to place it around an unrecognized character: 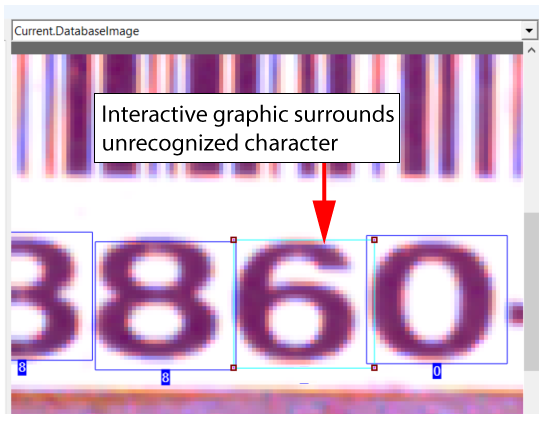 Use the edit control to enter a label for the character: 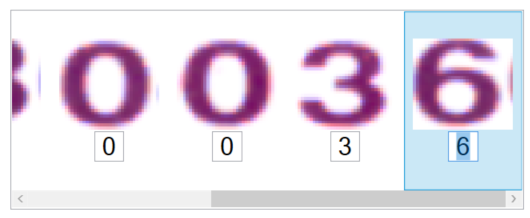 Note: Do not change the size of the region or the tool will lose any trained characters. |
| Remove Character | Remove the selected character(s) from this image before you attempt to train the tool with all the characters currently recognized. |
| Clear All | Remove all characters from the tool without adding them to the trained database. |
| Accept Characters | Adds the recognized characters in the current image to the trained database. |
| Grab Image | Takes the acquired Current.InputImage and scans it for characters. |
Load Images | Load images from a file or image database. The edit control opens a pop-up window with interactive graphics for you to specify the size (height and width) for the characters in your images: When you click OK, the tool uses the character size you specified to locate all the characters in one of the images from the file or image database. View the Current.DatabaseImage to see results:  Use other buttons in the edit control to remove false characters, add characters the tool did not recognize, or clear all the recognized characters from the Current.DatabaseImage image. |
Remove Character(s) | Remove the selected characters before adding them to the trained database. Remove image features that the tool confuses with actual characters: 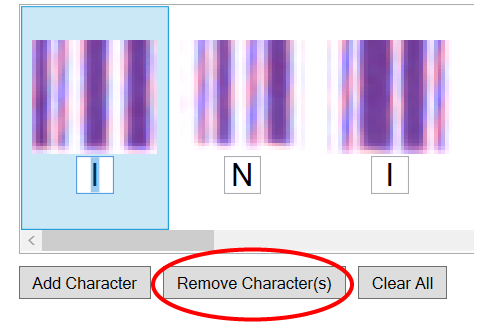 |
| Suggest Image | Have the tool select an image that contains potentially confusing characters. |
See the topic Using a ViDiEL OCR Tool for a detailed description on using this edit control to train an OCR tool. Use the Overview tab to inspect your character set.
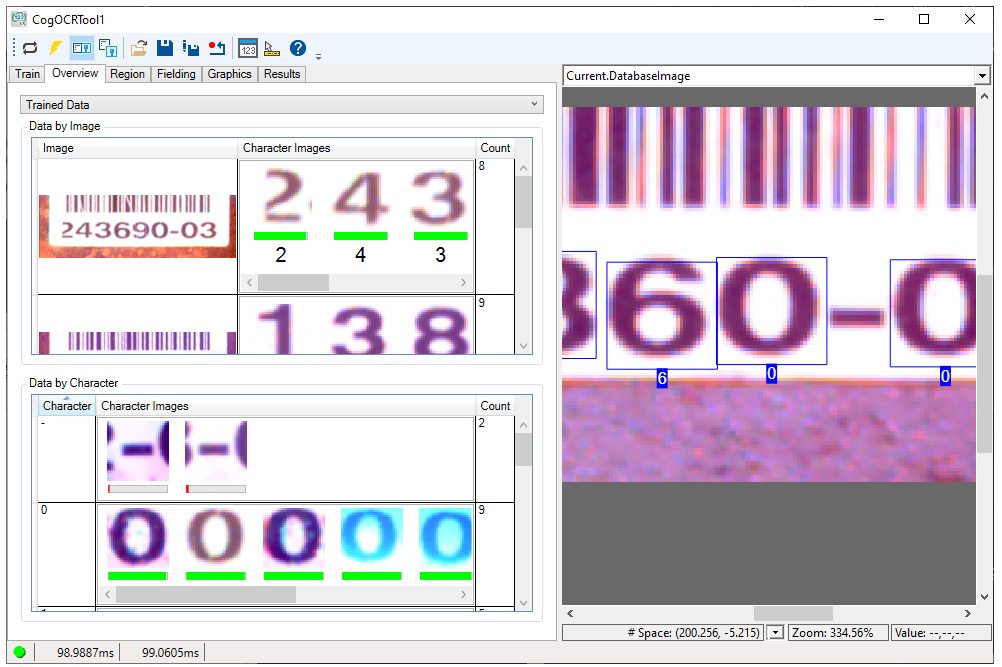
The tab allows you to view Trained Data and Untrained Results:
- Trained Data: The images you used to train the character set and the characters in each image.
Untrained Results: Images available to the tool but were not used to train the character set.
The ViDiEL OCR tool still analyzes all the untrained data and can show you the confidence scores for each character as a colored bar:
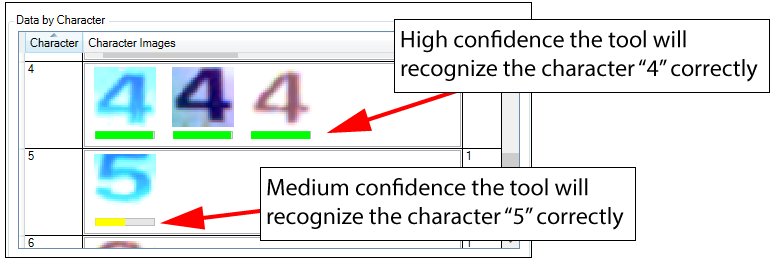
Use images where the confidence is not high to continue added trained characters to the character set:
- Select Untrained Results to find an image containing the character with the confidence score is not high.
Double-click the image.
The edit control switches to the Train tab and attempts to identify all the characters in the image.
- Confirm or correct all the characters the tool recognizes and click Accept Characters to add these characters to the trained charater set.
Use the Region tab to specify an input region for the tool:
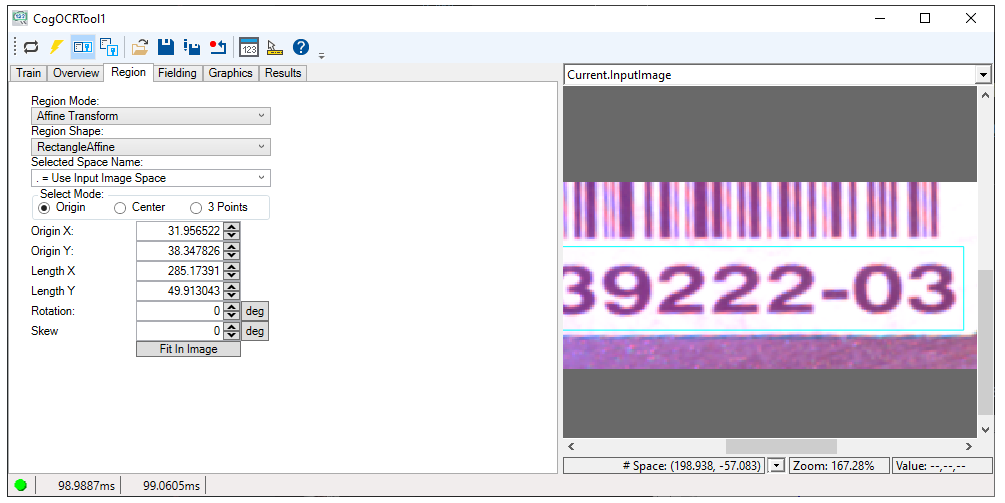
The tab offers the following choices:
Region Mode:
- Pixel Aligned Bounding Box: Encloses the defined region within a rectangle. Portions of the image that are outside the defined region but within the bounding rectangle are included for consideration by the tool.
- Affine Transform: Removes the effect of any rotation and skew present in the dimensions of the region
Region Shape:
- None: Use the entire image
- RectangleAffine: A rectangular region of interest that can be skewed or rotated
Use the Fielding tab to limit the characters the tool recognizes based on character patterns you specify. See the section Fielding for details on using fielding.
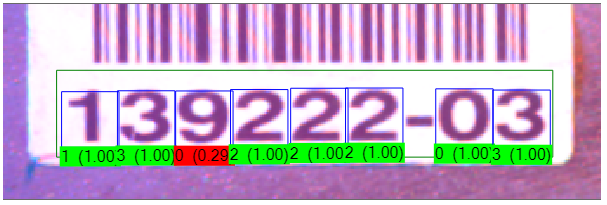
For example, the following example uses Basic Fielding to limit recognized characters to any of the following: "012345-":

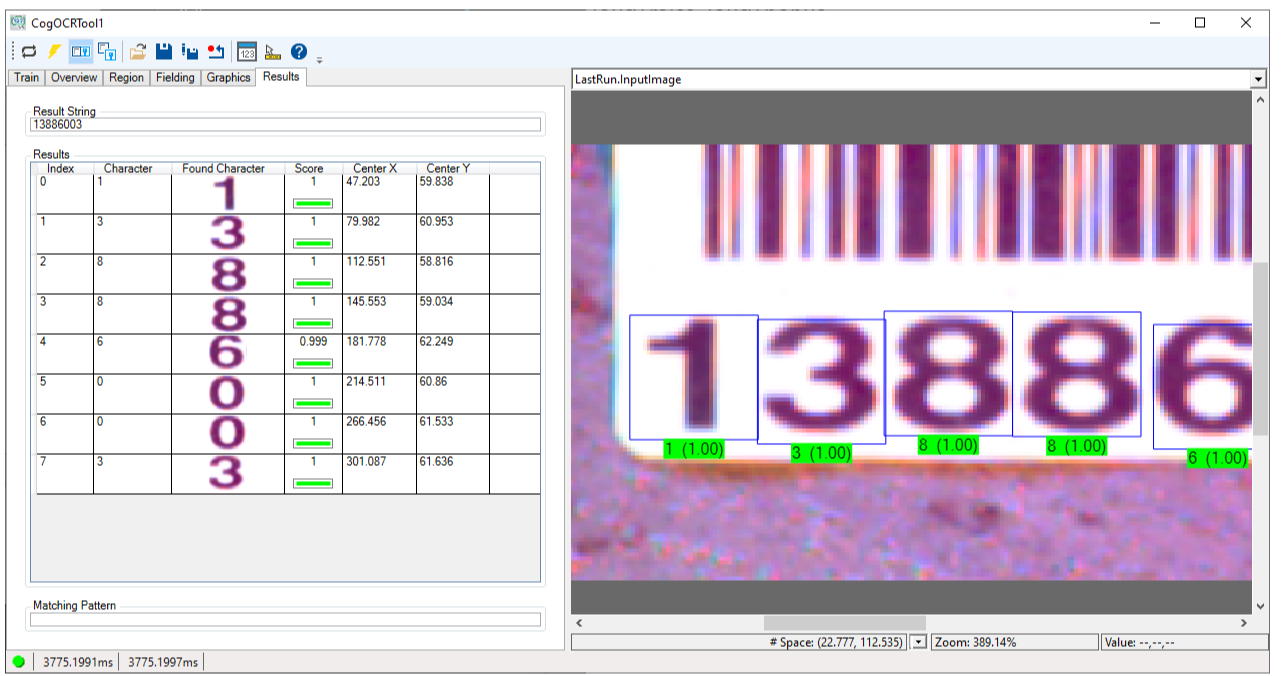
With fielding configured this way the tool will not return any character results outside this range. For example, the following image contains the character "9" but the tool returns a result string with the found character as a "0", which is the closest match:
Use explicit characters in your Basic Fielding range or use one of the following special characters to indicate a range of allowed characters in your images:
- \d: Any numerical character
- \l: Any alphabetic character
- \w: Any numerical character or alphabetic character
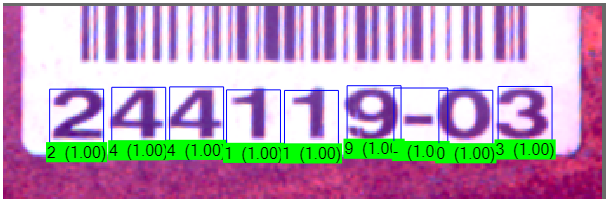
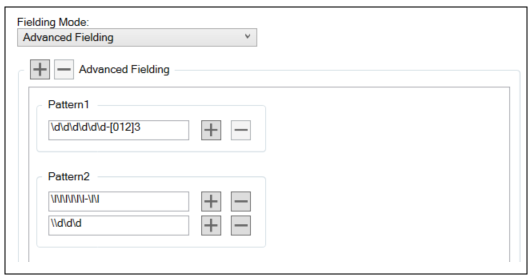
Use Advanced Fielding to specify the allowed characters at every position of the found string. Advanced Fielding supports the same special characters as Basic Fielding but also allows you to place multiple characters between "[ ]" to allow any one of them to be at that position. For example, the pattern "\d\d\d\d\d\d-[012]3" matches the following character string
Advanced Fielding allows you to specify multiple patterns and each pattern can have multiple lines:
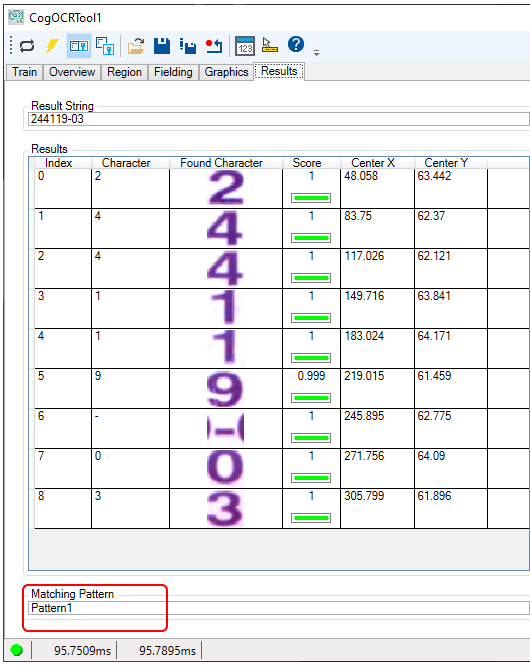
The Results tab indicates which Advanced Fielding pattern matches the found string:
Use the Graphics tab to enable or disable graphics over the LastRun.InputImage:
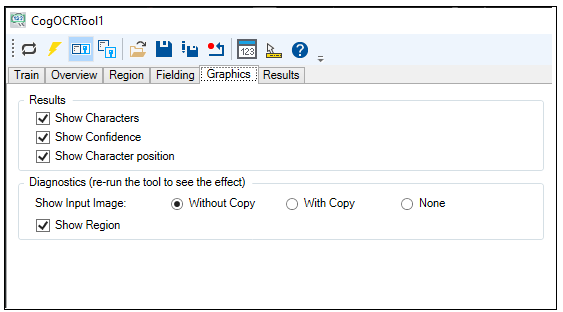
The tab offers the following options:
Results: Enable or disable the graphics for:
- Each character the tool identified
- The confidence score for each found character
- The region graphic for the position of each character
Diagnositcs:
- Show Input Image: Determines whether or not the input image is recorded as part of the diagnostic record, and whether the image is copied to the record or saved in the record as a reference
- Show Region: Displays the region of interest the tool uses
Use the Results tab to view the result string and the characters the tool identified in the current image: