Cognex supports the Trevista Computational Imaging (CI) Module for defect detection, particularly for objects with shiny or matte surfaces. The Trevista CI Module supports a set of area-scan and line-scan cameras. Contact your Cognex sales representative for more details.
Use the Trevista Acquisition Wizard to establish the right acquisition parameters for the area-scan or line-scan camera mounted in your Trevista Dome Light. Access the wizard through the Image Source in QuickBuild:
- Launch QuickBuild.
- Open CogJob1 or the Job you are using to acquire images with a Trevista Dome Light.
- Double-click on Image Source.
Select the Trevista Dome Light as the Image Acquisition Device:
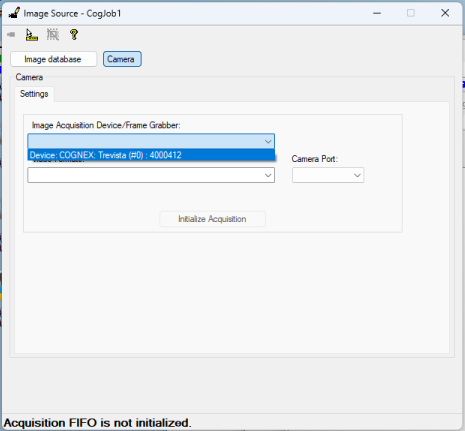
- Click Initialize Acquisition.
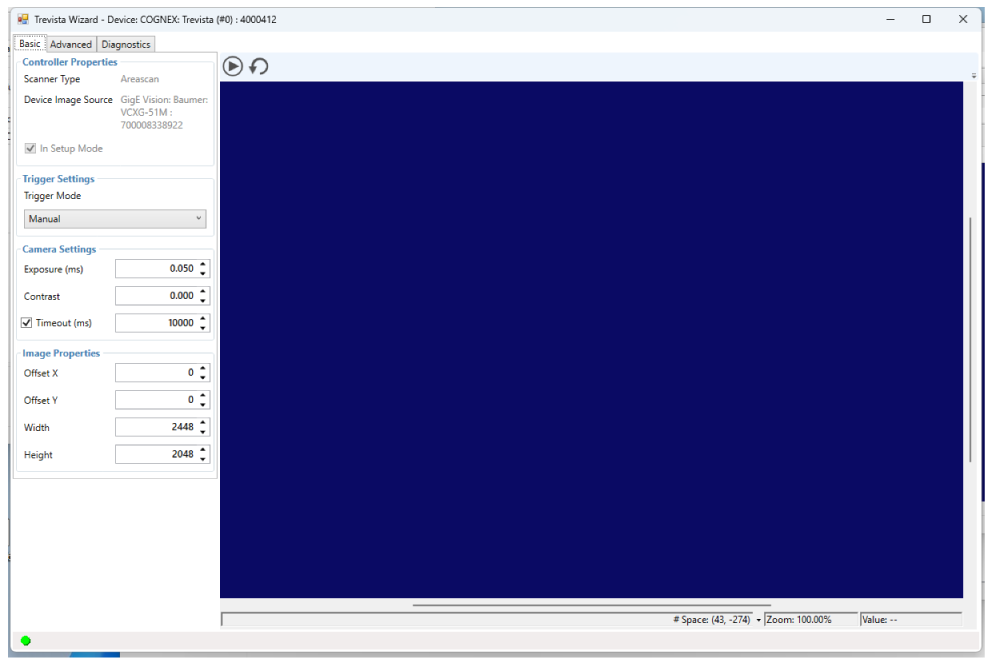
Click Launch Trevista Wizard.
The Trevista Wizard appears, as in the following example with an area-scan camera:
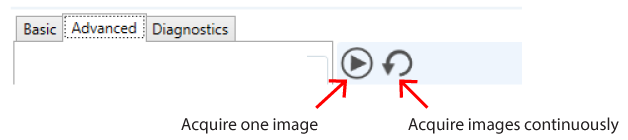
The wizard supports two methods of image acquisition with the current parameters:
See the following sections for more information on using the wizard:
Configure the following settings for the camera attached to your Trevista Dome Light:
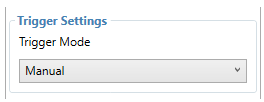
Choose from the following trigger modes to signal the start of an acquisition:
| Manual | Acquires a single image when you press the Run button |
| Free Run | Acquires images continuously at the highest frame rate that your camera and frame grabber support |
| Hardware Auto | Acquires an image when the application detects a transition on an external trigger line |
| Hardware Semi-Auto | Acquires an image when you press the Run button and wait for the application to detect a transition on an external trigger line. |
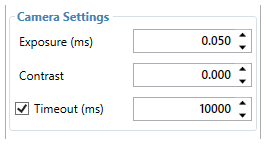
Be aware you might need to experiment with settings for Exposure and Contrast to determine the best settings for your application:
| Exposure | Set an exposure time, in milliseconds. |
Contrast | Set a contrast level in the range from 0.0 (least contrast) to 1.0 (highest contrast). The level controls how different light levels are mapped to pixel values. |
| Timeout | Specify how long the Trevista Wizard waits for an image after receiving a trigger before it generates a timeout error. |
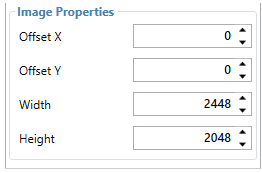
The Trevista Wizard offers image properties that allow you to specify a smaller region of interest and limit the size of the image as required by your vision application. The wizard offers default values for Width and Height based on the camera you use:
Note: Offset Y not supported on line-scan setups.
Use Offset X and Offset Y to reduce the size of the image you pass to the CogTrevista tool, as shown in the following examples:
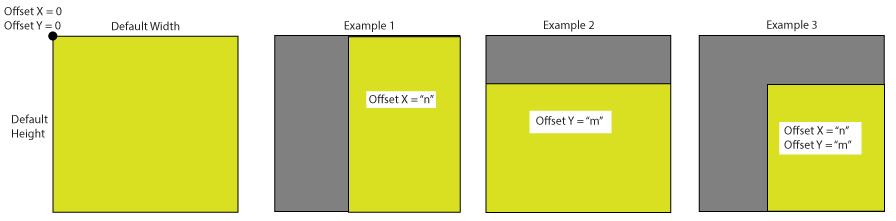
Note: Be aware you cannot modify Offset X or Offset Y without modifying the default values for Width or Height, respectively. For example, If you try to set a value for Offset X to 150 you must first reduce the value of Width by 150, or the wizard will reset the value of Offset X to 0 automatically.
Note: The Trevista Wizard displays these properties only for Trevista CI Dome Modules using a line-scan camera:
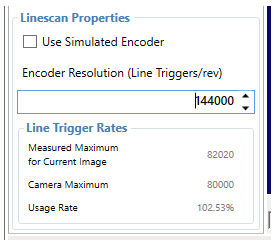
Encoder Resolution defines how many lines of the image the wizard acquires during one full revolution of the encoder. The default encoder Cognex provides with a Trevista CI Module rotates at 144,000 lines per revolution.
To calculate your desired Encoder Resolution for square pixels, first calculate the X-dimension of your pixels based on your working distance and the optics of the camera you are using. With this value, calculate what amount your encoder needs to rotate to move the object of inspection the same distance as the X-dimension of your pixels.
The wizard also offers a simulated encoder for image acquisition when a hardware encoder is unavailable.
A Usage Rate at or above 100% shows a warning icon to indicate that the settings are near or at the limit.
The Trevista Wizard supports additional parameters you might need to adjust for your production environment:
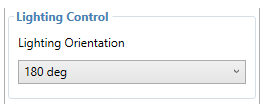
A Trevista CI Module requires an exact lighting sequence to properly generate the correct output images you can analyze in your vision application. Because the Trevista Dome Light allows you to mount the camera in different orientations, the setting for Lighting Orientation must match the orientation of the camera for the internal algorithm of the Trevista tool to produce valid images.
Cognex recommends this default setting of 180 deg for Trevista CI Modules that arrive with the camera already attached to the Trevista Dome Light.
If you change the mounting position of the camera, use the Diagnostics tab and the Orientation Detection diagnostic to determine the correct setting for Lighting Orientation.
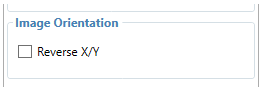
For area-scan setups only, the wizard offers an option to alter the pixels in the image by swapping the (x,y) pixel coordinates around the horizontal and vertical mid-lines of the frame.
Reversing the image can make adding vision tools to the output image more intuitive.
Note: These parameters appear only for GigE Vision cameras:

| Latency Level | Latency Level manages CPU utilization during GigE transmission. "3" reduces CPU but increases transmission time. "0" increases CPU utilization but shortens transmission time. |
| Interpacket Delay (ticks) | Specify a delay between sent packets, to reduce the CPU load on the host PC. |
| Request Timeout (ms) | Specifies in ms how long the Gige application should wait between receiving the header and trailer packets. |
The Trevista Wizard offers a set of diagnostic tools to assist in setting the best parameters for image acquisition:
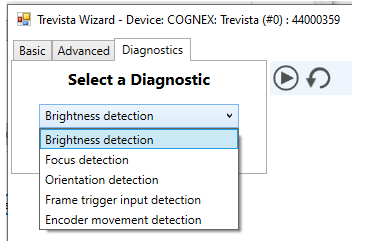
The wizard supports the following diagnostic tools:
Brightness detection
Test the camera parameters to ensure the object is properly lit.
Focus detection
Test the focus of the camera lens.
Orientation detection
Verify the setting for Lighting Orientation on the Advanced tab matches the orientation of the camera mounted in the Trevista Dome Light.
Frame trigger input detection
Verify the Trevista Controller recieves input triggers from your connected I/O device.
Encoder movement detection (line-scan cameras only)
Verify the Trevista Controller receives the pulses sent from an attached encoder.
Each diagnostic tool provides its own instructions for use.
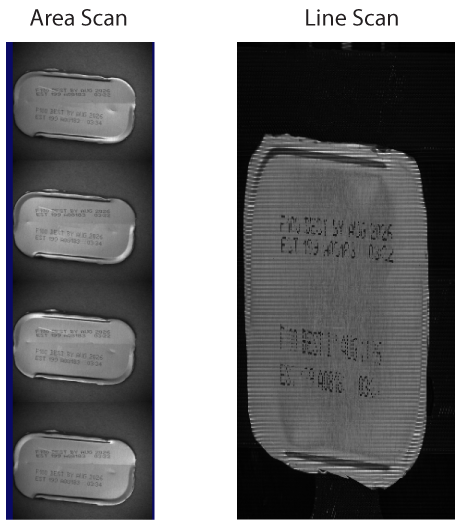
In QuickBuild, be aware area-scan images appear as four separate images taken during varied illumination patterns in the Dome Light, while line-scan cameras acquire each line with different light quadrants of the Dome Light and combine those lines in the output image:
As you work with a Trevista CI Dome (both area scan and line scan), VisionPro saves your custom acquisition properties in a .vpp file representing a saved CogJob or a saved QuickBuild application.
Cognex recommends you be aware of the following limitations and behaviors regarding actions you might take with a saved .vpp file in your production environment:
- Migrating your .VPP File to a Trevista CI Dome Setup with a Different Controller and Different Frame Grabber or Camera
- Opening a saved .VPP file on a Trevista CI Dome Setup that is Missing the Frame Grabber or Camera
- Opening a saved .VPP file on a Trevista CI Dome Setup that is Missing the Controller and the Frame Grabber/Camera
If you open a saved .vpp file on a PC (area-scan or line-scan system) using both:
- A different Trevista Controller
- A different frame grabber and camera
You can expect the following behavior:
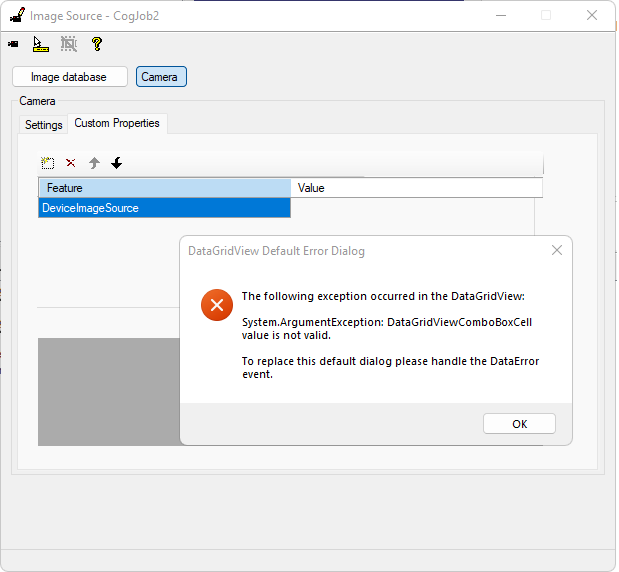
Choosing the Custom Properties tab in the Image Source dialog box displays a System.ArgumentException error, as shown:
- The Trevista Wizard launches without error but overwrites some or all of the saved settings from the .vpp file with their default values.
To migrate a saved .vpp file from one PC to another PC, Cognex makes the following recommendation:
- Exit QuickBuild if it is running on the target PC.
- Turn off the Trevista Controller or disconnect it from the PC.
- Launch QuickBuild and open the saved .vpp file.
- Make a record of the existing custom property settings and Trevista Wizard parameters.
- Exit QuickBuild.
- Reconnect the PC to the Trevista Controller.
- Launch QuickBuild and set custom properties and Trevista Wizard acquisition parameters from your saved record to create a new .vpp file.
Alternatively, you can open your saved .vpp file on a laptop or other PC without a connected Trevista Controller and make a record of the existing custom property settings and Trevista Wizard parameters from there before you launch QuickBuild on the target PC.
If you open a saved .vpp file on a PC (area-scan or line-scan system) with a connected Trevista Controller but missing either:
- The frame grabber
- The camera
You might experince the following behavior:
Choosing the Custom Properties tab in the Image Source dialog box displays a System.ArgumentException error, as shown:
For area-scan systems:
The Trevista Wizard launches without error and displays the correct saved property values, but the Device Image Source displays No Device Image Sources Detected.
For line-scan systems:
The Trevista Wizard launches without error and displays the correct saved property values, but displays different errors based on what hardware cannot be detected:
- If the system cannot detect the camera, the error message Accessing camera failure appears in the status bar.
- If the system cannot detect the frame grabber, the Device Image Source displays None.
Reconnect the missing frame grabber or camera to restore correct behavior for the Trevista CI Dome Setup.
If you open a saved .vpp file on a PC (area-scan or line-scan system) with no Trevista Controller and missing either the frame grabber or the camera, you can expect the following behaviors:
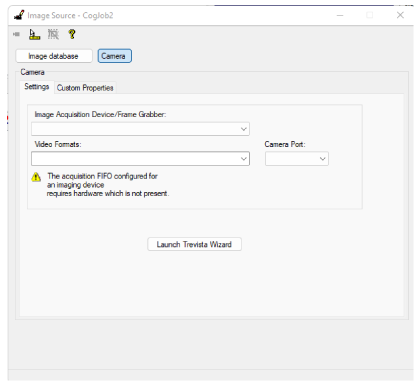
The Settings tab of the Image Source dialog box displays the following error message:
- The Custom Properties tab displays the correct saved settings in a read-only state.
- The Trevista Wizard displays all the correct saved parameters in a read-only state, but does not display the Diagnostic tab.
In addition, in case of any errors opening the saved .vpp file, the Trevista Wizard displays an error message in the status bar as shown in the following example:
