Anomaly Detect Tool
The
To use the Anomaly Detect tool:
-
Prepare your training samples:
-
If you are training the function Functions are tools that are available in Spreadsheet for processing and analyzing acquisitions or other results. You can add functions to your Spreadsheet job to create tool chains and produce results for specific applications. with saved images, load your sample image set into the Filmstrip, and load the first image in your set into
-
If you are using live acquisitions for training, prepare the inspection object for the first training acquisition Acquisition is the process or result of the vision system acquiring a new image..
-
Make sure that the
-
-
Select the Anomaly Detect tool under the ViDi EL Tools group in the Inspect application step.
 Note: Not all tools shown in the screenshot are available on every vision system. 3D tools are only available on 3D-capable vision systems.
 -
Position the region over the area you want the tool to inspect. To resize the Input Region box, click and drag the corners. To rotate the box, click and drag the rotate button.
-
Click OK.
Note: Once you click OK, you can no longer resize the region of interest (ROI).The tool configuration interface opens:
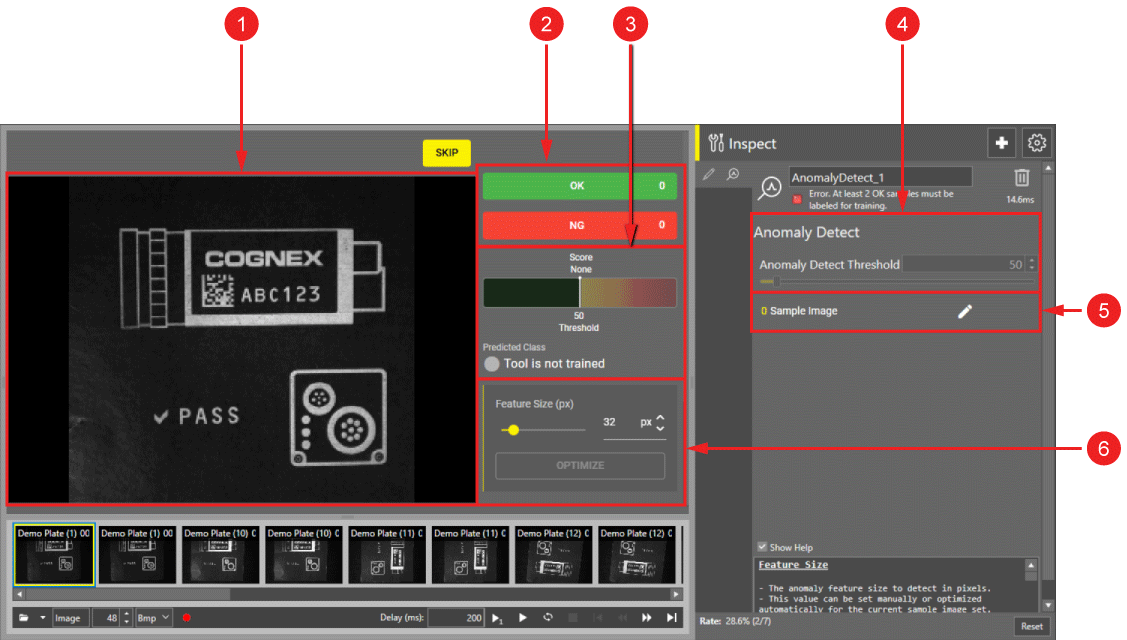
Element Description 1 Image display 2 Sample labeling controls 3 Tool predictions 4 Tool settings 5 Sample images labeled for training 6 Tool settings -
Depending on the size of the anomalies you want the tool to find, you can also adjust the feature size and anomaly threshold:
-
You can adjust the feature size using the Feature Size (px) slider in the tool settings next to the image display, or click Optimize for automatic feature size settings.
Note: Larger feature size settings decrease the resolution of the image for faster processing, and smaller feature size settings provide better accuracy at the cost of speed. -
By default, the tool automatically sets the anomaly threshold based on the detection settings. The Auto-Threshold Options dropdown in the tool settings next to the image display allows you to set the automatic anomaly threshold to the following options:
-
Prioritize OK Detection sets the automatic anomaly threshold to reduce the number of OK results that are falsely classified as NG.
-
Balanced Detection sets the automatic anomaly threshold to minimize undetected anomalies while avoiding false positives.
-
Prioritize NG Detection sets the automatic anomaly threshold to reduce the number of NG results that are falsely classified as OK.
Alternatively, you can disable the Autoset Anomaly Threshold setting in the tool settings next to the image display, which enables the Anomaly
-
-
-
You can also enable or disable a heat map overlay using the Heat Map toggle in the tool settings next to the image display.
-
To enable Advanced Settings for the Anomaly Detect tool, click the Settings icon in the top right corner:
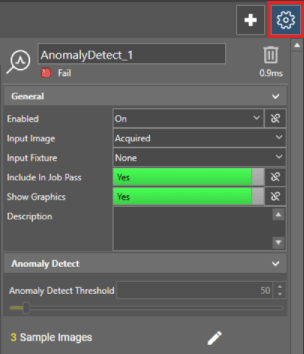
For more information about Advanced Settings, see Advanced Tool Settings.
-
Train the
-
Label the first image from your sample image set as OK or NG by clicking on the OK or NG button in the result controls next to the image display.
-
Load the next image in your sample set:
-
If you are training the function with live acquisitions from the vision system, click the Next Image button to send a manual trigger.
-
If you are training the function with images loaded from the Filmstrip, double-click the next image in the Filmstrip to load it.
-
-
Label the next image, and repeat until you have labeled at least two OK images and one NG image.
-
To review your training images, click on the Edit button next to Sample Image in the bottom right section of the property sheet. The sample image view allows you to delete or relabel any images you have added to the training set.
-
-
Once you have trained the