Web HMI Filmstrip
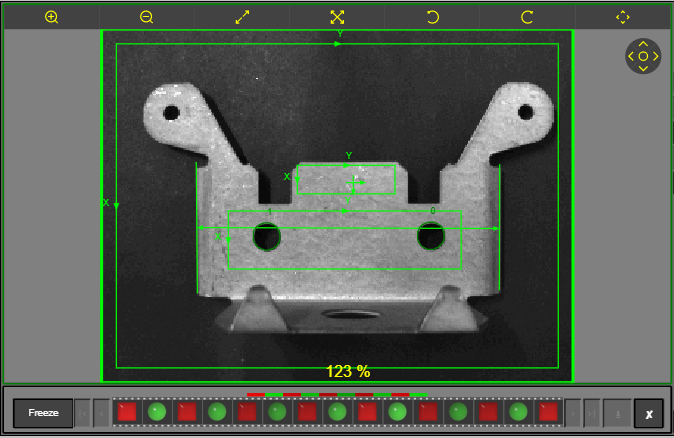
The filmstrip in the Web HMI application (Web HMI filmstrip) displays the vision system’s inspection results. As images are acquired, a graphic is added to the Web HMI filmstrip. To view a result, click the graphic in the filmstrip; the corresponding acquired image and accompanying data (if available in the current view) are displayed in the image area and the filmstrip is frozen.
Display the Web HMI Filmstrip
- From In-Sight Explorer, open the HMI Settings Dialog dialog and check the Show Filmstrip checkbox in the Filmstrip group box.
- Optionally, configure the filmstrip's Save Images and Status Icon settings in the dialog.

- To view the Web HMI filmstrip, you need to disconnect the vision system or sensor from In-Sight Explorer or VisionView.
- To display the Web HMI filmstrip, you must have Full or Protected access to the connected vision system. If you have Locked access, the Web HMI filmstrip will be hidden. For more information on the user access levels, see User Access Settings Dialog.
- The vision system must be Online for results to be added to the filmstrip.
- Enabling the Web HMI filmstrip may increase the job execution time. Ensure that the increased time is acceptable for your application.
- If the vision system is configured to use the maximum number of image buffers available, and is also configured to use the Web HMI Filmstrip when the vision system is Online, there may not be enough memory available to save filmstrip images to the vision system. In this case, decrease the number of image buffers below the maximum. For more information, see Image Buffers Dialog.
- All results are deleted from the vision system if the Queue, Queue Size or Queue Type settings are modified, a new job is loaded or if the vision system is power cycled.
- If there isn't enough memory to store the number of results originally allocated, the vision system automatically adjusts the operating Queue Size; the Queue Size setting in the Sensor Filmstrip Settings dialog remains unchanged.
- The Web HMI Filmstrip does not support the SD Card installed to the vision system.
Web HMI Filmstrip Controls


Configure the Web HMI Filmstrip Settings
The filmstrip settings must be configured in In-Sight Explorer.
Spreadsheet Environment
- Open the Sensor Filmstrip Settings dialog. For more information, see Sensor Filmstrip Settings Dialog.
- Configure the filmstrip settings.
EasyBuilder Environment
- From the Filmstrip Application Step, configure the settings in the Sensor Settings group box.
Monitor Results in the Web HMI
- Click the Online button
 to place the vision system Online.
 -
Trigger image acquisition on the vision system. As images are acquired, the images are stored to the vision system and populated in the filmstrip, based on the Queue setting specified in In-Sight Explorer.
-
View the updated status graphics in the filmstrip, which represent the pass/fail results. The vision system remains Online, but the filmstrip stops updating and enters "frozen" mode (indicated by a yellow bar at the top of the display area) if any of the following occurs:
- A result receives a failing status and Freeze on Fail and/or Resume After is specified in the In-Sight View Settings dialog in the Web HMI application.
- A result receives a failing status and Freeze on Fail or Pause on Fail is specified in In-Sight Explorer (Sensor Filmstrip Settings Dialog or the Sensor Settings group box in the EasyBuilder Filmstrip application step).
- A pass or fail graphic is selected, a navigational button is clicked or the Freeze button
 is clicked.
Note:- When the filmstrip stops updating while Online, the job continues to run but does not send updates to the display area.
- If multiple Web HMI applications are connected to the same vision system,
- All the Web HMI applications will enter "frozen" mode when you select a pass or fail graphic, click a navigational button, or click the Freeze button on one of the Web HMI applications.
- Each Web HMI application can individually be used to select a queued result to review.
- All the Web HMI applications will enter "frozen" mode when you select a pass or fail graphic, click a navigational button, or click the Freeze button
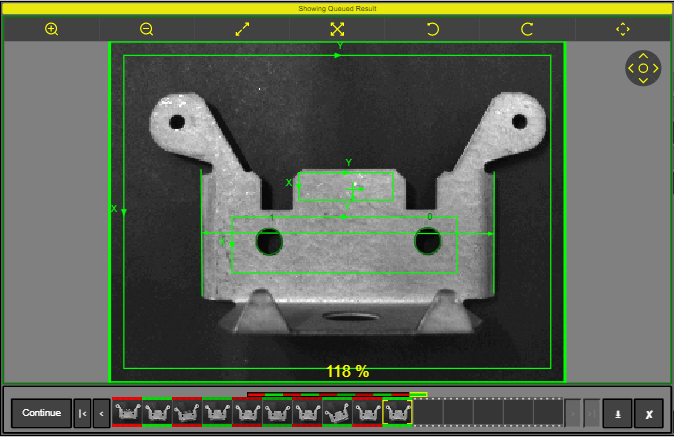
In "frozen" mode, you can navigate through the results in the filmstrip or save images from the vision system to the PC. The stored image and results are loaded to the display. Meanwhile, the job continues to run, but nothing is added to the queue. The filmstrip resumes updating if one of the following occurs:
- The time specified in the Resume After setting (In-Sight View Settings) elapses.
- The time specified in the Pause Delay setting in In-Sight Explorer elapses (Sensor Filmstrip Settings Dialog or the Sensor Settings group box in the EasyBuilder Filmstrip application step).
- The Continue button
 is clicked.
 - The Clear Queue button
 is clicked.
Note:- If multiple Web HMI applications are connected to the same vision system,
- All the Web HMI applications will resume updating when you click the Continue or Clear Queue button on one of the Web HMI applications.
- When the filmstrip resumes updating, all the Web HMI applications will display the non-queued result.
-
When finished monitoring the results, click the Offline
 button to place the vision system Offline. When the vision system is placed Offline, no new results are added to the filmstrip. When an existing pass or fail graphic is selected, the stored image and results are loaded to the display. Click the Continue button to return to the standard Offline mode of operation.
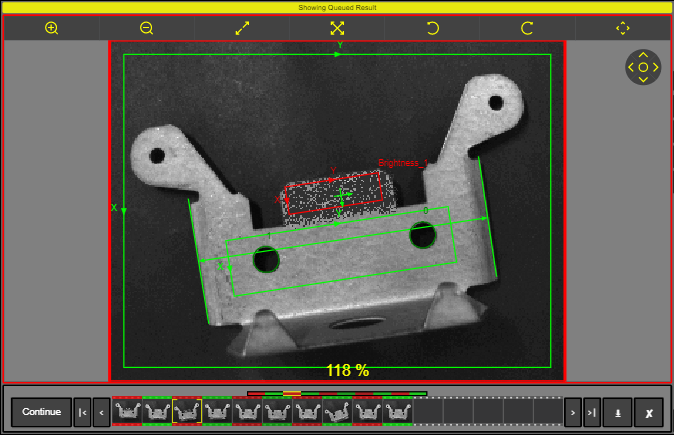
Save Filmstrip Images to a PC or FTP Server
You can save the filmstrip images to a PC or a remote FTP server using the Web HMI application.
Display the Save Images Button 
From In-Sight Explorer, open the HMI Settings Dialog and check the Save Images checkbox in the Filmstrip group box.
Save Filmstrip Images
- Select a result in the filmstrip or click the Freeze button to enter "frozen" mode. This mode is indicated by a yellow bar at the top of the display area. The stored image and results are loaded to the display. Meanwhile, the job continues to run, but nothing is added to the queue.
-
Click the Save Images button
in the filmstrip. The Save Filmstrip Images dialog appears.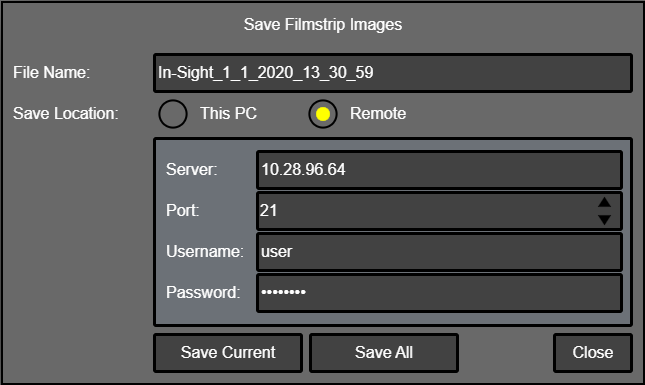
- Specify the File Name for filmstrip images. By default, a pre-configured file name (device name, the date, and the time) automatically populates in the filed.
-
Select a location for saving filmstrip images. You must have write privileges for the selected Save Location.
-
This PC: Saves filmstrip images to the PC. This option uses the web browser's Downloads settings to save images.
Note: If the web browser is set to automatically download files to a specific directory (such as the Downloads directory), the image(s) will be automatically saved to the location. - Remote: Saves filmstrip images to a remote FTP server. This option saves images from the connected vision system to the FTP server. If you select this option, you must specify the FTP server's address (Server), Port, Username, and Password as well.
-
- Click to save filmstrip images. There are two options:
- Save Current: Click to save the currently selected filmstrip image only. The image is saved in the BMP format.
Save All: Click to save all the filmstrip images. When saving to This PC, the image files are saved in a zip folder. When saving to Remote (FTP Server), each individual image is saved in a BMP file (will not be zipped).