PROFINET PLC Configuration
In-Sight 3D supports PROFINET, an industrial communications protocol that maps the In-Sight vision system's inputs and outputs into the process memory of Siemens PLCs. Once these values have been established, they are synchronized at an interval defined by the update rate of the PROFINET IO system. PROFINET IO describes a device model, which consists of insertion places (slots) and groups of I/O channels (subslots). The technical characteristics of the field devices are described by an XML-based GSD (General Station Description) file.
PROFINET IO distinguishes the following three device types:
- IO-Controller: The vision system on which the automation program is running.
- IO-Device: A remotely assigned field device, which is assigned to an IO-Controller.
- IO-Supervisor: A programming device (PC), which runs commissioning and diagnostic functions.
The PROFINET IO engineering process is similar to PROFIBUS: decentralized field buses are assigned to one or more control systems during configuration. The IO-Device is configured to the actual system expansion, based on the content in the GSD file. The IO-Device is simultaneously integrated, appropriately parametrized, and configured into the PROFINET topology.
After the engineering process has been completed, the expansion data is loaded into the IO-Controller. The IO-Controller then independently takes over the data exchange with the IO-Device.
Follow the below steps to enable the PROFINET protocol:
-
Launch In-Sight Vision Suite. Select the vision system you wish to configure on the Device Pane (1), then click the Industrial Ethernet button in the Utilities tab (2).
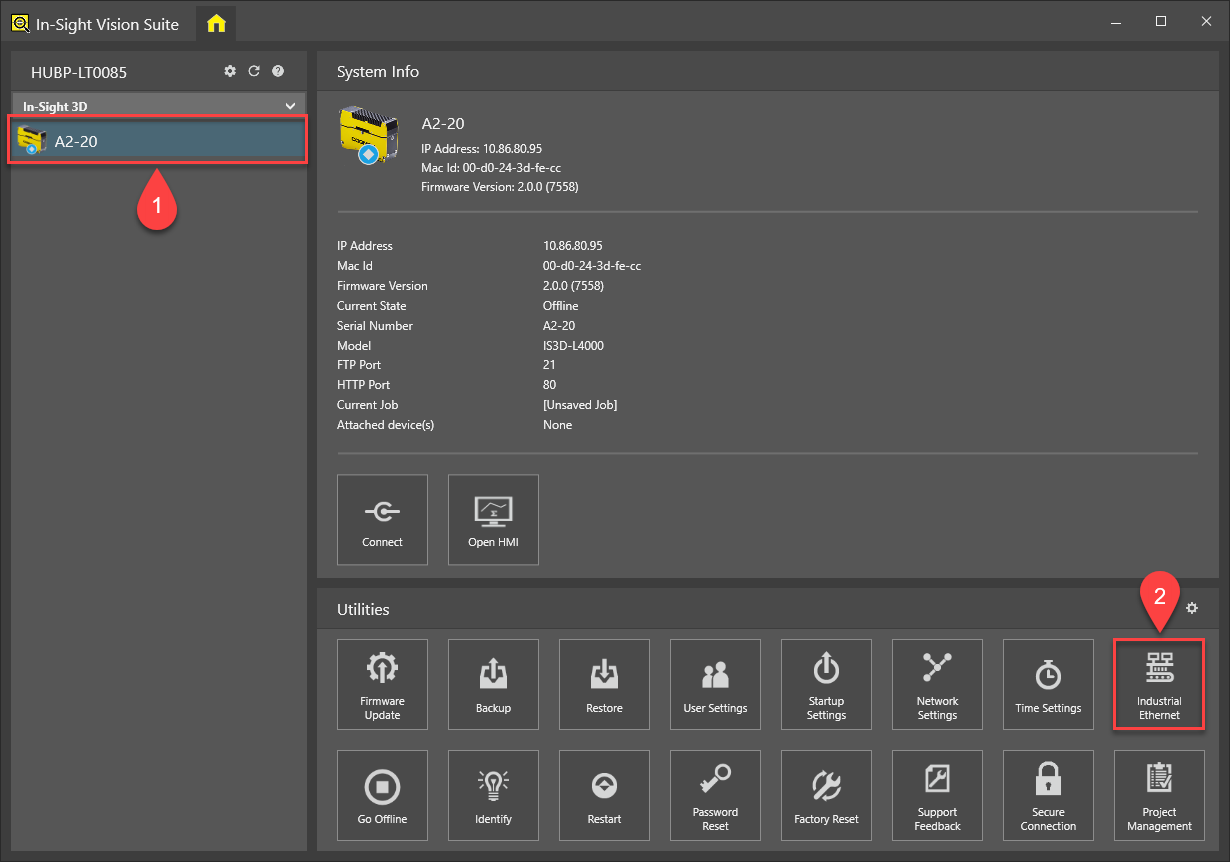
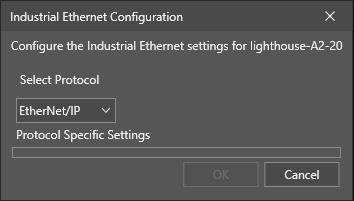
The Industrial Ethernet Configuration dialog will then appear.
 Tip:
Tip:- If you are already connected to a vision system, and have the In-Sight 3D adapter open, click the
 (Home) button at the top left corner of the application window to switch to the In-Sight Vision Suite interface. After that, select the vision system you want to configure and open the Network Settings dialog as described above.
 - You cannot configure vision systems that you are already connected to (in other words, for which the In-Sight 3D adapter window is already open). The available utilities (including the Network Settings utility) are enabled only if you are not connected to that device.
- If you are already connected to a vision system, and have the In-Sight 3D adapter open, click the
-
Select PROFINET from the drop-down list. The protocol-specific settings then appear. Configure the connection according to the local network properties. See the Industrial Ethernet – PROFINET Configuration topic of the In-Sight Vision Suite Help for more information.
Tip: If you are changing this setting from another protocol (such as Ethernet/IP) to PROFINET, the dialog may prompt you to restart the vision system. -
Install the preferred PLC configuration SW (e.g. SIMATIC Manager or TIA Portal) on the same PC as In-Sight Vision Suite.
- Open the configuration SW and configure the PLC. The steps are described both for SIMATIC Manager and the TIA Portal SW:
- In case of SIMATIC Manager, do the following:
- Select the SIMATIC 300 or SIMATIC 400 node, then double-click on the Hardware node in the object list. The HW Config tool opens.
- Ensure that the PROFINET IO interface on the CPU has been assigned a subnet address. To verify this, double-click the PROFINET IO module on the CPU. If the PROFINET IO module's Networked status indicates No then click the Properties button and add a new subnet.
- Once the PROFINET IO interface on the CPU has been assigned a subnet, add a PROFINET IO system to the hardware configuration diagram by right-clicking the PROFINET IO module in the PLC configuration and selecting Insert PROFINET IO System.
- In case of TIA Portal, do the following:
- Create a new project.
- Add the PLC to the project by clicking Add new device, and then select the correct PLC type.
- Double-click on Devices & networks, select Network view on the top, then click on the PLC CPU symbol. Select General on the bottom and click on PROFINET interface. Set the IP address, subnet mask and gateway for the CPU as applicable.
- In case of SIMATIC Manager, do the following:
-
If this is the first Cognex vision system to be added to the PROFINET network, install the Cognex-supplied GSD file.
- In case of SIMATIC Manager, do the following:
- From the HW Config tool, select Options > Install GSD Files from the menu.
Click the Browse button and select the following folder:
C:\Program Files\Cognex\In-Sight\In-Sight Vision Suite Adapters\In-Sight 3D 1.0.0\FFP\GSD
- Click the Select All button, then click the Install button to install the hardware description.
- In case of TIA Portal, do the following:
- Click Options > Install general station description file (GSD).
Press the Browse button and select the following folder:
C:\Program Files\Cognex\In-Sight\In-Sight Vision Suite Adapters\In-Sight 3D 1.0.0\FFP\GSD
- Tick the box in front of the GSDML file, then click Install.
- In case of SIMATIC Manager, do the following:
- Add your vision system to the PROFINET network by browsing to the appropriate node of the Hardware Catalog.
- In case of SIMATIC Manager:
In the Catalog, search for the following node:
Other field devices > PROFINET IO > Controllers > Cognex Corp. > Cognex Vision Controllers > <In-Sight Vision System>.
Drag and drop an instance of the desired vision system to the PROFINET-IO-System of the HW Config.
Right-click on the PROFINET-IO-System and select Object Properties. Uncheck the Use name in IO device / controller setting if it is checked, then click OK.
Right-click on the vision system in the HW Config, then select Object Properties. Type the same name for Device name that was configured for Station Name in In-Sight Vision Suite.
- In case of TIA Portal:
Double-click on Devices & networks on the left pane of TIA Portal, and select the Network view tab on the top of the screen. If the GSD file is already imported, the In-Sight vision system should already be present in the Catalog on the right side of the window in the following location:
Other field devices > PROFINET IO > Controllers > Cognex Corp. > Cognex Vision Controllers > <In-Sight Vision System>.
Drag and drop the In-Sight vision system next to the PLC in the Network View.
Establish a connection between the PLC and the vision system by connecting the small green boxes in the PLC and the In-Sight symbols while holding the left mouse button.
Click the In-Sight symbol, then select General on the bottom and click on PROFINET interface [X1]. Tick IP address is set directly at the device option and uncheck the box in front of Generate PROFINET device name automatically. Type the same name for the PROFINET device name that was configured for Station Name in In-Sight Vision Suite.
- In case of SIMATIC Manager:
- Once the vision system is added to the hardware configuration, download it to the PC.
- In case of SIMATIC Manager, do the following:
Click the Station menu in the HW Config window, and then selecting Save and Compile.
Click the PLC menu and select Downloadto start the download procedure.
- In case of TIA Portal, do the following:
Save the project, click on the PLC CPU symbol, and then on the Online symbol. Select Download to device to start the download procedure.
If the download is performed for the first time, then the Extended download to device window comes up. Select the PG/PC interface there. After that, click the Start search button to show the available devices. Select the PLC from the list and click the Load button.
TIA Portal then starts compiling the configuration. Once it is done, click on Load and then on the Finish button on the pop-up windows.
After the download is finished, click on the Go online icon on the top of the window. If the PROFINET connection is working fine between the PLC and the vision system, a green sign should be visible in the left top corner of the devices.
If the connection is not established properly, then right-click on the In-Sight symbol and select Assign device name from the context menu.
Select the vision system from the list and click Assign name.
- In case of SIMATIC Manager, do the following: