EasyView Panel
The EasyView panel allows you to customize the job data displayed in the WebHMI and on VisionView Web devices by adding the output of named Spreadsheet cells. You can also enable or disable editing rights for the displayed data.
You can open the EasyView panel from the View menu in the menu bar. The EasyView panel opens as a separate tab next to the Functions toolbox on the right side of the Spreadsheet.
You can select multiple items in the EasyView configuration at the same time. When multiple items are selected, the operations you execute affect all selected items.
The following table describes the EasyView panel controls:
|
|
|
|---|---|
| Element | Description |
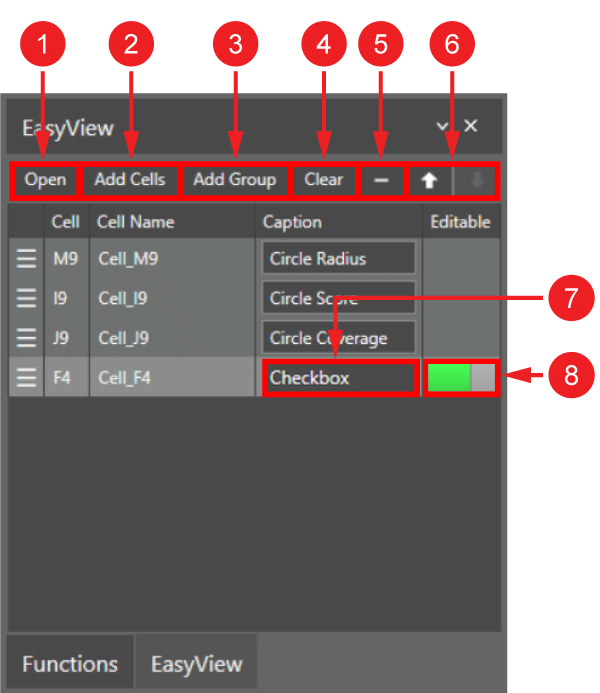
| 1 | The Open button opens the WebHMI for the vision system, displaying your current EasyView configuration. |
| 2 |
The Add Cells button allows you to add named cells to the EasyView configuration by selecting a cell or cell range in the Spreadsheet. Note: You can only add named cells to the EasyView configuration. If you select unnamed cells, they are ignored.
|
| 3 | The Add Group button allows you to add a new row in the EasyView configuration, which acts as an expandable group for named cells below it in the configuration order. |
| 4 | The Clear button removes all items from the EasyView configuration. |
| 5 | The – button removes the highlighted item from the EasyView configuration. |
| 6 | The Up and Down arrows move the highlighted item up or down the configuration order. You can also move items by dragging and dropping the grab handle icon on the left of the item. |
| 7 | The Caption field defines the display name on the WebHMI for each added cell. |
| 8 |
The Editable field enables or disables operator editing rights in the WebHMI for the selected cell. This setting is only available for cells that represent an input to the job, such as the functions in the Controls Functions tool group. Editing rights are disabled by default. |
 To name cells:
Only named cells can be added to the EasyView configuration. To name a selected cell, edit the cell ID in the expression bar:

When a cell is named, a blue tag appears in the bottom right corner of the cell, and the cell name is displayed in a tooltip when you hover the cursor over the cell.
To add cells to the EasyView configuration:
You can add named cells to the EasyView configuration by clicking Add Cells in the EasyView panel and selecting the desired cell or cell range in the cell selection view. Press Enter or double-click on the selected cell or cell range to finalize your selection. Only named cells in the cell range are added to the EasyView configuration.
Alternatively, you can add cells to the EasyView configuration by selecting the desired cell or cell range in Spreadsheet, and right-clicking on your selection. In the context menu that appears, select Publish to EasyView > Selected or Publish to EasyView > Named.
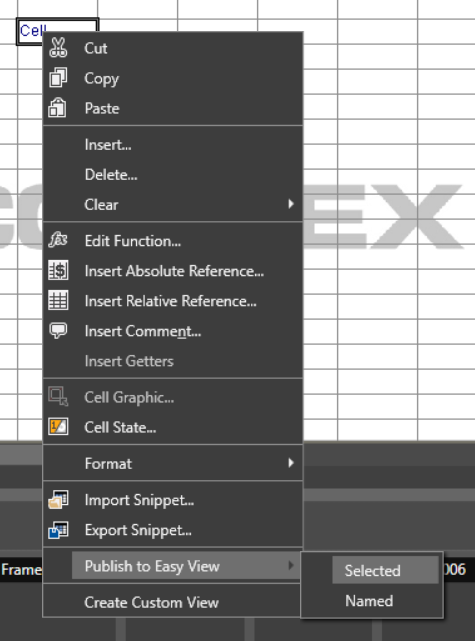
If you click Publish to EasyView > Selected, default cell names are assigned to any selected cells that are not named, and all selected cells are added to the EasyView configuration.
If you click Publish to EasyView > Named, only the named cells in the selected cell range are added to the EasyView configuration.