Calibration
Calibration informs the verifier about the grey scale levels and pixel dimensions of the verifier. This way, the verifier can report Symbol Contrast and X-dimension in true physical units.
For ISO compliant barcode verification, make sure that the verifier is in a calibrated state.
For Standards Based Grading, the verifier does not report all quality parameters without calibration.
In an uncalibrated state the verifier does not report:
- Aperture and Symbol Contrast (SC) for ISO/IEC 15415/15416 applications
- Minimum Reflectance (MR) for ISO/IEC TR29158 (AIM-DPM) applications
To calibrate the DataMan 475:
-
Click the Calibration icon in the top left corner in the TruCheck Verification window.
-
Enter the Rmax and Rmin values from the calibration card.
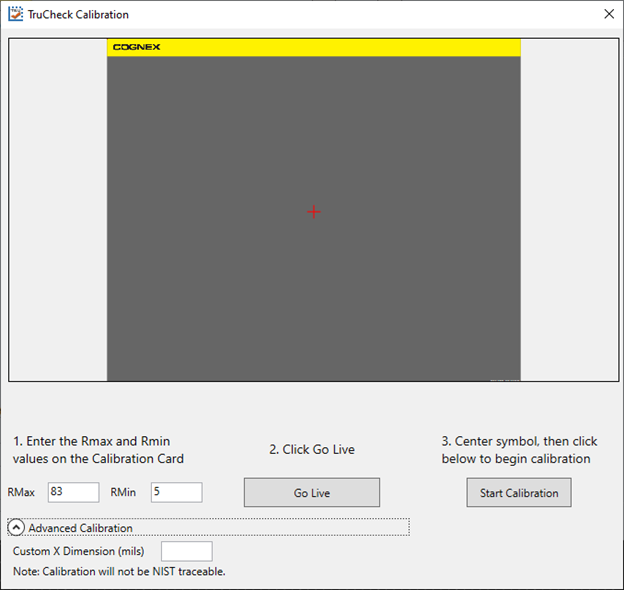
Use the Advanced Calibration option only if you use a non-NIST traceable calibration symbol. This option allows you to enter the Custom X-Dimension (mils) value of the barcode that you use to calibrate the unit. The calibration process uses the Custom X-Dimension (mils) value to calibrate dimension measurements.
-
Click Center Target.
- A live image appears in the Calibration screen. Center the verifier over the calibration symbol.
-
Clicking Start Calibration prompts a Calibrating progress bar appear in the window

-
If the calibration is successful, one of two messages pop-up.
If you performed the calibration with one of the supported NIST-traceable calibration symbols, the pop-up displays the following :
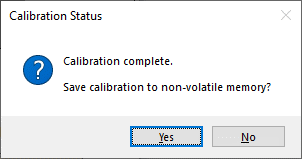
When you perform a successful calibration with a supported NIST-traceable calibration symbol, a calibration time date stamp appears on the bottom of the TruCheck window and is printed in the header of the report. For the list of NIST-tracable calibration symbols see the step list below.
If you performed the calibration successfully with any readable symbol other than the supported NIST-traceable calibration symbols, the pop-up displays the following:
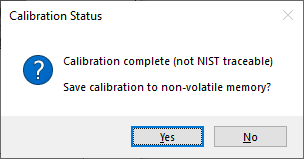
If you perform a successful calibration with a non NIST-traceable calibration symbol, no calibration date is recorded on the reports or displayed on the Main tab in the TruCheck window. Instead, The message reads "Calibration Complete (not NIST-traceable)".
If the calibration failed, see step 8.
-
For both successful calibration messages, you have the options to Save Calibration to non-volatile memory
If you select Yes, the unit saves the calibration for subsequent verifications and the values to non-volatile memory. If you power down the unit, the calibration will persist.
If you select No, the unit saves the calibration for subsequent verifications but does not save the values to non-volatile memory. If you power down the unit, the calibration values will be lost.
-
If the calibration failed, the pop-up displays the following message:
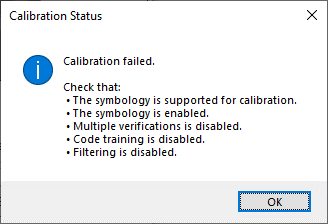
A failed calibration means that the calibration target was not detected. Ensure that:
-
a valid, readable barcode is visible within the field of view
-
you have selected the region of interest that includes the barcode that you use for calibration
-
the calibration barcode symbology type is supported
-
the calibration barcode symbology type is enabled in Code Details tab in the Setup Tool window.
-
the unit is not set for multiple verifications
-
no filtering is enabled
-
Supported NIST calibration symbols:
-
1D and 2D symbols on the Cognex Calibration Card (Cognex #DMV-CCC)
-
Symbols 1 and 5 on the Applied Image Conformance Calibration Standard Enhanced Test Card for ISO IEC Datamatrix and GS1 Datamatrix (Cognex #DMV-DMCC)
-
Symbol 1 on the GS1 ISO/IEC Data Matrix & GS1 Datamatrix Calibrated Conformance Standard Test Card (Cognex #DMV-GS1CC)
-
EAN-13 MASTER GRADE and UPC-A MASTER GRADE symbols on the GS1 Calibrated Conformance Standard Test Card for EAN/UPC Symbol Verifiers (Cognex #DMV-AICC)
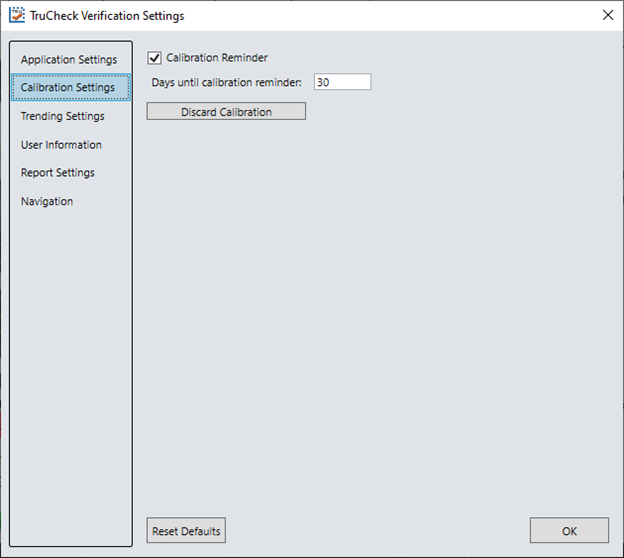
Calibrate your verifier as needed to ensure accurate verification results. Monthly calibration is recommended, or more frequently where required by internal quality guidelines.
Enable a calibration reminder in Calibration Settings to alert you about the next scheduled calibration. After enabling the calibration reminder, set the number of days for prompting a calibration reminder. For more information, see Calibration Settings