Enabling Optional Plugins for New Projects
Perform the following steps to enable optional plugins for a newly-configured project:
- Launch Cognex Designer, and click the New Project button on the Cognex Designer Launch Page. The New Project dialog appears.
- Fill the Project Name and Project Path properties as needed, and select a project template from the Project Type drop-down list if you do not want to start developing the project from scratch.
-
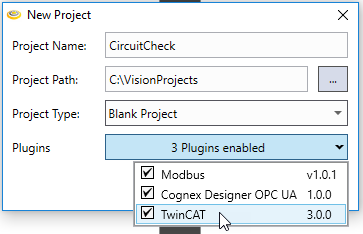
Click the Plugins drop-down list to display the available plugins. Plugins that are incompatible with the current Cognex Designer version are marked in red.
-
Tick the plugins that you wish to use in your project. The drop-down button will indicate the number of plugins enabled in the list, as shown above.
Note: If the In-Sight ViDi and AlignPlus plugins are installed on the PC running Cognex Designer, they are selected to be included by default. - Once you selected the plugin(s), click the drop-down button again (or anywhere outside of the plugin list) to close the list, and click Accept. Cognex Designer then starts creating the project with the selected plugins included in it.
Tip: In case you cannot find the plugin you are looking for in the list, you might not selected it for installation in the Cognex Designer setup. In this case, modify the Cognex Designer installation in Windows to install the missing plugins. You can do this, for example, by opening the Control Panel > Programs > Programs and Features dialog, selecting Cognex Designer, and then clicking Change. Click Change in the Cognex Designer installer to open the list of installed components, then select the missing plugins for installation.