Edit Regions Toolbar
The Edit Regions toolbar allows you to label defects before training Training is the process that your tool, which is a neural network, is learning about the features (pixels) based on the labels you made. For example, a tool will learn the defect/normal pixels in each image based on the defect/normal labels you drew. The goal of the tool Training is learning enough to give the correct inspection results of whether an unseen image is defective or not. The key to training is to ensure that you include all possible variations within your training set, and that your images are accurately labeled. Training times vary by the application, tool setup and the GPU in the PC being used to train the network. a Red Analyze tool by manually drawing over defect regions.
You can launch the Edit Regions toolbar with the following methods:
-
Select View > Edit Regions in the main menu bar.
-
Right-click in an image and select Edit Regions from the context menu.
-
Use the Ctrl+R keyboard shortcut.
After you have drawn the label on a view A view of an image is a region of pixels in an image. Tool processing is limited to the pixels within the view. You can manually specify a view, or you can use the results of an upstream tool to generate a view., click Apply or press Enter. You must do this on an image-to-image basis. Click Close to return to the process of constructing your Deep Learning application.
|
|
||
|---|---|---|
| Tool | Keyboard Shortcut | Description |
| Class Selection Menu | Number key 1, 2, 3, ..., 0 |
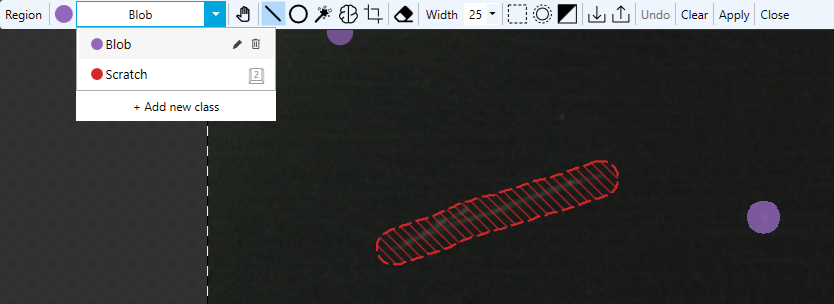
You can label multiple classes of defects or regions in the same image. For example, you can create a class for scratches and another for blobs.
The image shows two classes of labeled defects with different colors. You can use the dropdown menu in the toolbar to add, edit, delete, or switch between classes. You can switch between the defect classes in the toolbar or by pressing the numerical key assigned to the class. For example, press 1 to switch to the first class, and press 2 to switch to the second. To add a segmentation Segmentation is the process of selecting a view from an image. class:
To switch between classes while labeling Labeling is the process of annotating an image with "ground truth". Depending on the tool that you are using, labeling can take different forms. You label an image set for two reasons: to provide the information needed to train the tool and to allow you to measure and validate the performance of the trained tool against the ground truth., click the dropdown or use shortcuts. For example, pressing the number one key on your keyboard switches to the first class and pressing the number two key switches to the second class. |
| Pan | Space + Mouse left-click and drag |
Pans through an image by dragging the mouse. Press the Ctrl key to change the cursor to a hand shape or back to the original tool. |
| Line | Alt + L | Draws a line. Click and drag to create a line in your image. You can use this tool together with the other drawing tools. The Width value defines the size of the drawn area. Note:
|
| Circle | Alt + C |
Draws a circle. Place the cursor at the center of your circular object, and drag outward. You can use this tool together with the other drawing tools. The Width value defines the size of the drawn area. Note: Hold down the Shift key to have the circle expand from the corner of a bounding box.
|
|
Magic Wand (Fill) |
Alt + F |
Fills an area. Click and drag to fill in areas of the image. You can also click on individual features to apply fill to just that area. You can use this tool together with the other drawing tools. The Width value defines the size of the drawn area. Note: The Eraser tool can be used to trim and/or remove extraneous drawings on the image.
|
| AI Click Tool | A |
The AI Click Tool allows you to label regions with clicks:
This tool helps automate the labeling process, reducing the need for manually drawing labels. Note:
For large images, labeling can take time. In such cases, consider limiting the view size using a ROI The Region of Interest (ROI) defines the area of operation for the tool. The ROI preserves the positions, angles, stretch and skew of the original image. or try splitting the ROI. The AI labeling tools require GPU resources. Cognex recommends minimum 8 GB VRAM for the AI labeling tools. If you have one GPU, you cannot use the AI labeling tools while training or processing a tool. This limitation does not apply when using multiple GPUs. If you encounter memory issues when using the AI labeling tools:
If the issue persists, you might need to replace your GPU. |
| AI Box Tool | Shift + A |
The AI Box Tool lets you label regions by drawing rectangular boxes around objects. Draw a box around the object to generate a region based on the box shape. Note:
For large images, labeling can take time. In such cases, consider limiting the view size using a ROI or try splitting the ROI. The AI labeling tools require GPU resources. Cognex recommends minimum 8 GB VRAM for the AI labeling tools. If you have one GPU, you cannot use the AI labeling tools while training or processing a tool. This limitation does not apply when using multiple GPUs. If you encounter memory issues when using the AI labeling tools:
If the issue persists, you might need to replace your GPU. |
| Eraser | E | Removes the regions that you draw over. |
|
Width |
D + Mouse wheel |
Defines the pixel width of the drawing tools, region mask and the grow area. Set the Width before applying the region. If you adjust the Width value while editing your region, either with a drawing tool, border region or area growth, the new value will only be applied to the next region you create. Changing the Width value does not change previously created regions, even in the same editing session. |
|
Border |
B |
Creates a region around the border of the image, based on the Width value. |
|
Grow Area |
G |
Expands the area of the region by the Width value. |
|
Invert |
I |
Inverts the drawn region. Using this option removes the current region area, and applies a region to the area that previously did not have a region. |
|
Import/Export |
N/A |
The import and export buttons launch an Import Region-Image and Export Region-Image dialog for importing or exporting a region image, as a .png file. A region image is a two-dimensional array of pixels that has the same size as the view in which the region mask resides. The pixel values in the region image determine whether or not the corresponding pixels in the view are used for training or runtime processing. The import/export options allow you to either import a previously created region image, or export one that you just created. |
| Undo | Ctrl+ Z | Undoes the last action. |
|
Clear |
X |
Removes all drawn regions from the view. You cannot undo this action. |
| Apply | Enter | Applies the label to the image. |
|
Close |
Esc |
Ends the editing session. You must close the session to perform any other actions in the application. |