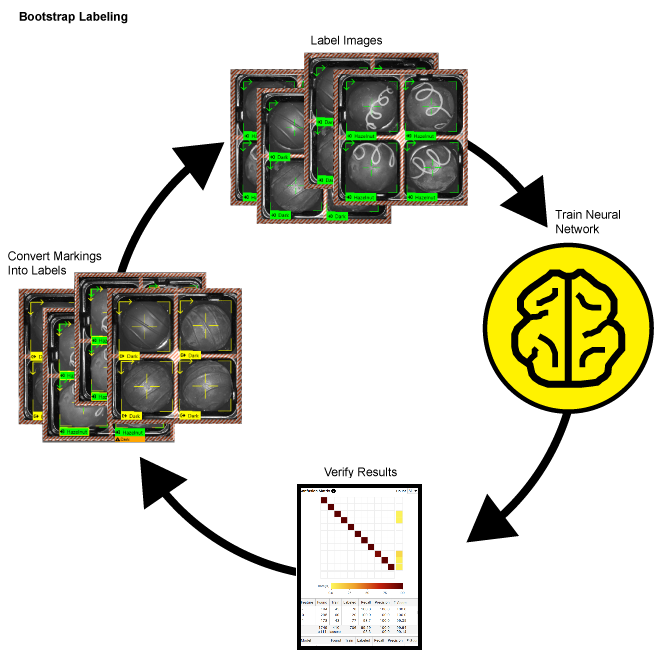
Bootstrap Labeling
To speed up the labeling Labeling is the process of annotating an image with "ground truth". Depending on the tool that you are using, labeling can take different forms. You label an image set for two reasons: to provide the information needed to train the tool and to allow you to measure and validate the performance of the trained tool against the ground truth. process, consider using the bootstrap method. This involves labeling a small sample of images, training Training is the process that your tool, which is a neural network, is learning about the features (pixels) based on the labels you made. For example, a tool will learn the defect/normal pixels in each image based on the defect/normal labels you drew. The goal of the tool Training is learning enough to give the correct inspection results of whether an unseen image is defective or not. The key to training is to ensure that you include all possible variations within your training set, and that your images are accurately labeled. Training times vary by the application, tool setup and the GPU in the PC being used to train the network. the tool, and reviewing the results. Accept views with correct markings to convert them into labels, and replace incorrect markings with correct labels.
You can further speed up the process by dividing images into multiple views and labeling only a single view A view of an image is a region of pixels in an image. Tool processing is limited to the pixels within the view. You can manually specify a view, or you can use the results of an upstream tool to generate a view.. Temporarily reducing the Epoch Count parameter also makes the training time shorter.
To speed up labeling using the bootstrap method:
- Label a few images in your training set.
- Train the tool.
- Review the images and results.
- Accept the views where the markings are accurate by right-clicking and selecting Accept View, or by pressing Ctrl + Shift + A. This changes the marking Image markings are annotations produced by the VisionPro Deep Learning tools. The markings produced by a tool are the "answers" that the tool obtained when it processed a specific image. You validate the performance of the tool by comparing the markings produced by the tool with the labels that you applied to the same image. As with labels, the specific markings produced depend on the tool. into a label. For the Red Analyze tool, you might have to edit the defect region.
- For markings that are inaccurate:
- Clear the markings from the image by right-clicking and selecting Clear Marking, or pressing Ctrl + C.
- Then add the correct label.