Calibration Phase
To perform line scan camera calibration, follow these steps:
- Rigidly mount the camera so that its image sensor is perpendicular to the direction of travel and parallel to the plane of travel (within ±5°).
- Adjust the camera focus so that a sharp image at the plate surface can be acquired.
-
Affix the calibration plate so that its movement relative to the camera is the same as the parts that are being imaged. If your physical configuration has a meaningful origin and you are using a calibration plate with a fiducial mark, place the mark so that it indicates the desired physical position. The plate should be sufficiently large that the plate fills the width of the image.
The line scan calibration provides functionality for the automatic alignment of the physical coordinate system with the scanning motion. Line scan calibration parameters include an enum member called calibrationYAxisAdjustmentMode() that can be:
ccCalibrateLineScanCameraDefs::eUsePlateOrientation – the orientation of the plate is used,
ccCalibrateLineScanCameraDefs::eAdjustOrientationToScanDirection– the computed physical space will be aligned with the scanning motion automatically.Note: The automatic alignment functionality provided by calibrationYAxisAdjustmentMode() is a prerequisite for using the 1D warper. - Accurately measure and record the distance between the surface of the calibration plate and the camera's image sensor (working distance). The accuracy of the measurement must be better than ±10% for the calibration to be accurate. You specify the distanceFromCameraToTarget parameter using the parameters class.
-
Acquire an image of the plate.
If you are using the 1D warping transformation option, the image should be large enough to contain at least ten rows of calibration plate squares but there is no upper limit on the size of the image and there is no requirement that the image be filled in the vertical dimension by the plate. If you are using the 2D warping transformation option, the calibration image must match the height and width of the desired run-time images.
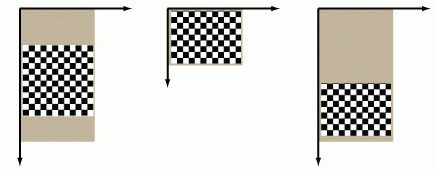
The figure below shows examples of valid calibration images.
- Run the checkerboard feature detector (specified in ch_cvl\calibftr.h), and specify the grid pitch and whether or not the calibration plate includes a fiducial mark.
- Run the Line Scan Camera Calibration tool, and specify the distance from the camera to the plate in the same units as the grid pitch and the y-axis adjustment mode.
In addition to reporting whether the calibration was successful, the calibration tool also computes and reports the RMS error for the calibration. You can use this information to assess the accuracy of the calibration.